Overview
Delivery templates are managed within the Fourth Purchase to Pay module (formerly known as "Tradesimple").
Supplier delivery templates are built as templates, which can then be assigned to sites as a default or override (an override is where a different template is assigned to a site(s) for a specific week(s) - eg. a change in order/delivery days over Christmas week).
Where configured, the Ordering app and/or Inventory will refer to these templates when a site is placing an order.
Benefits of Delivery Templates
- A single template can be applied to multiple sites
- Templates allow for unique cut-off and lead times per day
- Overrides can be applied to multiple sites and also applied in advance
- All default and override template assignments can be imported using a simple CSV file
Permissions
- The permission Manage Delivery Templates will need to be applied to the user's role within Tradesimple
Supplier Configuration
Delivery Templates are one of a number of different delivery date types, and therefore must be applied against the supplier.
- Navigate to Community > Maintain Suppliers
- For the required supplier select Edit
- Change the Delivery Date Type to Schedule Templates
- Note: Where Schedule Templates is selected against a supplier, the logic within the templates will supersede any other lead time or cut-off configuration
- Save changes

Fig.1 - Selecting Schedule Templates as the Delivery Date Type
Building Templates
- Navigate to Community > Maintain Suppliers
- For the required supplier select Define Delivery Templates

Fig.2 - Selecting Define Delivery Templates against a supplier
A summary of all existing templates, template codes will display, and indication if the template is assigned as a default template at any sites.
- Select an existing template to edit by selecting the binoculars
- Make a new template by selecting Create from the bottom of the page

Fig.3 - Delivery Templates information, including Edit and Create options
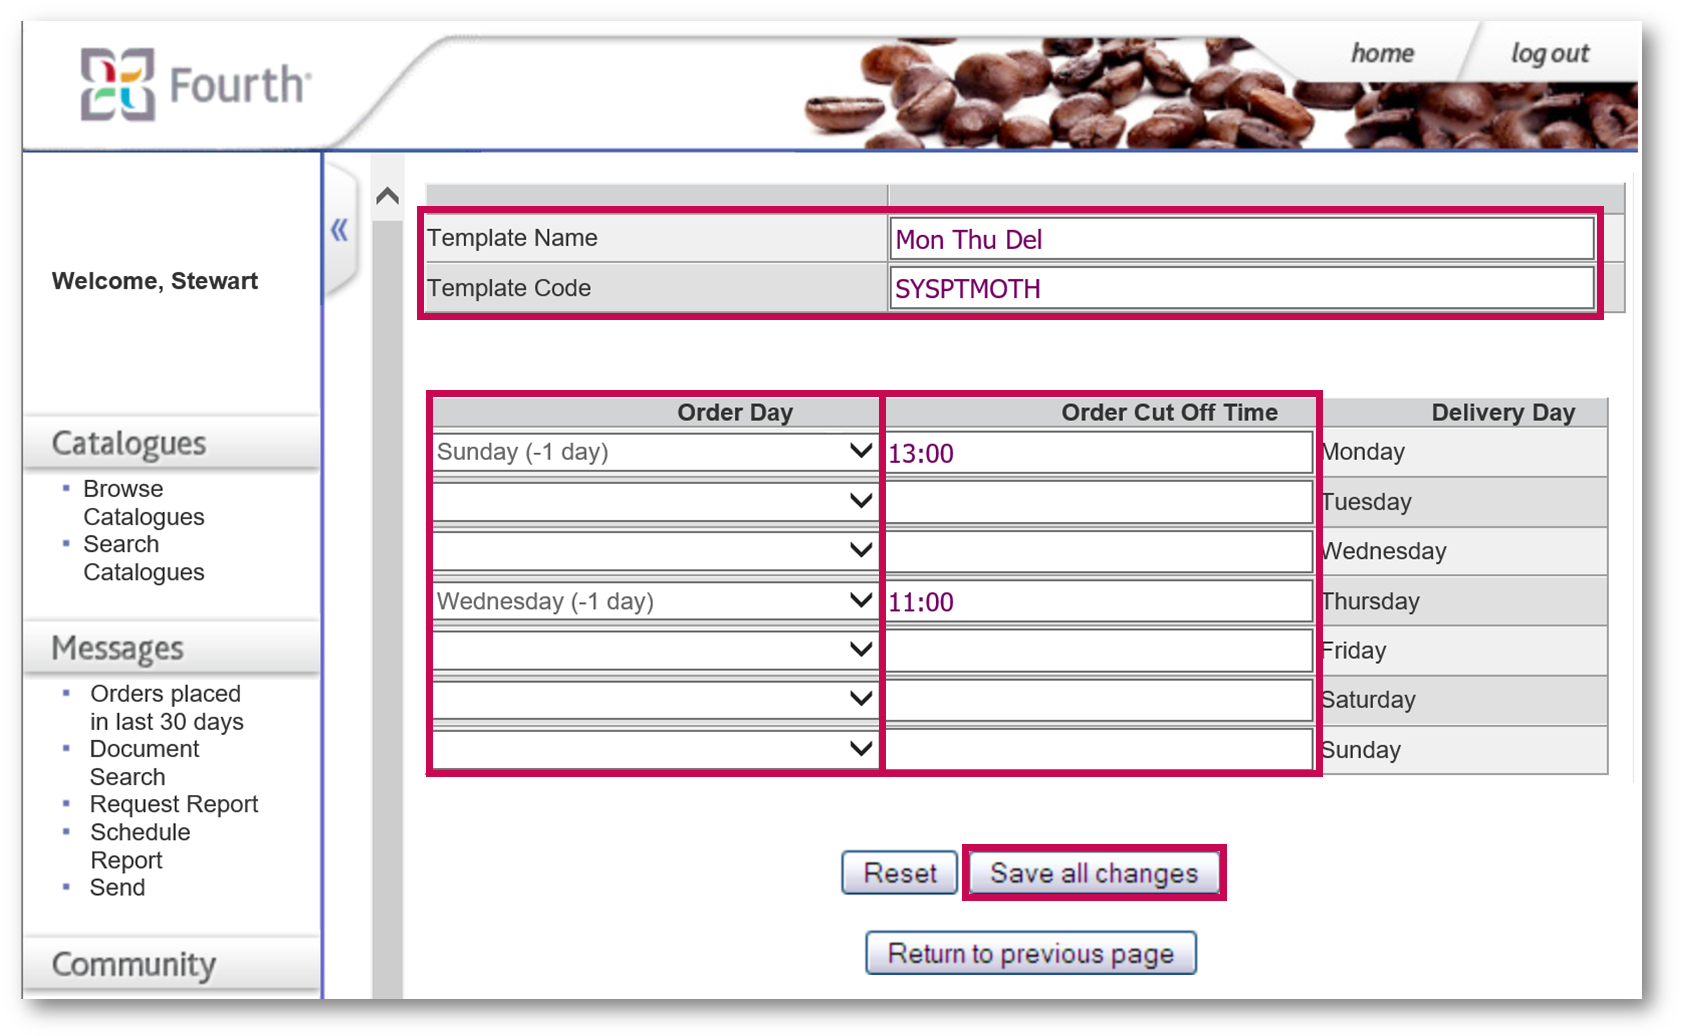
- A template requires a unique Template Name and unique Template Code
- For each required delivery day, an Order Day must be selected from the drop-down list, followed by an Order Cut Off Time
- Once the template is built, select Save all changes

Fig.4 - Creating a new template
Assign Default Delivery Templates
- Navigate to Community > Maintain Suppliers
- For the required supplier select Assign Delivery Templates
- Locate the required site(s), using the search option if needed
- In the Default column, select the required template from the drop down list
- Select Save all changes
- Repeat for all required suppliers

Fig.5 - Assigning a default Delivery Template against a site
Assign Override Delivery Templates
- Navigate to Community > Maintain Suppliers
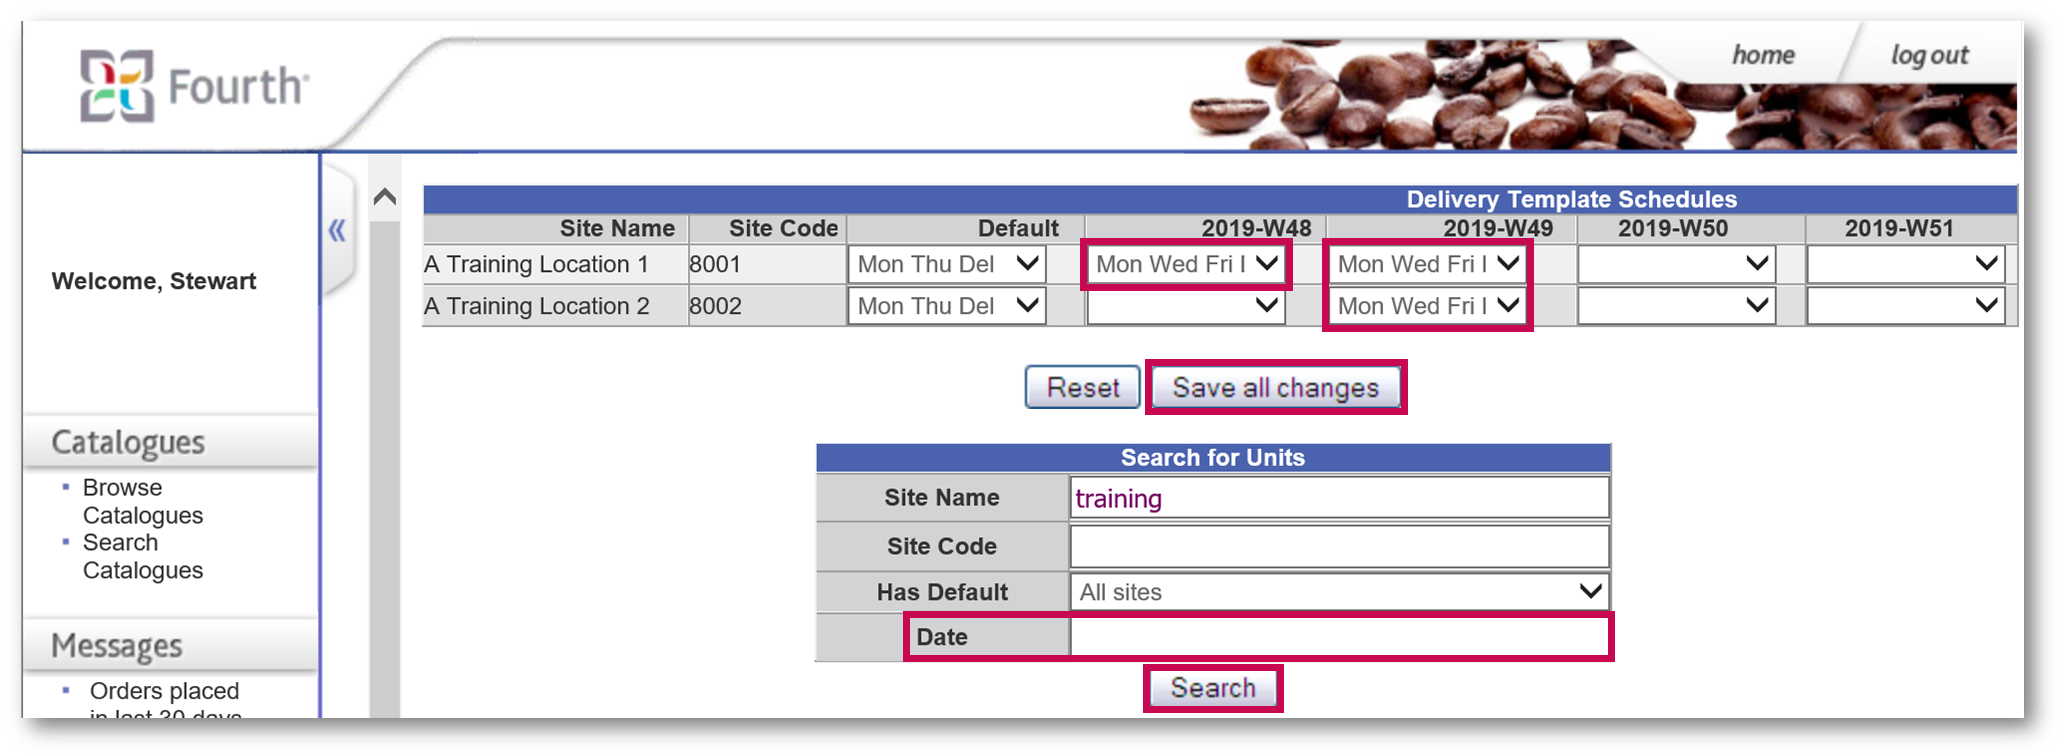
- For the required supplier select Assign Delivery Templates
- Locate the required site(s), using the search option if needed
- In the relevant week column, select the required template from the drop-down list
- Use the Date filter in the Search box to show dates further in advance
- Select Save all changes
- Repeat for all required suppliers

Fig.6 - Assigning Delivery Templates to override the default
Remember, override templates will apply an override for the chosen week only, returning back to default where an override is no longer in place.
Import Template Assignment
Templates can be assigned to multiple sites via a CSV import.
Create CSV Import
A CSV file can be created using Microsoft Excel.
- There should be no headers on the import file, only the actual data
- Column A - Site Code - used to match upon import
- Column B - Site Name - for reference only, not used to match
- Column C - Template ID - used to match upon import
- Column D - Template Name - for reference only, not used to match
- Column E - Effective Date
- For Default template assignment leave blank - will be effective immediately
- Must be complete for Override template assignment - format must be "2019-W53"
- Column F - Assignment Type - O or D (Override or Default)
- Save as a CSV file

Fig.7 - Creating a Delivery Template in Excel
Upload CSV Import
- Select Messages > Send
- From the Document Type drop-down select Delivery Schedule Template Timetable
- Browse and select the required template file
- Upload

Fig.8 - Uploading a CSV template
Any failure notifications will be sent to the email address stored against the user.
Reporting
There are a number of reports available to help you manage schedules effectively.
To access reports:
- Navigate to Messages > Request Report
- Select the required report
- Choose parameters
- Request Report
- The report will be generated and emailed to the requestor
Available Reports
- Weekly Delivery Schedule Report - shows the actual delivery schedule for sites based on the chosen week start date. This takes overrides into account
- Locations without a Default Delivery Template Report - shows any sites for the chosen supplier that do not have a default delivery template assigned
- Default Delivery Template Report - shows the template assigned to sites as a default for the chosen supplier
- Delivery Template Report - shows the template assigned to a site for the chosen supplier for the chosen week. This could be either default or override
Alternative Delivery Logic Options
P2P&I - Creating and Loading Delivery Logic Files
P2P&I - Delivery Logic - Non-Working Days

Comments
Please sign in to leave a comment.