Overview
This article will cover the required steps needed to create a Goods Received Note (GRN) in Purchasing (also known as Tradesimple). A GRN is required when a delivery arrives, as the goods received will need to be checked against the goods on the original order placed for discrepancies.
Finding what Orders need a GRN
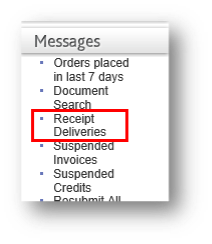
- Log in and navigate to Messages > Receipt Deliveries as seen in Fig. 1.

Fig.1 - Receipt Deliveries
Some portals may have a bespoke Receiving tab which can also be used to create GRNs. Please refer to your Head Office for their preferred process for receipting orders.

Fig.2 – Example of bespoke ‘Receiving’ tab
- Search for or select from the list the order which needs to be receipted. Select the Receipt option to bring up the GRN creation page

Fig.3 – Receipt action
Creating the GRN
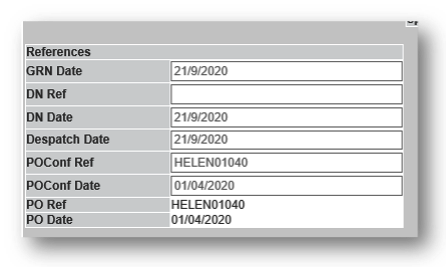
When on the GRN creation page there is a References section with editable fields.

Fig.4 – References
Sometimes some of the fields (such as DN reference - delivery note reference) may be pre-populated with the information required. This happens when the supplier has sent a document (such as an invoice) before the goods are receipted.
If this is not pre-populated, the DN and PO confirmation references and dates are required fields and will need to be entered manually. These references can be the numbers stated on the paper document received with the order, or the PO number itself.
It is recommended that this number be unique to this GRN. It is not advised to use the date or a person’s name as this can affect future documents matching. Please refer to your Head Office for their preferred process.
Receipting the Goods
All lines
- If all the goods expected have been received select Accept All Unchanged Lines
- If the whole delivery did not take place or you returned all the items at the point of delivery, select Reject All Unchanged Lines

Fig.5 – Accept/Reject All Unchanged Lines
Please note: For weighted items the actual weight received will be required when receipting the line.
Line by line
- To accept a line, select the Thumbs Up icon
- To edit a line, select the Pencil icon and input a reason for change
- To reject a line, select the Bin icon and input a reason for rejection

Fig.6 – Actions Line by Line
Adding a New line
- Select Add New Line
- If the product is in the catalogue, input the code into the Supplier’s Code field and select the Glasses icon. This will fetch the details of the product and populate them
- If the product is not in the catalogue, the fields will need to be manually entered to match the paper document
- Always add a reason for addition, e.g. Substitution
- Finally, select the Send Document button to create the GRN. This will take a few minutes to process
- The Reset button can also be used at any time to remove changes to lines.
Summary
The GRN is an important document as it provides confirmation of what the site actually received on the delivery. It is then used in invoice matching to check for discrepancies.
For this reason, the GRN which is created should always reflect what has been received and should match any paperwork signed at the point of delivery. It is not advised to wait for subsequent delivery of shorted goods to receipt or receipt goods that have not been delivered.

Comments
Please sign in to leave a comment.