Overview
Wastage transfers are used to record stock that is consumed by reasons other than sales for example an item has passed its sell by date and needs to be disposed. This document explains how to create a wastage transfer.
Prior to creating a wastage transfer all the products and or menu items to be transferred along with the relevant wastage accounts need to be assigned to the site.
Creating a Wastage Transfer
Wastage Transfer Page

Fig 1 - Stock Management Page with Wastage Transfer Link
- Select the Stock Management tab to get the option to create a wastage transfer.
- Click on the ‘Wastage’ link.

Fig 2 - Wastage Transfer Page
- Fig 2 shows the page that is displayed after clicking the ‘Wastage’ link. It is possible to search for any pending transfer by entering the relevant criteria in the boxes provided. It also shows a pending wastage transfer that was created at ‘Site One’.

Fig 3 - New Wastage Transfer Link
- To begin creating a new wastage transfer; click the ’New Transfer’ link.
New Wastage Transfer Page
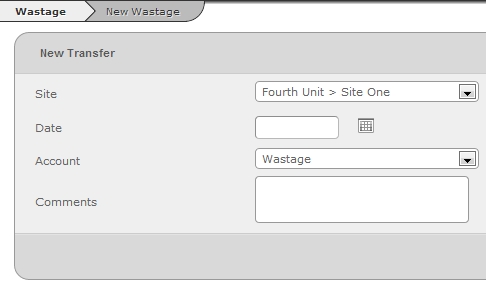
Fig 4 - New Wastage Transfer
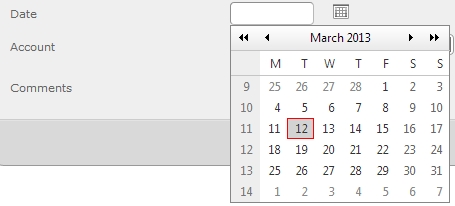
Fig 5 - New Wastage Transfer Calendar Pop-Up
- Select the site that the wastage transfer relates to.
- Choose the correct Date by either manually typing in the date or selecting one using the calendar icon in Fig 5
- By default the system shows today’s date on the calendar as the transfer date. If the date is not today, then amend accordingly.
- The date cannot be in a past or closed stock period as the system will not allow it to be approved.
- Select the appropriate wastage account from the ‘Account’ drop-down box.
- A meaningful comment may be added to the wastage transfer in the ‘Comments’ box. E.g. this stock was delivered with a short shelf life and is out of date.
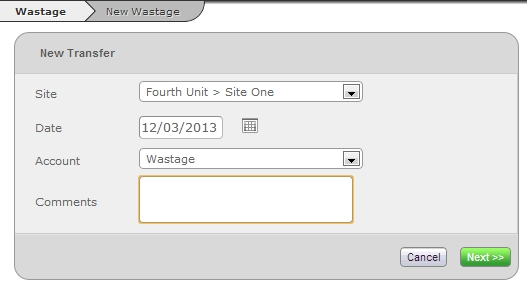
Fig 6 - Wastage Information Filled In
- Click the green ‘Next’ button when all the fields have been filled in correctly.
Wastage Detail

Fig 7 - Types of Items That Can Be Transferred
- The type of item being transferred must be selected on the Wastage Transfer Detail page.
- After selecting the item type, your category structure will appear, allowing you to drill down to specific catrgories and items
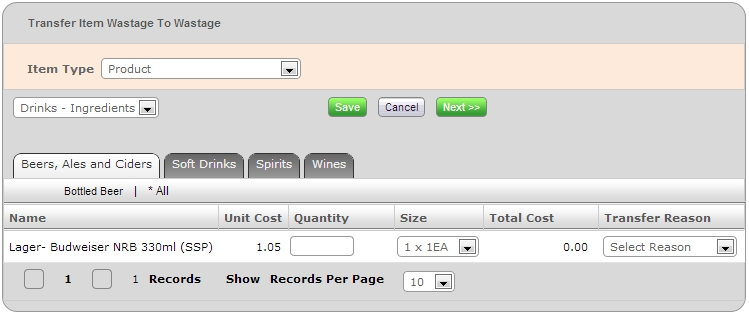
Fig 8 - Wastage Transfer Selecting Products
- Enter the quantity and correct pack size of the item being transferred.
- You can chose mutiple "types" of item to transfer. If moving between Products and Menu items, always click the green "Save" button to ensure your changes have been saved.
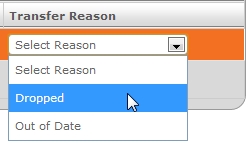
Fig 9 - Transfer Reason Drop-Down Box
- If a transfer reason is required, select the appropriate one from the ‘Transfer Reason’ drop-down box.

Fig 10 - Total Cost Calculated Automatically
- The Total Cost is automatically calculated after the quantity has been input.
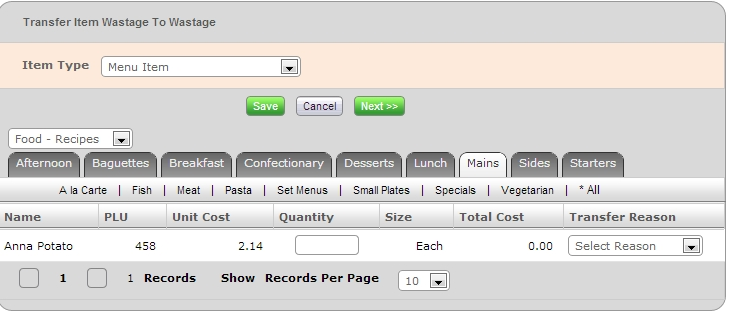
Fig 11 - Wastage Transfer Selecting Menu Items
- The transfer of menu items is very similar to that of products however pack sizes are not available.
- After entering the quantities for all the items that are being transferred click the green ‘Next’ button.
Wastage Transfer Summary

Fig 12 - Wastage Transfer Summary Buttons
- There are 4 buttons across the top of the wastage transfer:
- 'Edit Detail’ – Returns to the Wastage Transfer Detail page.
- ‘Save’ – Saves any changes made to the wastage transfer on the Wastage Transfer Summary page for example to the effective date, quantities etc.
- ‘Approve’ – Approves the wastage transfer. This will affect stock levels.
- ‘Delete’ – Completely removes the wastage transfer from the system. If a transfer is deleted it cannot be recovered.
- Once the details on the wastage transfer are correct, click the green ‘Approve’ button.
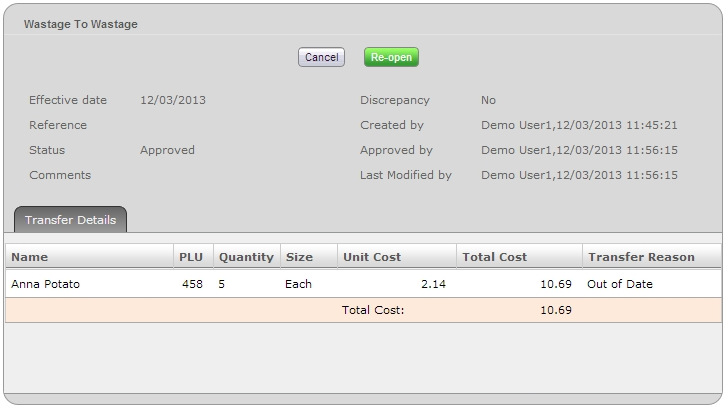
Fig 13 - Approved Wastage Transfer
- After approving the Wastage Transfer, Fig 13 shows two buttons:
- ‘Re-Open’ – This re-opens the wastage transfer so that it may be edited.
- ‘Cancel’ – Returns to the main Stock Management Page.
Additional Notes
Effect on Cost of Sales (COS)
- Though it may be configured differently, transfers to wastage have an impact on Cost of Sales (COS). Whenever a wastage transfer is created it has a negative impact on the Actual Cost of Sales for that period.
- Actual COS is calculated as follows: (Opening Stock + Purchases - Returns +/- Transfers Excluded from COS) – Closing Stock
As an example an item costs £2:
- At the beginning of the period there are 10.
- 3 have were transferred to a wastage account during the period.
- 0 were delivered or returned to the supplier during the period.
- 0 were sold during the period.
At the end of the period the COS would be calculated as follows:
- (Opening Stock: £20 + Purchases: £0 - Returns: £0 +/- Transfers Excluded from COS: £0) - Closing Stock: £14
- Actual COS = £20 - £14 = £6.00

Comments
I like it
Please sign in to leave a comment.