Overview
This article describes the process of creating a Requisition in Inventory.
Creating a Requisition
- To create a requisition, select the Stock Management tab
- Select Requisition

Fig.1 - Requisition Link
- Select the Site which requires the stock and select New by Category

Fig.2 - Create a Requisition Options
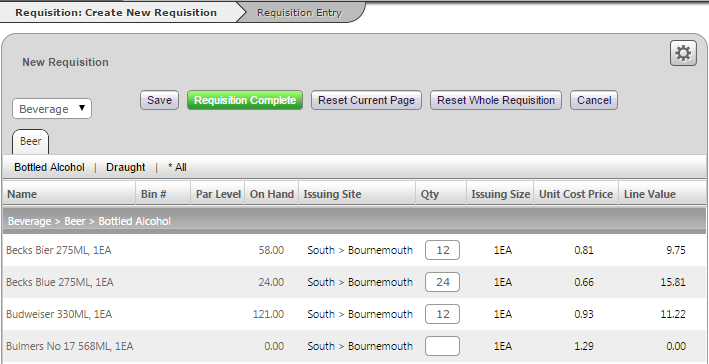
- On the next page, select the Cost Centre and relevant Category
- Enter an amount in Qty column of the items which are required. Everything else should be left blank
The system calculates a cost base on the cost of the item at the Site where the requisition is being initiated.
- Select Requisition Complete to save and move onto the next page
More detail on the information shown on this page is detailed below.

Fig.3 - New Requisition Page
Things to Note:
- If a Cost Center/Category is not displayed, this may be corrected by the system administrator
- The Issuing Site is also set up by the system administrator and cannot be changed. It is possible that the Site is located in a different unit to the Site making the requisition
- The On Hand column is showing the stock available on the receiving Site
| Button | Purpose |
|---|---|
| Save | Saves the requisition and gives it a status of ‘Draft’ |
| Requisition Complete | Saves the requisition and gives it a status of ‘Pending' |
| Reset Current Page | Clears the quantity of all the items on the current page only |
| Reset Whole Requisition | Clears the quantity of all the items on all pages |
| Cancel | Does not save any changes and returns to the previous screen |
Requisition Management
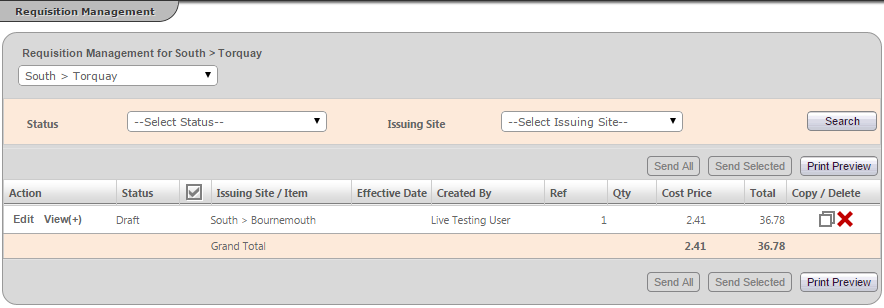
The Requisition Management page shows a summary of all Draft, Pending and Modified requisitions.
Requisition Status
| Status | Explanation |
|---|---|
| Draft | The requisition has been saved by a user, but it is not competed. It cannot be sent to the Issuing Site |
| Pending | The requisition has been completed by a user, and is ready to be sent to the Issuing Site |
| Modified | A pending requisition that has been modified |

Fig.4 - Requisition Management Page
- Requisitions may also be sent, deleted or copied by selecting the red icon [
 ] or the copy icon [
 ] respectively
Please Note: Once deleted, a requisition cannot be recovered.

Fig.5 - Requisition Details
- Users may also view the items of an individual transition by selecting Edit, as seen in Fig.5 above
- To view the details of all the requisitions, select Print Preview
Sending a Requisition
Only requisitions with a status of 'Pending' or 'Modified' can be sent to the issuing Site.

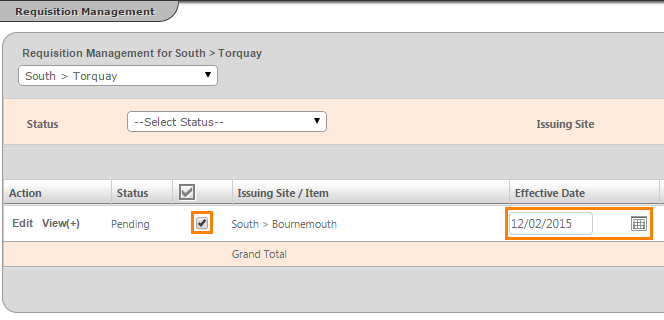
Fig.6 - Effective Date
- Select the requisition(s) to be sent and double check the effective date
Please Note: Selecting the wrong effect date will have an adverse effect on the management figures.

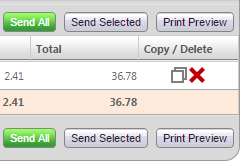
Fig.7 - Send Buttons
- Select Send Selected to send the requisition to the issuing Site
- Alternatively the Send All button may be used if the user is certain that all pending/modified requisitions should be sent to the relevant issuing Site(s)

Comments
Please sign in to leave a comment.