Entering wastage

Fig.1 – Accessing Stock Management and Transfers
The system will refresh to show a new screen.

Fig.2 – The New Transfer button

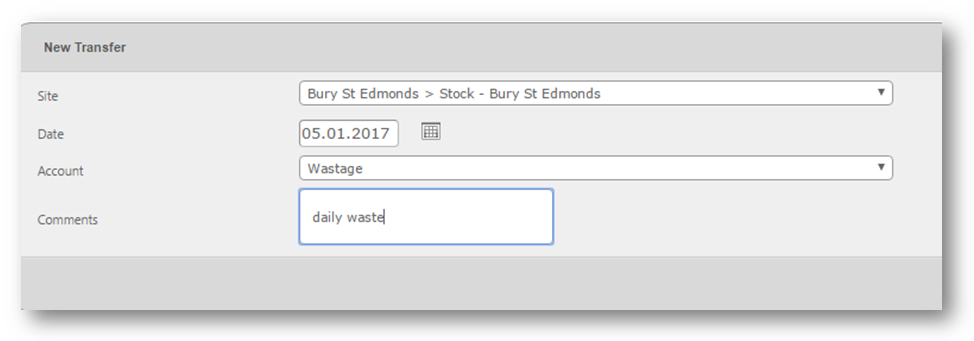
Fig.3 – Adding details for a wastage transfer

Fig.5 – Searching for an item to waste

Fig.6 – Adding quantities and reasons for waste

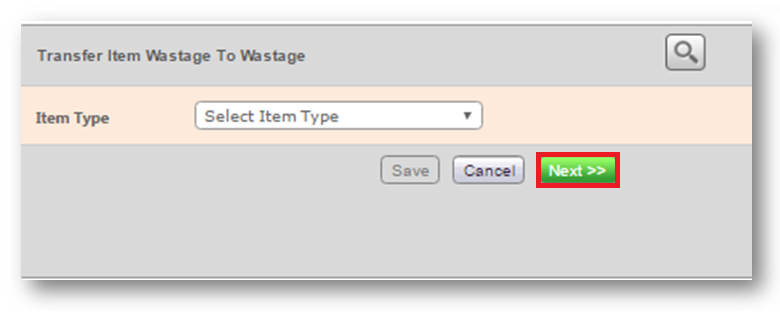
Fig.7 – Selecting Next
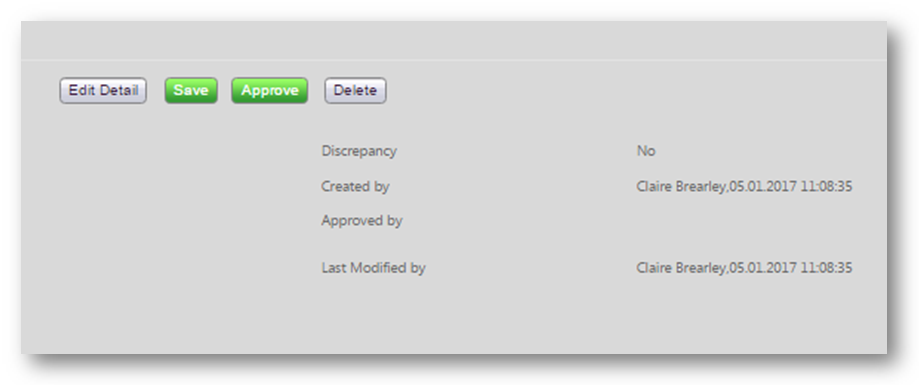
The system will refresh and display the approval screen. On this screen the wastage transfer can be approved.

Fig.8 – Showing the approval of a wastage transfer
Approval will remove the stock from the site's holding. The transaction will then show on the Stock management screen under the approved tab.
Wastage accounts are, as a general rule, set to ‘Affect the COS’.
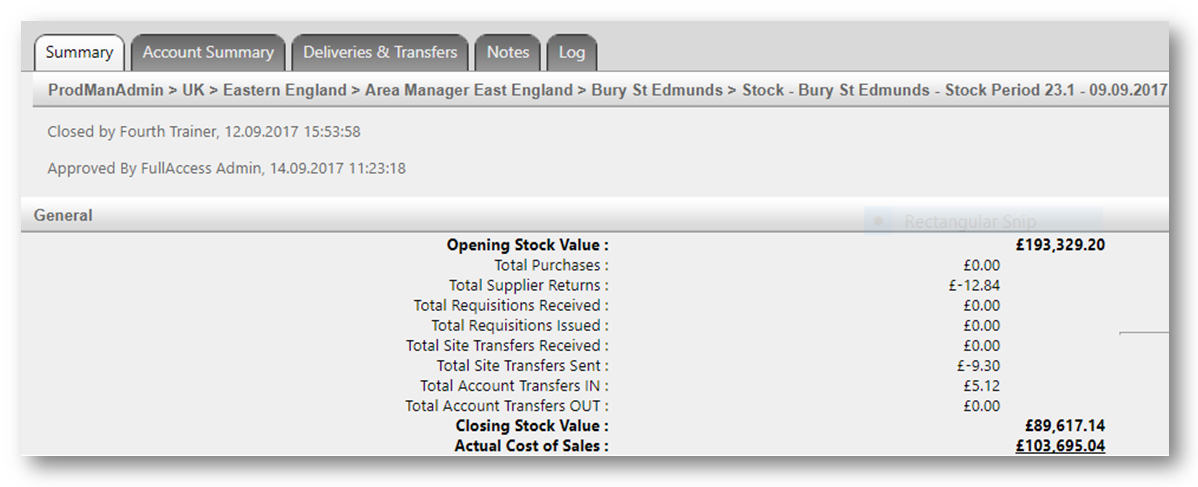
This means the cost of this wastage will show as part of the Actual COS.

Fig.9 – Identifying the Actual COS
Wastage is therefore part of variance between the Actual and Theoretical cost.

Fig.10 – Showing the variance of the Actual vs Theoretical COS
The wastage value can be excluded from the overall variance.

Fig.11 – Accessing the account summary and identifying the waste cost
Genuine variances show on the Stock reconciliation report.
- Log in and select the Stock Management tab
- Open All Options and move to the Transfers section
- Select Wastage

Fig.1 – Accessing Stock Management and Transfers
The system will refresh to show a new screen.
- Select New Transfer from the top-right corner

Fig.2 – The New Transfer button
- Select the correct Site and enter the Date (of when the transfer is made)
- Select the appropriate
Account - Add Comments if wished

Fig.3 – Adding details for a wastage transfer
- Select Next
- On the refreshed screen, select the magnifying glass in the top-right corner

Fig.4 – Navigating to the search magnifying glass
When the magnifying glass is selected, the system will refresh showing a screen where products, recipes or batch items can be searched for and added to the wastage.
- Use the Type drop-down to select the relevant type e.g a product, then enter a value in the Name field for the item to be wasted
- Select Search, and the system will then list all relevant products based on the Name

Fig.5 – Searching for an item to waste
- Identify the product to be wasted, add a Quantity and use the drop-down to select a Transfer Reason

Fig.6 – Adding quantities and reasons for waste
- Save in between each item being wasted
- Select Next
- Select Next again to see details of the transaction created

Fig.7 – Selecting Next
The system will refresh and display the approval screen. On this screen the wastage transfer can be approved.

Fig.8 – Showing the approval of a wastage transfer
Approval will remove the stock from the site's holding. The transaction will then show on the Stock management screen under the approved tab.
Wastage accounts are, as a general rule, set to ‘Affect the COS’.
This means the cost of this wastage will show as part of the Actual COS.

Fig.9 – Identifying the Actual COS
Wastage is therefore part of variance between the Actual and Theoretical cost.

Fig.10 – Showing the variance of the Actual vs Theoretical COS
The wastage value can be excluded from the overall variance.
- Access the Account Summary tab to see the value of recorded waste

Fig.11 – Accessing the account summary and identifying the waste cost
Genuine variances show on the Stock reconciliation report.

Comments
Please sign in to leave a comment.