
Overview
Schedules allow you to organize employees and jobs for scheduling and labor management. You can create schedules for individual positions, such as Server or Bartender, or group multiple jobs into a single schedule, such as Front of House.
From Store Settings, users with the appropriate permissions can add and edit schedules, assign jobs and labor categories, configure applicable requirements, and inactivate or reactivate schedules.
Note: Available options may vary based on your permissions and your organization's configuration. If you do not have access to manage schedules, contact your HotSchedules administrator.
This gets us out of the long support explanation. I don't think we need to immediately tell customers to have their administrator contact Support. If their administrator determines permissions need Support intervention, that's a separate support path.
Understanding the Schedules Page
Navigate to Settings > Store, then select the Schedules tab.
The Schedules page displays active schedules first, followed by schedules in the Inactive section.
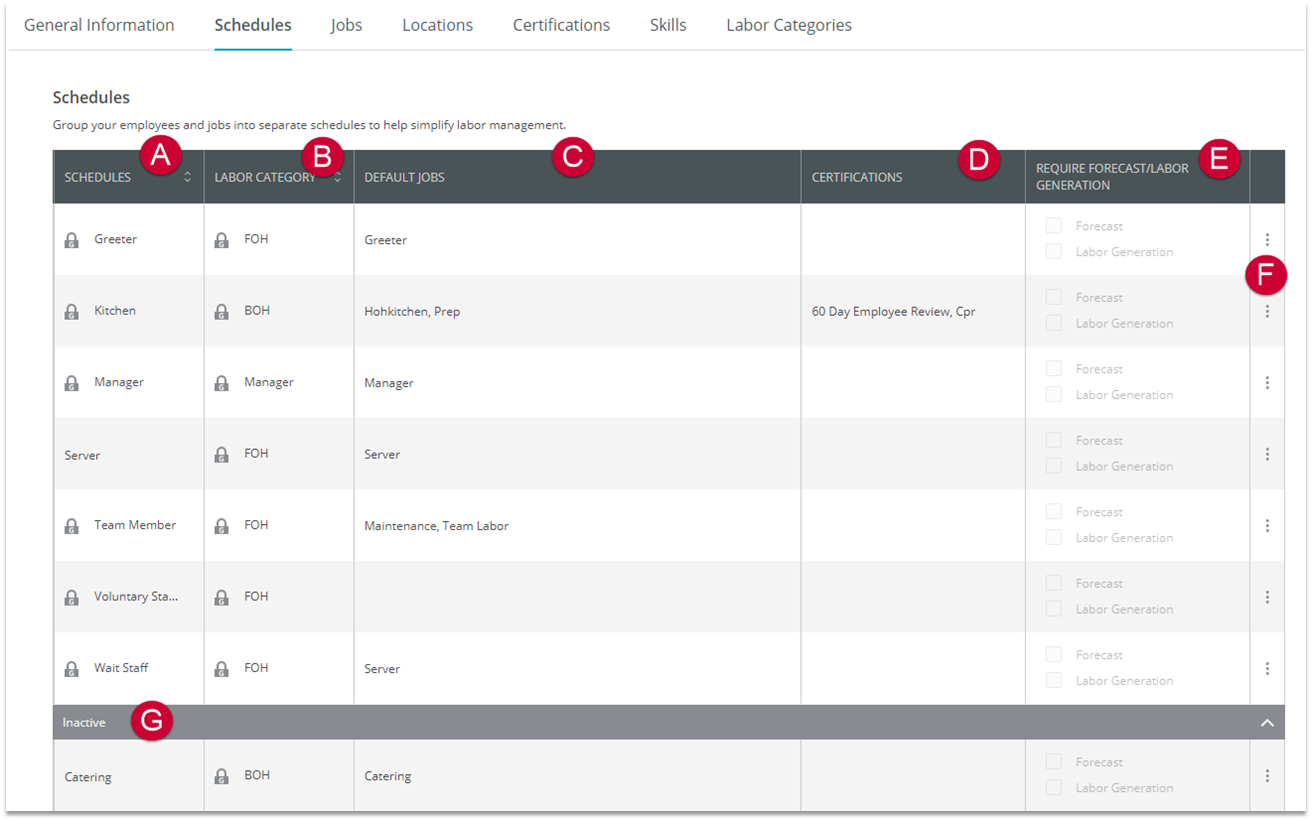
Fig.1 - Schedules
A — Schedule
Displays the schedule name. A lock or house icon may indicate a group schedule.B — Labor Category
Displays the labor category assigned to the schedule. Each schedule can be assigned to one labor category.C — Default Jobs
Displays the jobs assigned to the schedule. Multiple jobs can be assigned to a schedule, but a job can only be assigned to one schedule.D — Certifications
Displays certifications required for employees assigned to the schedule, when applicable.E — Require Forecast/Labor Generation
Displays Forecast and Labor Generation requirements when those features are available for your organization.F — Actions
Provides available options for managing the schedule, such as editing or inactivating it.One thing: the screenshot also has G — Inactive, but the original text doesn't explain G! I would absolutely fix that.
G — Inactive
Displays schedules that have been inactivated and are no longer active for scheduling.
Add a Schedule
To add a schedule:
- Navigate to Settings > Store.
- Select the Schedules tab.
- Select Add a New Schedule.
- Enter the Schedule Name
- Select the Labor Category.
- Select the jobs you want to assign to the schedule, as applicable.
- Select any required Certifications, as applicable.
- Configure Forecast or Labor Generation requirements, if available.
- Select Add Schedule.
Fig.2 - ADD a new schedule
Note: Available fields may vary depending on your organization's configuration and enabled features.
Edit a Schedule
To update an existing schedule:
- Locate the schedule you want to update.
- Select the three-dot menu.
- Select Edit Schedule.
- Update the available schedule information as needed select Done.
Depending on the schedule and your organization's configuration, editable information may include the schedule name, labor category, jobs, required certifications, and Forecast/Labor Generation settings.
Fig.3- Editing a Schedule
Inactivate a Schedule
If a schedule is no longer needed, you can move it to the Inactive section.
To inactivate a schedule:
- Locate the schedule you want to inactivate.
- Select the three-dot menu.
- Select Inactivate.
The schedule moves to the Inactive section of the Schedules page.
Reactivate a Schedule
To return an inactive schedule to active use:
- Expand the Inactive section.
- Locate the schedule you want to reactivate.
- Select the three-dot menu.
- Select Activate.
The schedule returns to the active Schedules list.
Fig.4 - Inactivating/Reactivating a Schedule
Comments
Please sign in to leave a comment.