
How to Create a Purchase Requisition Template
A Purchase Requisition Template is used to make the ordering process simpler, as the template can contain products that are commonly purchased.
Creating the Purchase Template
- Go to Requisition > Template Center
- Select Create Purchase Template, as per Fig.1
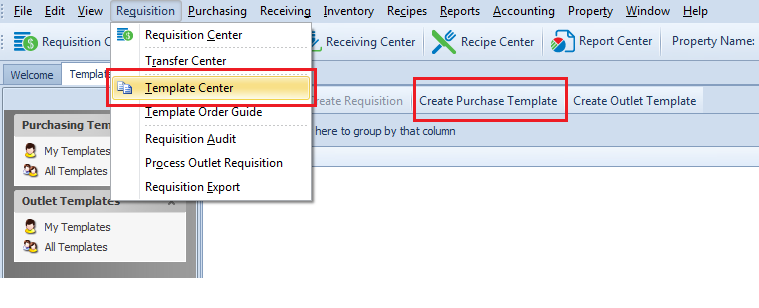
Fig.1 - Create Purchase Template screen
- Enter the required information for the fields marked with an asterisk(*), as per Fig.2
- In the Outlet list, select the Outlet that will be requesting the products
- In the Ship To list, select the needed delivery address
- In the Description box, type a brief description of the template

Fig.2 - Template Details required information
Template Detail fields:
| Field | Description |
|---|---|
| Template Number | The number assigned to the template by the system upon creation. |
| Outlet* | [Mandatory Field] The Outlet that is selected be being saved. Note: Once the Template is saved, the Outlet cannot be changed. |
| Ship To* | [Mandatory Field] The selected Ship To address |
| Available in Mobile Ordering | If this box is ticked then the template will be available in the mobile Ordering app. |
| Description* | [Mandatory Field] Text entered for a brief description of the template. Note: This field displays within the Ordering app as the name of the Market List when published from the Template. |
| Release To |
Will display where the requisition created from the template is to be released for processing. The release options are as follows:
Note: Will default to the Release To flag (Property/CP) set in Property > Administration > Property Preferences > Requisition. The Auto Release Requisition on Approval flag will need to be enabled first in the same screen. |
| Created By | Displays the creator's name. The creator has full edit rights for templates created by them. |
| Owned By | Displays the name of the owner of the template. The owner has full edit rights to the template. It can be a different user other than the creator. |
| Project | In the Project list, a project can be associated to the template if needed. |
| Standing Order | Select the Standing Order check box to enter and save default quantities of the products in the template. |
| Direct Charge |
Select the Direct Charge check box if the outlet is to be directly charged for this order. Note: This flag will be enabled by default if the Outlet is a Direct Charge outlet from Property > Setup > Location > Outlet screen. |
| Route List | In the Route List list, choose a default routing list if needed. |
- Once all the information is entered into the Template Details section, select Save
Adding Items to the Template
Below the Template Details pane, there two panels. The upper panel, labeled as Order Guide on the right side of the screen, lists all of the products that are included in the Outlet’s Order Guide. These are products that have previously been purchased for the Outlet or have been assigned to the outlet manually in the guide (Inventory > Maintain Guides) and are flagged as "In Order Guide".
The lower panel, labeled as Template Products on the right side of the screen, lists the products that are assigned to the template.
- To add product(s) to the template, select the product(s), and use the down arrow button, as per Fig.3. Or Double-Click a product to add it to the template
- To remove product(s) from the template, select the product(s), and use the up arrow button, as per Fig.3. Or Double-Click a product to add it to the template
Note: To filter the products displayed, type a search word into the filter row at the top of the grid.
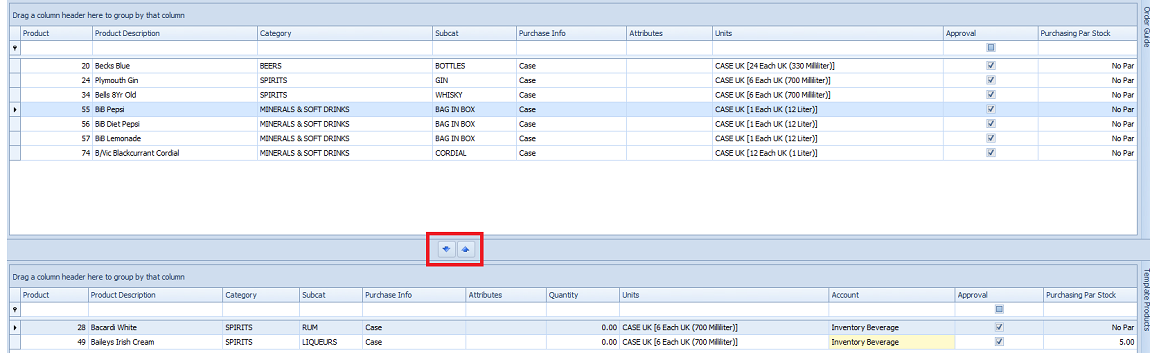
Fig.3 - Adding products to the template.
- Once all required products have been added to the Template, select Save
Template Security
Template Security is a function designed to allow users, outlets, and the property, certain access rights to the template. This security is in addition to the User Group security found in Property > Setup > User Groups > User Groups and is unique to each specific template.
- Select Template Security, as per Fig.4
- Select the desired security tab, (ie. User Security, Outlet Security, or Property Security)
- For example, in the Full Name list, select the user needed, as per Fig.4
- In the Write Permission list, select the permission needed, (ie, Read)
- Select Save
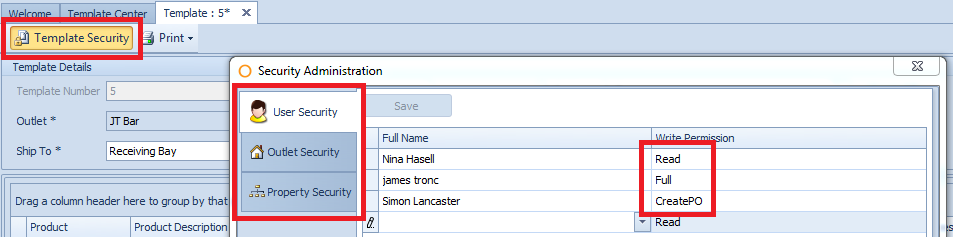
Fig.4 - Template Security screen
| Field | Description |
|---|---|
| User Security | Users listed will have access to the template. Only one access can be assigned at a time. The access available for this security is as follows:
|
| Outlet Security | Users that have access to the selected outlets will have access to the template. Only one access can be assigned at a time. The access available for the Outlet is as follows:
|
| Property Security | Users at the property will have access to the template. Only one access can be assigned at a time. The access available for the property is as follows:
|
Printing Templates
When printing an Outlet or Purchase Requisition Template to be used as a physical ordering sheet there is an option to print as either a single or 7 day ordering sheet.
When the 7 day option is selected the report will be printed in landscape format with 7 columns for daily on hand and order quantities. The columns will have a Day of the Week header as well as a space to enter the date.

Fig.5 – Option to print 7 day order sheet
Comments
Question
How can I move product sequence with in my purchase template ounce created to fall in the same sequence of the storeroom
Hi Ed Tebo
Unfortunately once you've added products into the Template Products section of the Template, the only way to re-sequence them is to remove them from the lower panel named Template Products using the Up arrow, double clicking on the product or Ctrl + A to select all products, and re-add them in the required sequence,
However, if you print the Template, it will show in the same sequence as that of the sequence setup through Inventory > Maintain Guides,
Best,
Pritesh
Fourth
Please sign in to leave a comment.