The System is designed to help those in the hospitality industry manage their purchasing, stock control and time.
Accounts are used to record stock that has been brought into or left the business by reasons other than deliveries or credits; site transfers or sales. For example transferring stock to a marketing account when stock was used for a new site opening; the reasons for an account transfer may vary for each organisation; nevertheless they are always used to track stock movement.
Wastage is a special type of account transfer. An example of when a wastage account would typically be used is; when an item has passed its sell by date and needs to be disposed of, it won’t be sold or transferred but must be accounted for so that it doesn’t appear to be missing at the end of the stock period. Administrators need to create and maintain accounts to enable users to correctly record stock moment.
Creating an Account

Fig 1 - Account Admin Link

Fig 2 - Account Admin Link
- Click the ‘Setup’ Tab > Account Admin as in Fig 1 above.
- Click the ‘Add New Account’ link.
Account Fields
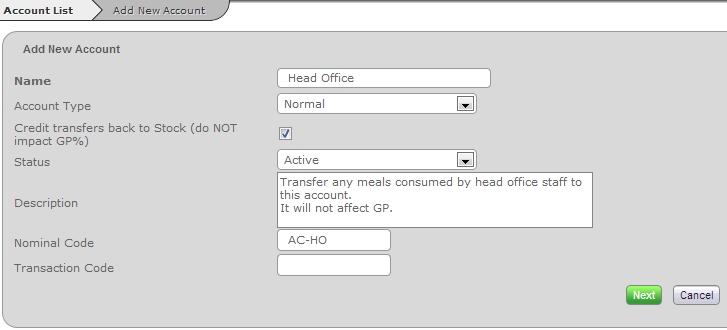
Fig 3 - Add New Account Page
- Fill in the relevant text and drop-down boxes (see section Account Fields. for an explanation of each field).
- In Fig 3 a non-wastage account is being created this is called normal.
- Click the green ‘Next’ button.
- ‘Name’: Descriptive name of account.
- ‘Account Type’:
- Normal – Used for any other account besides wastage.
- Wastage – Used for wastage accounts only.
- ‘Credit transfers back to Stock (do NOT impact GP%)’: Whether transfers to and from the account impacts GP%. Best practice says that Wastage should impact GP%.
- ‘Status’:
- Active – Users are able to transfer stock to and from the account.
- Disabled – The account is still visible to users however they are cannot transfer stock to and from the account.
- ‘Description’: Detailed description of the purpose of the account. [Optional]
- ‘Nominal Code’: Code used if transfers are exported to accounting package*. [Optional]
- ‘Transaction Code’: Required if transfers are entered on the EPOS tills and send to the system**. [Optional].
Adding a New Account to Site(s)
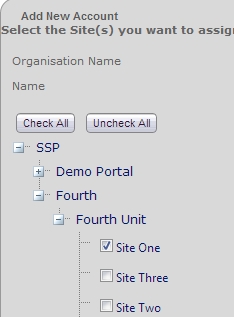
Fig 4 - Add Account to Site(s)

Fig 5 - Save & Cancel Buttons
- The account being created must be assigned to the appropriate sites(s).
- Expand the organisation hierarchy and select the relevant site(s). Alternatively, click the grey ‘Check All’ button to assign the account to all within the organisation.
- After selecting the relevant site(s) click the green ‘Save’ button.

Fig 6 - Account Created Confirmation
- Fig 6 above shows confirmation of that the account has been successfully created and assigned to a number of sites.
- Click the grey ‘Return To Account List’ button to return to the Account List page or ‘Add Another Account’ to go back to the Add New Account page as in Fig 3.
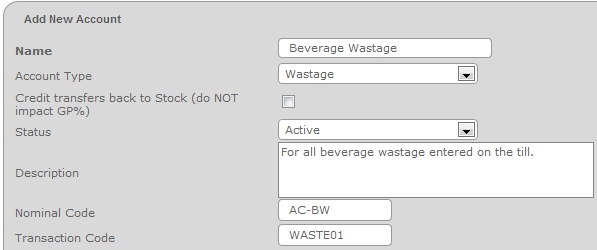
Fig 7 - Setting Up a Wastage Account
- Fig 7 shows an example of setting up a typical wastage account.
- Follow the same steps as above from Fig 1 through to Fig 6 with the only difference being that the Account Type is Wastage and the option to ‘Credit transfers back to Stock’ is not selected to ensure that recording wastage correctly impacts the GP generated.
Updating an Account
- It is possible, and sometimes necessary, to update details on an account.

Fig 8 - Edit Details Tab
- Click the ‘Setup’ Tab > Account Admin as in Fig 1 above.
- Search for the account that is to be amended (see article: How to: Search for an Account on how to search for accounts).
- Click on the ‘Edit Details’ tab.
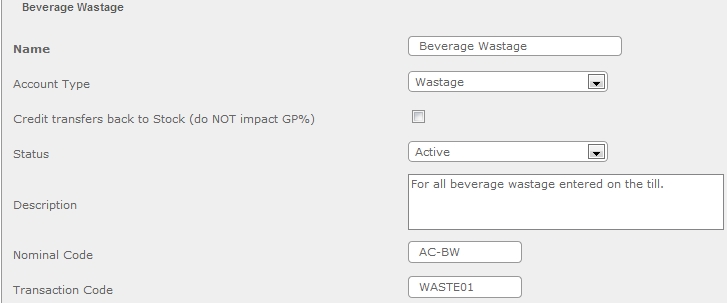
Fig 9 - Editable Fields

Fig 10 - Green Save Button
- Fig 9 shows the fields that are editable.
- Make the necessary changes and click the green ‘Save’ button.
- ‘Credit transfers back to Stock (do NOT impact GP%)’: Changing this field will impact the management figures for the current period; historical periods will not be updated. This change may result in different GP percentages than expected especially when viewing consolidated stock period figures.
- ‘Account Type’: Changing the type will affect a few areas of the system; the area that the user needs to go to create a transfer to this account, and some reports.
Adding an Account to Site(s)
- As new sites are added to the organisation there may be a requirement to add existing accounts to the site.

Fig 11 - Where Used Tab
- Click the ‘Setup’ Tab > Account Admin as in Fig 1 above.
- Search for the account that is to be amended (see article: How to: Search for an Account on how to search for accounts).
- Click on the ‘Where Used’ tab.

Fig 12 - Add Account to Sites Button
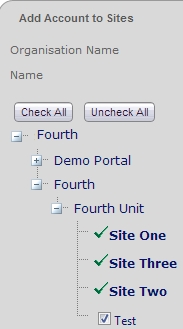
Fig 13 - Select Sites to Add Account

Fig 14 - Green Save Button
- Click the grey ‘Add Account to Sites’ button.
- Select the site(s) that the account will be added to.
- Click the green ‘Save’ button.
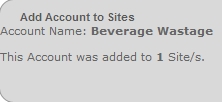
Fig 15 - Account Added to Site Confirmation
- Fig 15 shows the confirmation message that the account was added successfully to the selected sites.

Comments
Please sign in to leave a comment.