Overview
One of the methods to simplify Stock Counts is to arrange the products on the worksheet matching the store layout. A count location is where an item in inventory is stored. An inventory item can be stored in multiple locations in the back of the house, front of the house, or in separate storerooms. Count location should be a replication of the actual shelf to sheet or mobile device count.
Count Locations Features
-
The ability to divide areas of the store where items are stored into locations
-
The ability to add and remove items from the count locations
-
The ability to search for items in the count locations
-
Users are notified of all new items created by corporate so that they can select to include them in their count locations
Create, Modify, and Delete a Count Location
- In the Menu tab, navigate to the Counts tab, select Count Locations
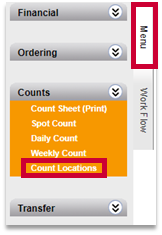
Fig.1 - Menu navigation
A list of count locations and inventory items will appear.

Fig.2 - Count locations page
![]() The Unassigned section displays the items that have not been assigned to a count location. All inventory items will default to New Items until they are moved to other locations. Each inventory item can be in multiple locations.
The Unassigned section displays the items that have not been assigned to a count location. All inventory items will default to New Items until they are moved to other locations. Each inventory item can be in multiple locations.
- To add a new count location, edit an existing count location, or to change the order in which the item appears select MANAGE LOCATIONS

Fig.3 - MANAGE LOCATIONS
- Enter the name of the location and select the + ADD LOCATION button to save
- Select Done
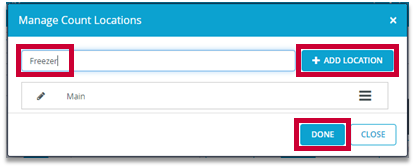
Fig.4 - Adding count locations
- Edit a location by selecting the Pencil icon
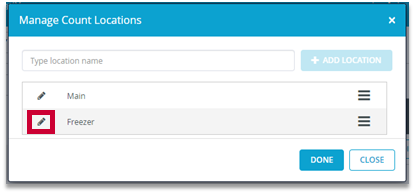
Fig.5 - Editing count locations
- Make the appropriate change, select SAVE
- Select DONE
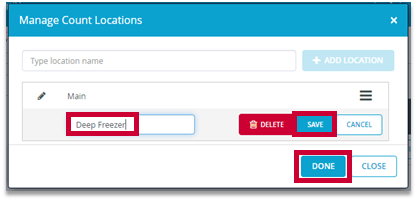
Fig.6 - Editing count locations (continued)
![]() If there are items in the location, you won’t be able to delete them until the items have been removed from that location. If the delete button is not present, check to make sure all items have been removed.
If there are items in the location, you won’t be able to delete them until the items have been removed from that location. If the delete button is not present, check to make sure all items have been removed.
-
To change the count location order, select the Order icon
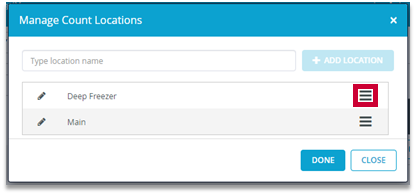
Fig.7 - Change order
- The order icon for the location selected will now display as a Pin icon, and the other locations now display Target icons
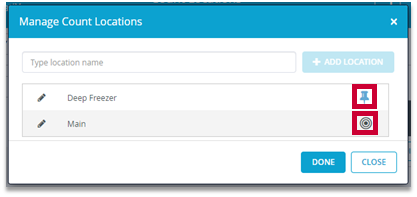
Fig.8 -Change order (continued)
-
After selecting the target location icon, the selected location will move to below the target location

Fig.9 - Change order (continued)
![]() After the move, the order of locations listed on the left-hand side of the count location page will not change. The change will only take effect on the count pages.
After the move, the order of locations listed on the left-hand side of the count location page will not change. The change will only take effect on the count pages.

Fig.10 - Location order on count location page
Inventory Items for Count Locations
Assign, Copy and Delete Inventory Items to a Count Location
Items can be moved, copied, or deleted from count locations.
-
-
Move: Will move the selected item to another count location
-
Copy: Will copy the selected item to another count location, while leaving the item in the current count location
-
Delete: Will delete the selected item from the count location selected
-
Moving Items to a Different Count Location
- To move an item to a different count location, select the Count Location where the item currently resides
- Select the item to move
- Select ACTIONS
- Select Move

Fig.11 - Move item
![]() The number next to Move is the number of items selected to move to the new location.
The number next to Move is the number of items selected to move to the new location.
- The Move to location (#) pop-up window will display with all locations listed. Select the desired count location
- Select MOVE

Fig.12 - Move item (continued)
- The item is now listed in the new count location

Fig.13 - Move item (continued)
Changing the Order of Items in a Count Location
- To change the order of an item to another position in the count location, select the Order icon of the item
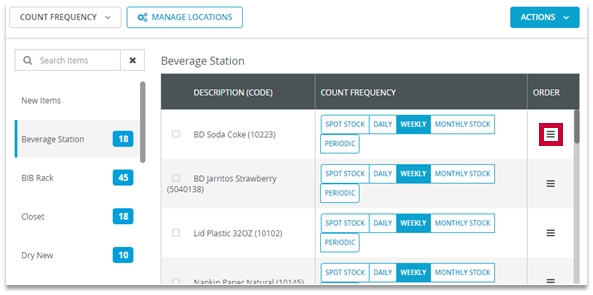
Fig.14 - Change order
- The Pin icon will appear for that item. Select the Target icon where the item should move
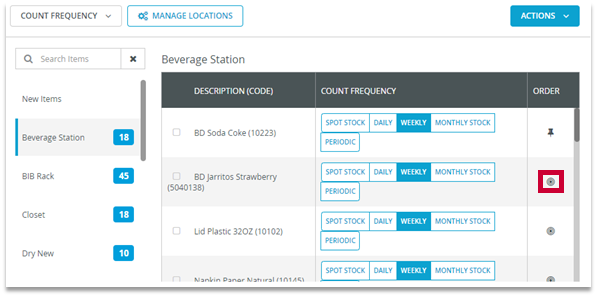
Fig.15 - Change order (continued)
- The item will move to the desired position in the list of items in the count location
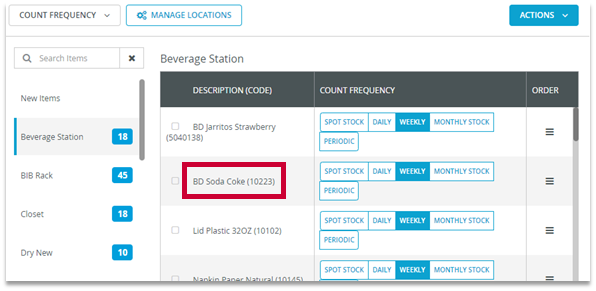
Fig.16 - Change order (continued)
![]() Inventory items can be in multiple count locations since they can be placed in different locations in the store.
Inventory items can be in multiple count locations since they can be placed in different locations in the store.
Copying Items to Another Count Location
- To copy items to another count location, select the count location where the source items are located
- Select the items in that need to be copied to the target count location
- Select ACTIONS
- Select Copy
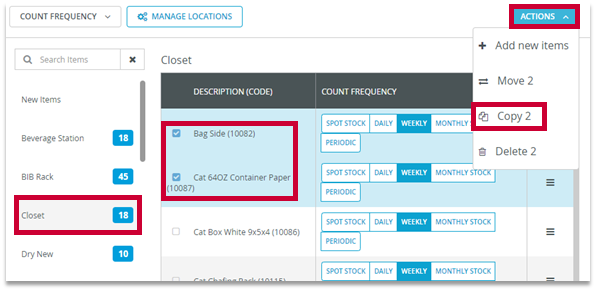
Fig.17 - Copy item to a different location
- The Copy to location(s) pop-up window will display to select the target count location
- Select COPY
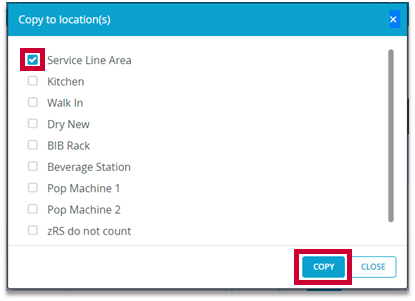
Fig.18 - Copy item to a different location (continued)
- The copied items will now display in the target count location
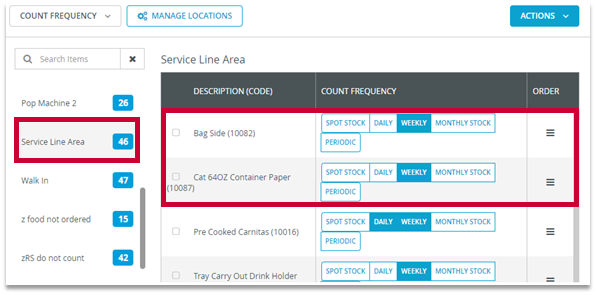
Fig.19 - Copy item to a different location (continued)
Deleting Items from Count Locations
Deleting items from a count location is very similar to the process of copying items.
- Select the count location where the items are listed
- Select the items in the count location that should be deleted
- Select ACTIONS
- Select Delete #
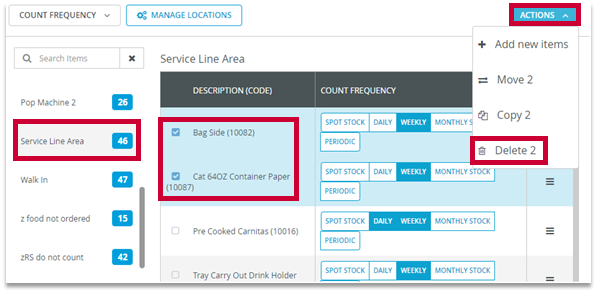
Fig.20 - Delete items from count location
- The Delete Item(s) pop-up window will display. Select DELETE

Fig.21 - Delete items from count location (continued)
![]() The items are only deleted from the count location that was selected, not any other count locations where the items also reside.
The items are only deleted from the count location that was selected, not any other count locations where the items also reside.
Adding New Items to a Count Location
- New items may be added to a Count Location by selecting ACTIONS
- Then select + Add new items
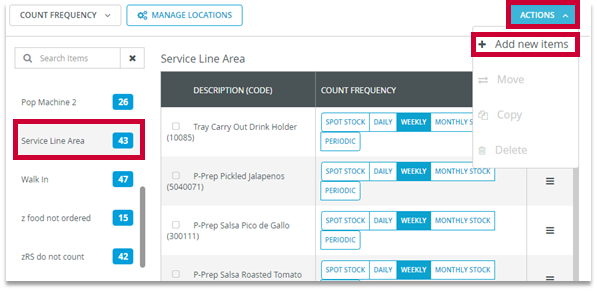
Fig.22 - Add items to count locations
- The Add new items pop-up window will display. Type a partial, or whole description of the item or inventory code
- Select SEARCH
- All inventory items matching the criteria will appear. Select the items you want to add
- Select ADD ITEM(S)
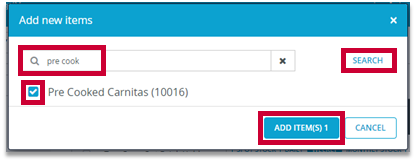
Fig.23 - Add items to count locations (continued)
- The items will then display in the desired count location
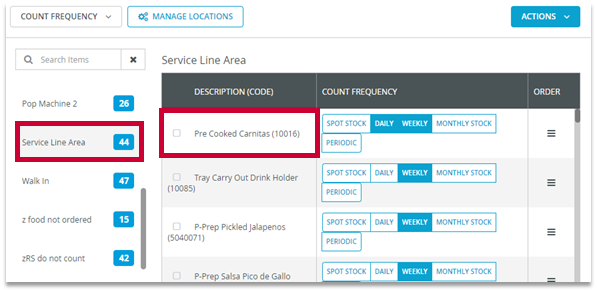
Fig.24 - Screenshot description
Related Articles

Comments
Please sign in to leave a comment.