Overview
To provide access to Macromatix, a manager account must be created for the user. This can be created from scratch for a new user, or an existing account can be updated when an hourly employee becomes a manager. This article will review both how to create a user and how to update user access.
Creating a User
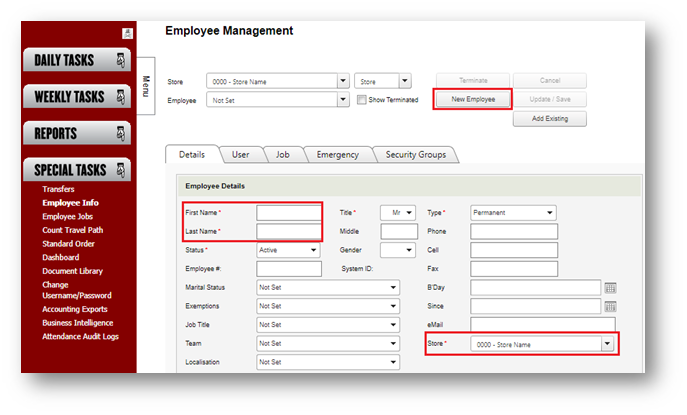
To begin, select Employee Info from the Special Tasks menu on the left. Confirm the correct store is selected at the top of the page.
- Select the New Employee button
- Once the page refreshes, enter the employee's first and last name on the Details tab
- Confirm that the Store reflects the appropriate home store
- Select the Update / Save button at the top of the page to create the user
Note: If this is an hourly employee who was promoted, their existing hourly account can just be modified to provide manager access. Rather than creating an account with the New Employee button, simply search for the user in the Employee drop-down menu to pull up their profile and proceed with making the changes outlined below.

Fig.1 – Creating a new user on the Employee Info page
User Tab
Once a user has been created on the Details tab or selected from the Employee menu, the next step is to setup their initial login information.
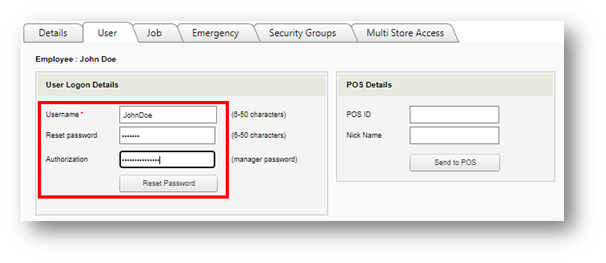
- Select the User tab of the employee profile
- Username - Enter an initial username for the employee
- Reset Password - Enter an initial password for the user
- Authorization - Enter the password of the user that is currently logged into Macromatix (the user creating the new account)
- Select the Reset Password button
- Select the Update / Save button at the top of the page
Note: We suggest that the user change their login information when they first log into their account. This article reviews how to complete this.

Fig.2 – Setup the username and password on the User tab
Job Tab
The next step is to configure the new user's job settings, if necessary.
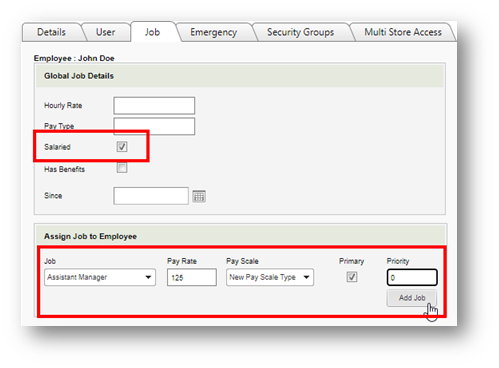
- Salaried - If the new user is a salaried manager, check this box
- Use the Assign Job to Employee box to add the applicable job
- Job - Select the position/title from the drop-down menu
- Pay Rate - For a salaried employee, enter the amount they get paid per day; for an hourly employee, this should reflect their hourly rate
- Pay Scale - Leave this as New Pay Scale Type
- Primary - Check this for their default job. If they have more than one job role, the primary job will be set by default when a shift is manually inserted.
- Priority - Set as 0 default
- Select Add Job once all of this information is added
- Select the Update / Save button at the top of the page to save all changes

Fig.3 – Salaried job setup on the Job tab
Security Groups Tab
Security Groups provide a user with the appropriate access in Macromatix, ensuring they will have the management features and reports when they log into their new account. The following two security groups will be needed for all Jimmy John's management users:
- JJ GMs
- 5 New Reports
Currently, users are not able to assign these security groups, so please contact the Macromatix Support team to make these changes.
Multi Store Access Tab
The Multi Store Access tab is only visible when viewing a user's profile at their home store. It allows users to grant an account access to multiple store locations in Macromatix. The home store can be confirmed on the Details tab (as seen in Fig.1).
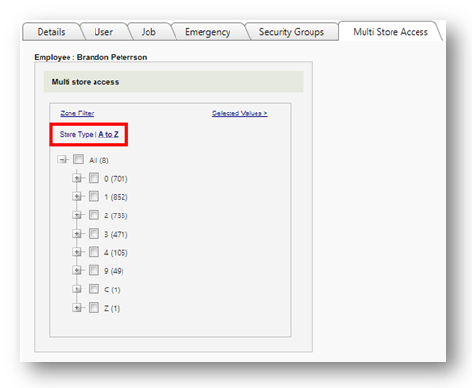
If a user needs access to multiple stores, select the Multi Store Access tab on their profile.
- Select the A to Z filter (as seen in Fig.4)
- Click on the + icons to open up the store lists based on the first digit of the store number
- Example: Expand the 4 menu to find store 4567
- Check the box(es) for any stores to provide access
- Select the Update / Save button at the top of the page to save all changes
Note: The user making these changes will see all stores that they currently have access to within their own account. So, a user cannot provide access to a store that they are not associated with in Macromatix.

Fig.4 – Assigning multi store access

Comments
Please sign in to leave a comment.