
Overview
This article will go over the inventory process that includes starting a new count, adding the stock count and applying the count correctly.
![]() The order in which the items appear on the inventory screen is set up by the count travel path - see MX: Count Travel Path for more information.
The order in which the items appear on the inventory screen is set up by the count travel path - see MX: Count Travel Path for more information.
Start a Count
Before starting a count it is good to make sure that all items are currently present, and nothing is missing (useful if you know a new item has been added recently). The easiest way to do this is to go to the inventory report for the same week.
- Go to JJ Store > Reports > Weekly Reports > Analysis = Inventory > Week = the current week
All the items that are appearing in the list will appear on the inventory count screen when the new count is started. If an item is missing, call the support team to get the item added to the inventory count.
- To start a count go to JJ Store > Weekly Tasks > Inventory > select the New Count tab
- Count Type – this will always be set to Weekly
- When – by default this will be set to End of this Week
![]() The When field updates the Apply Date field so that it is for the end of the current week. Changing it to End of last Week’ will change the date to the end of last week.
The When field updates the Apply Date field so that it is for the end of the current week. Changing it to End of last Week’ will change the date to the end of last week.
- Apply Date – This field can be manually overridden if the date/time needs to be changed (and can also be changed later in the process)
- Once complete, select Create New Count

Fig.1 – Starting the inventory count process
![]() If the system brings up a message about merging inventories, this means an inventory has already been created for the week.
If the system brings up a message about merging inventories, this means an inventory has already been created for the week.
Counting Stock
The system will then display the 'Count in Progress' tab.
- To navigate to this screen from another area of the system, go to JJ Store > Weekly Tasks > Inventory > select the Count In Progress tab
When counting on this screen, it can be either be done group-by-group or by all items at once.
- To change to 'all items' change the Inventory Group drop-down to All
- Enter the desired values into the corresponding units of measure (Closing Unit.) for each item
- The Apply check box will automatically check itself when a value is entered. If the count for an item is 0, the Apply box will need to be manually checked - checking the Apply box in the header will update the field for all items
- Once all counts for a group are entered, select Save and then change the group
- Repeat this process for each group
![]() Changing the group before saving will remove all counts for that group.
Changing the group before saving will remove all counts for that group.
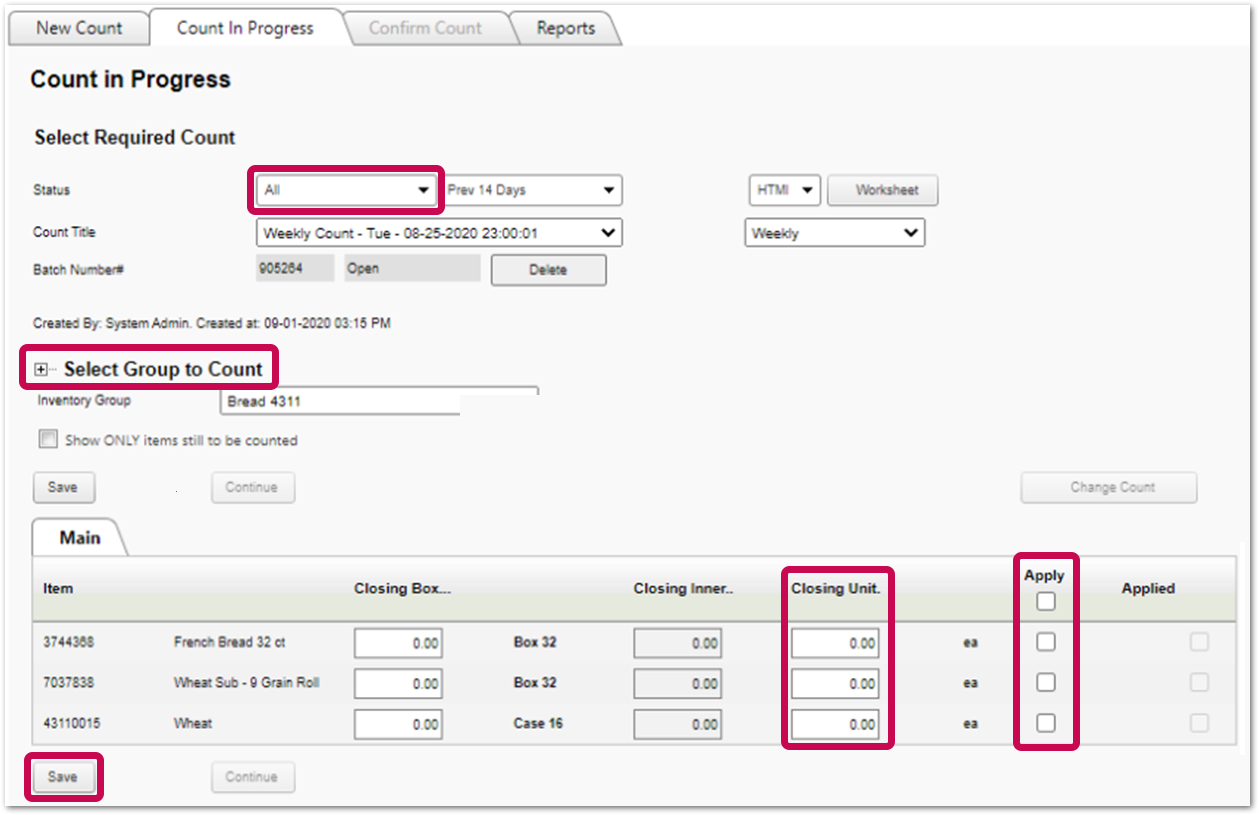 Fig.2 – After starting a new count the screen will reload and this screen will appear
![]() Once all counts have been entered it is useful to make sure all items have been applied.
Once all counts have been entered it is useful to make sure all items have been applied.
- A quick way to do this is to set the Inventory Group as All, and scroll down the list to see if any items haven’t been applied
- Once all items are applied, Save one more time to make sure all changes are saved
- Then select Continue
![]() Not all items will have a closing box unit or closing inner unit (this can be updated by the support team). All items will have a closing unit (this is predetermined by Jimmy Johns HQ and cannot be changed by the support team).
Not all items will have a closing box unit or closing inner unit (this can be updated by the support team). All items will have a closing unit (this is predetermined by Jimmy Johns HQ and cannot be changed by the support team).
Applying the Stock Count
The next screen will be the Confirm Count tab.
- Make sure the date and time are correct in the field as shown in Fig.3.
![]() The date and time must be between the day close on the Tuesday and the day open on the Wednesday.
The date and time must be between the day close on the Tuesday and the day open on the Wednesday.
- If the POS was closed late or started early, enter a new date/time into this field so it fits between the two days
- When the date/time field is correct, select Apply
This will then apply the inventory to the week. It is then advised to review the inventory report to check the COS%.
If the inventory needs to be reapplied to a different date/time, contact the support team to have this done.
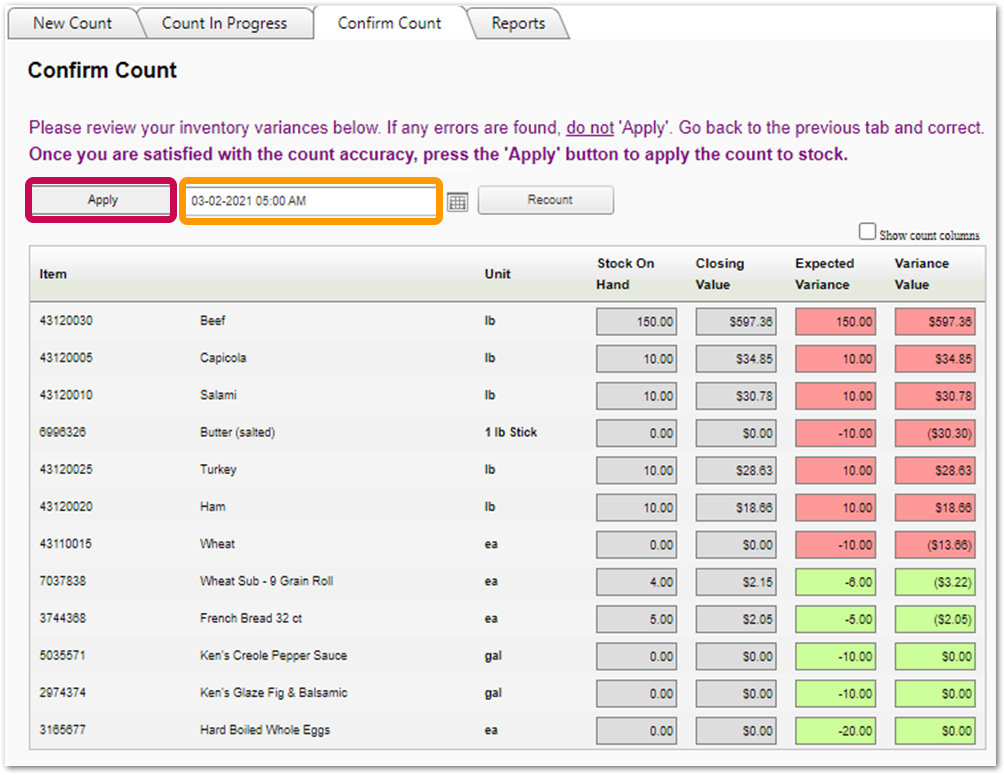 Fig.3 – The confirm count screen will appear after the continue button is pressed
Changing the Stock Count
If any item count value errors are found after the inventory has been applied, the count values can still be edited.
- Navigate to the Count In Progress tab and select Change Count from the right side of the screen
The fields will become editable again and any values can be changed.
- To apply and save any changes made, select Apply Change from the left side
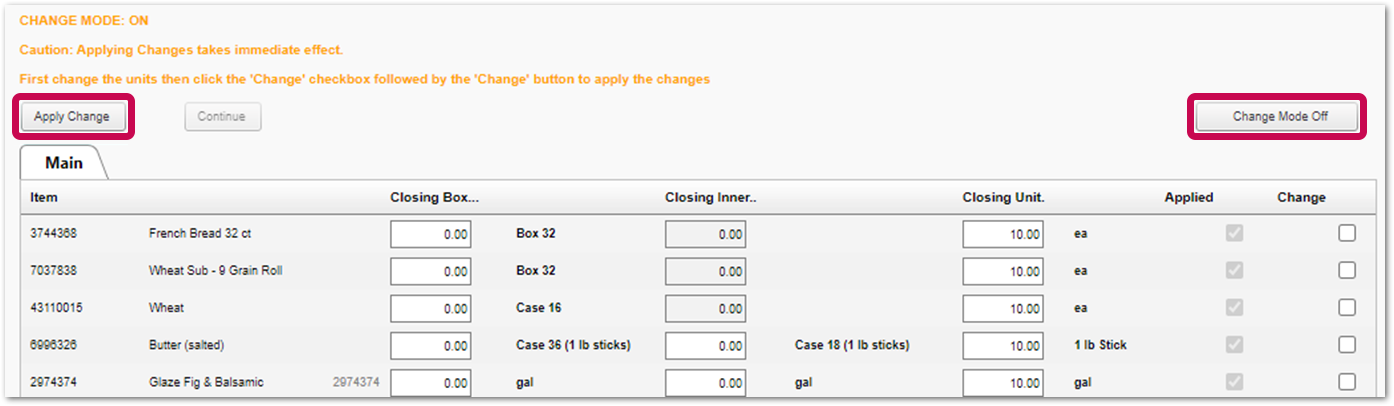 Fig.4 – The count screen after the change count button has been pressed
These changes will take effect immediately and will reflect on the current week’s inventory report.
Comments
Please sign in to leave a comment.