
Configuring MICROS 2-Way Interface Outgoing Feed Configuration
This document will assist in configuring a MICROS 2-Way interface from within the Adaco software. For the MICROS 2 way outgoing feed to work properly, the following sections must be properly configured in the Adaco software. If any of the below sections are missed, those products will not in the feed and thus, not processed when imported into Adaco.Sections covered:
- Property Administration>POS
- Product Screen>Retail
- Product Screen>POS Fields
- Product Screen>Barcode
- Outlet Configuration
- Outlet Maintain Guides
- Label Printing
- To view the interface settings, go to Property > Administration > Interfaces > POS
Please note: The information displayed in Fig.1 is for informational purposes and does not reflect specific settings for a property.

Fig.1 - POS Interface Details
- Go to Property > Products
- Search for and double-click the product or select Details
- Select Retail
- In the Price field, enter the correct price as per Fig.2
- In the PLU field, enter the retail product PLU as per the POS system, as per Fig.2
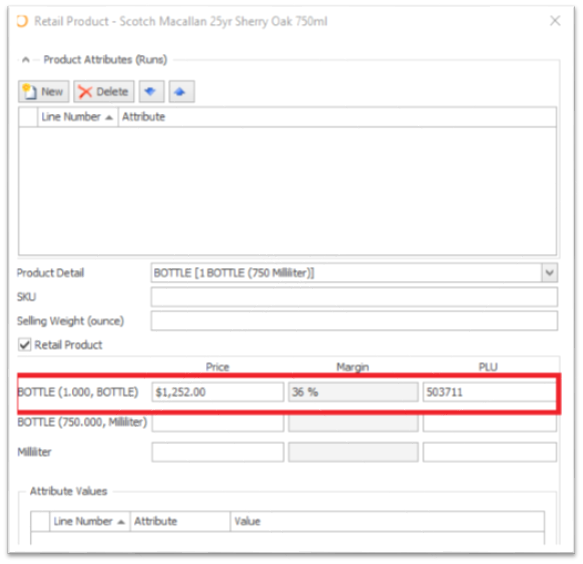
Fig.2 - Retail Product Details
- Go to Property > Products
- Search for and double-click the product or select Details
- Select POS Fields
- In the Tax Type, Major, and Family fields, enter the needed information, as per Fig.3
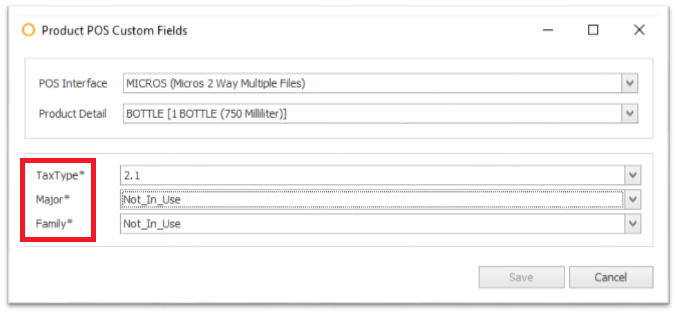
Fig.3 - Product POS Custom Fields
Please note: The system will not export any barcodes if the barcode unit is not tied to the unit that is selected for PLU.
Bar code length shouldn’t be more than 12 characters. Refrain from using UPCE0 and UPCE1 bar symbologies as most MICROS scanners will not read bar codes printed with those symbologies.
- Go to Property > Products
- Search for and double-click the product or select Details
- Select Bar Codes
- In the Product Detail list, select the correct Detail
- Select New
- In the Unit list, select the correct Retail Unit
- In the Bar Code Symbol list, select the correct bade code symbology (ie. UPCA)
- In the Bar code field, enter the bar code number
- Save
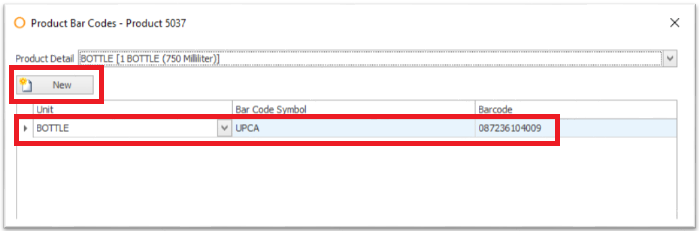
Fig.4 - Product Bar Codes
- Go to Property > Setup > Location > Outlet
- Double-click the Outlet or select the Outlet and go to Details
- In the POS Revenue Center, enter the revenue center from the POS system to link to the correct Outlet in Adaco, as per Fig.5
- Save
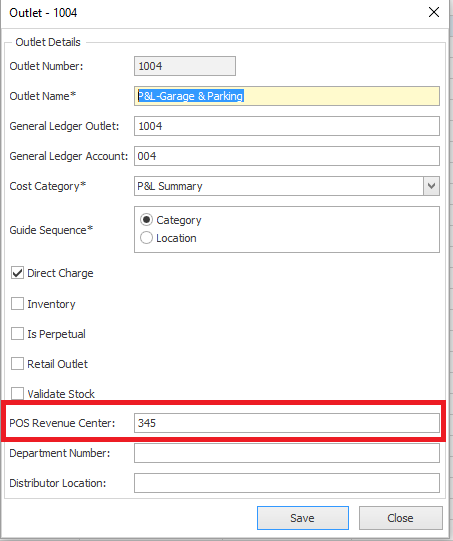
Fig.5 - POS Revenue Center Field
- Go to Inventory > Maintain Guides
- Double-click the Outlet/Location or select the Outlet/Location and go to Details
- Navigate to the product, and in the In Inventory Guide check box, enable (check) the box as needed, as per Fig.6
- If product is not in the guide, use Add Product to search for and add the product as needed
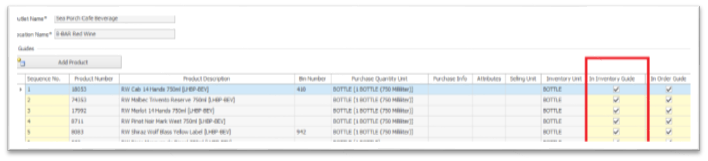
Fig.6 - Maintain Guide Screen
Please note: In contrast, if a bar code that was included with checksum flag was entered in the bar code field at product screen (as per Product Screen > Barcode section above) then include the checksum flag when printing labels with bar codes. This is not controlled by the Adaco software as some users may enter the manufacturer bar code in Adaco that includes checksum.
- Go to Report Center > Property Reports
- Double-click the Product List with Labels report, or the Retail Labels report
- Uncheck the Checksum check box if needed, as per Fig.7
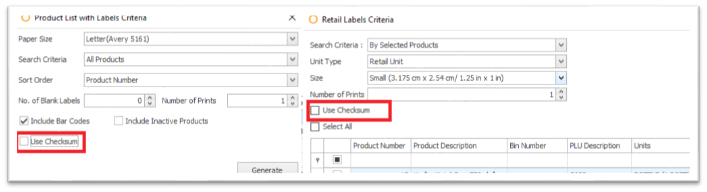
Fig.7 - Checksum check box
Comments
Please sign in to leave a comment.