
How to Create and Edit an Inventory Cycle
The purpose of this article is to demonstrate how to create and edit an Inventory Cycle that is used during either Interim or Month End inventories. An Inventory Cycle is a list of Outlets, or Locations within a Location-based outlet, in which inventory is counted. Typically, a Property has more than one Inventory Cycle. For example, some Properties have Inventory Cycles for Period End monthly, quarterly or annual counts of inventory and/or Interim weekly or bi-weekly counts of inventory.
To Create a New Inventory Cycle:
- Go to Property > Setup > Accounting > Inventory Cycle Setup
- Select New as per Fig.1
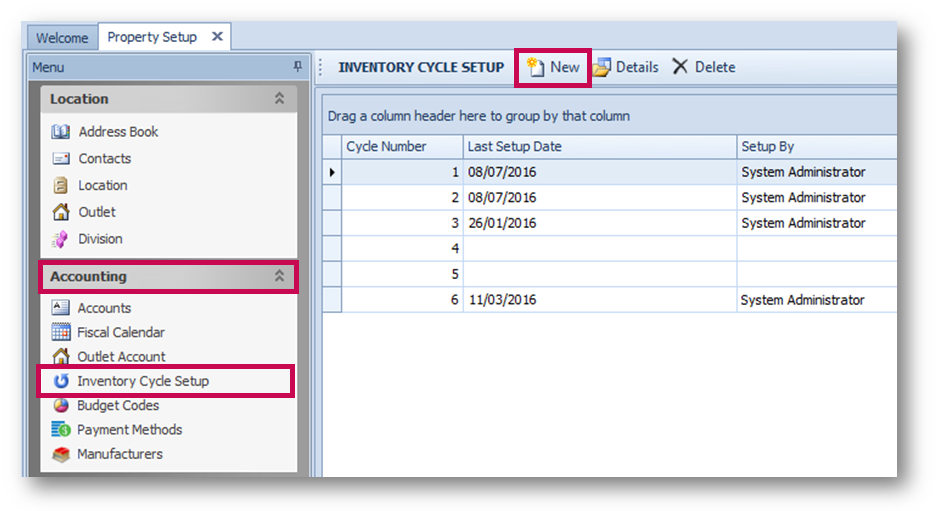
Fig.1 - Creating a New Inventory Cycle
- Type the Cycle Name and select the Cycle Type, as per Fig.2. The Cycle Type can be used for either Month End inventory or for Interim inventory, but not both
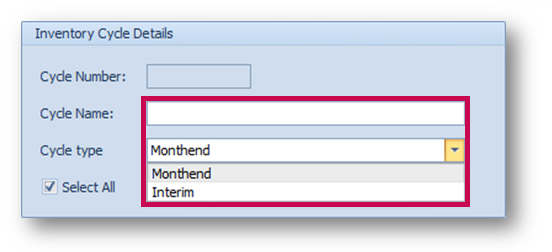
Fig.2 - Inventory Cycle Details
- In the Outlet Details section of the screen, select the Outlet or Locations check box to configure the Inventory Cycle as per Fig.3
-
In the Outlet Details section, select or clear the "Include" column to choose how the outlet will be used in inventory
- If the Outlet is not selected (not check marked), it means when the inventory is started, the current on-hand is placed into the Physical Inventory Count screen, thus effectively rolling over that Outlet - Please note: this will only happen if the Outlet is set to 'Perpetual'. If not, the number that is rolled over is pulled from the original inventory
- If the Outlet is selected (check marked), it means when the inventory is started, all counts will be set to zero in the Physical Inventory Count screen
- If the Outlet is showing a blue "square", it means the Locations within that Outlet have some Locations that are both selected and not selected
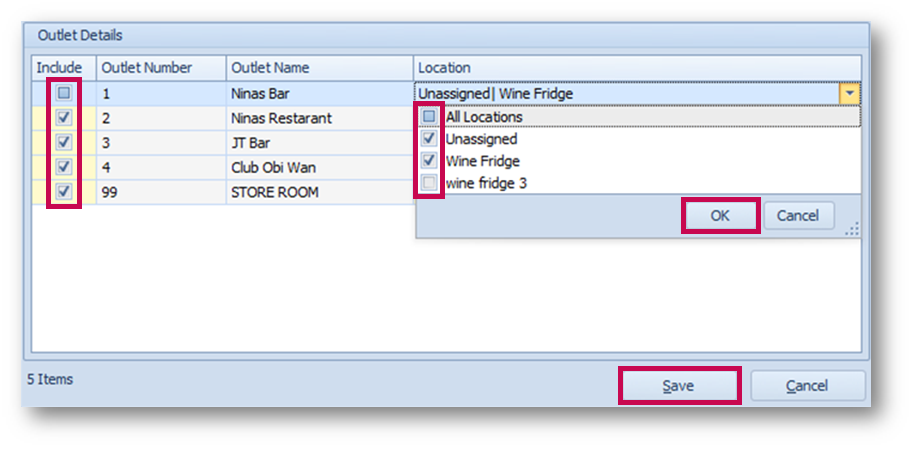
Fig.3 - Including/Excluding Outlet/Locations
- For Outlets that have Locations, under the Location list, select or clear Locations as needed with the same inventory rules as mentioned above for Outlets, as per Fig.3
Note: If an Outlet is configured as a Category Outlet, it will not have a drop-down list available and will show as "No Locations Exist".
- Once all Outlets and Locations are configured as needed, select Save
To Edit an Existing Inventory Cycle:
- Go to Property > Setup > Accounting > Inventory Cycle Setup
- Double-Click the Cycle that needs to be edited or select the Cycle and select Details
- As per the steps for Fig.2 and Fig.3, change the Cycle Name and/or the Include/Exclude check-boxes as needed
- Select Save once all edits are completed.
Comments
Please sign in to leave a comment.