Overview
When this functionality is enabled, every new vendor created in the system needs to go through the Vendor Approval process before they can be used.
The approval process is done at Central Purchasing level, or at property level for standalone Properties.
No special security is required for this process and no budget is required for vendor approval.
A setting does need to be enabled:

Fig.1 - The Enable Vendor Approval Process tick box
Routing Vendors Awaiting Approval
A vendor approval route first needs to be set up (if not already).

Fig.2 - Selecting a new Vendor Route

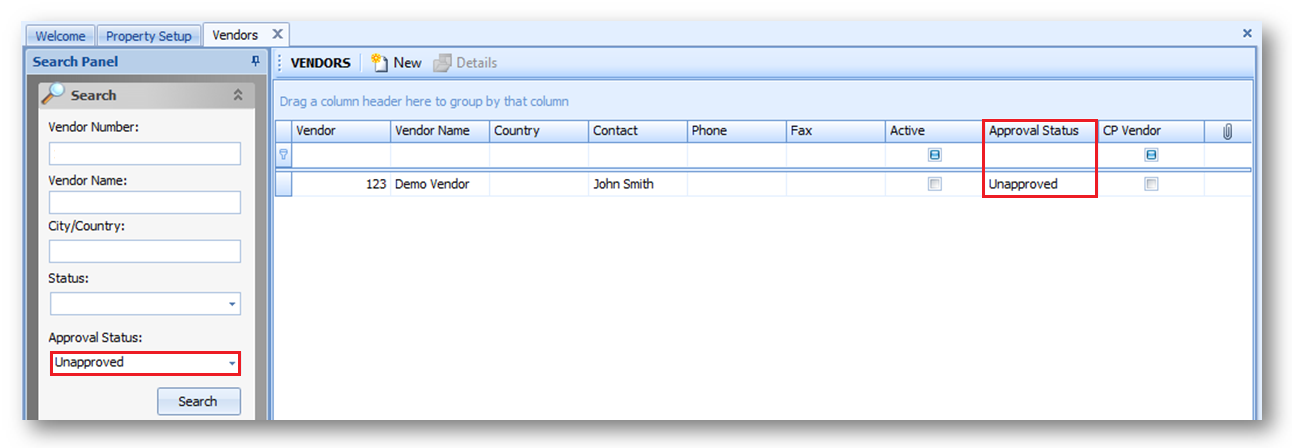
Fig.3 - Searching for unapproved vendors

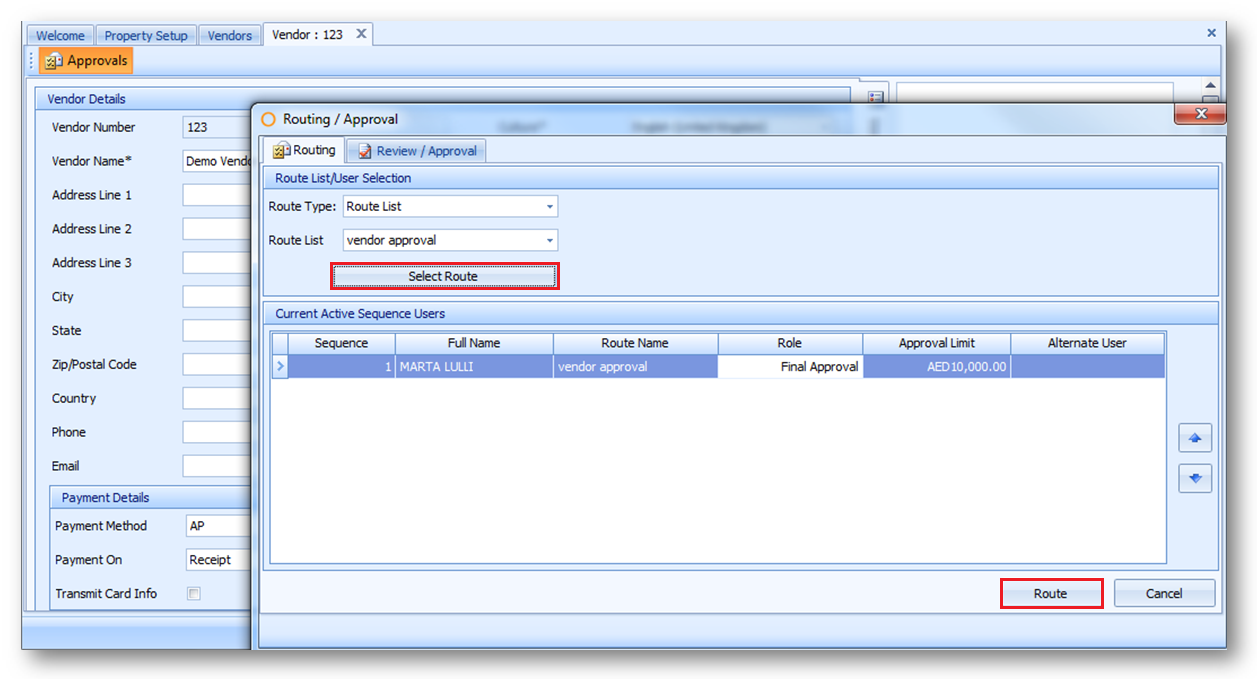
Fig.4 - Routing a vendor for approval
Once a vendor is submitted for approval, its status will change from "Unapproved" to "Approval Pending". When in this status, vendor details cannot be modified, only viewed.
Notifications
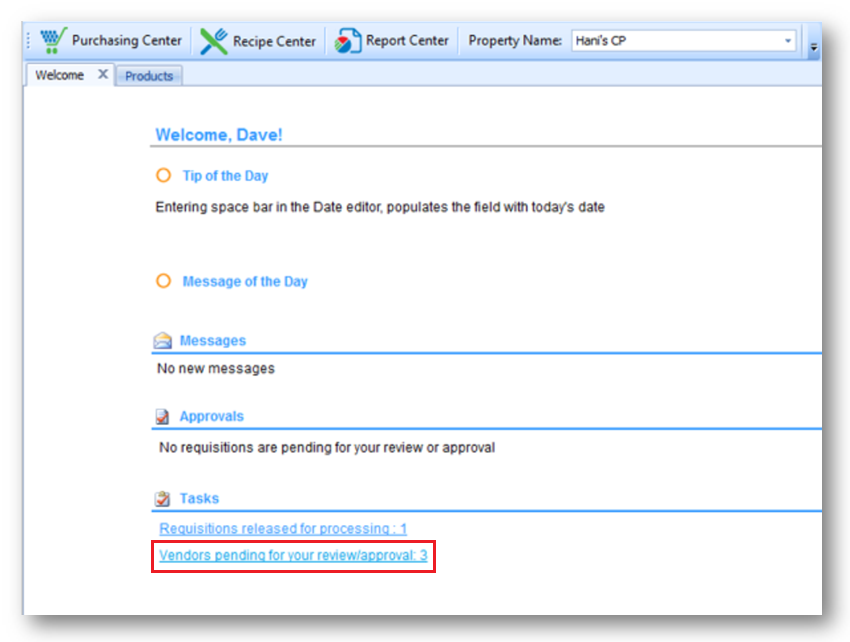
The approver will receive notification by email and/or a message on their home page (see Fig.5).

Fig.5 - Vendor approval message on home page
If an email notification is sent out, it will read as follows:
"You have a new Vendor for approval:
Vendor Number : 123
Vendor Name: Demo Vendor"
Approving Vendors

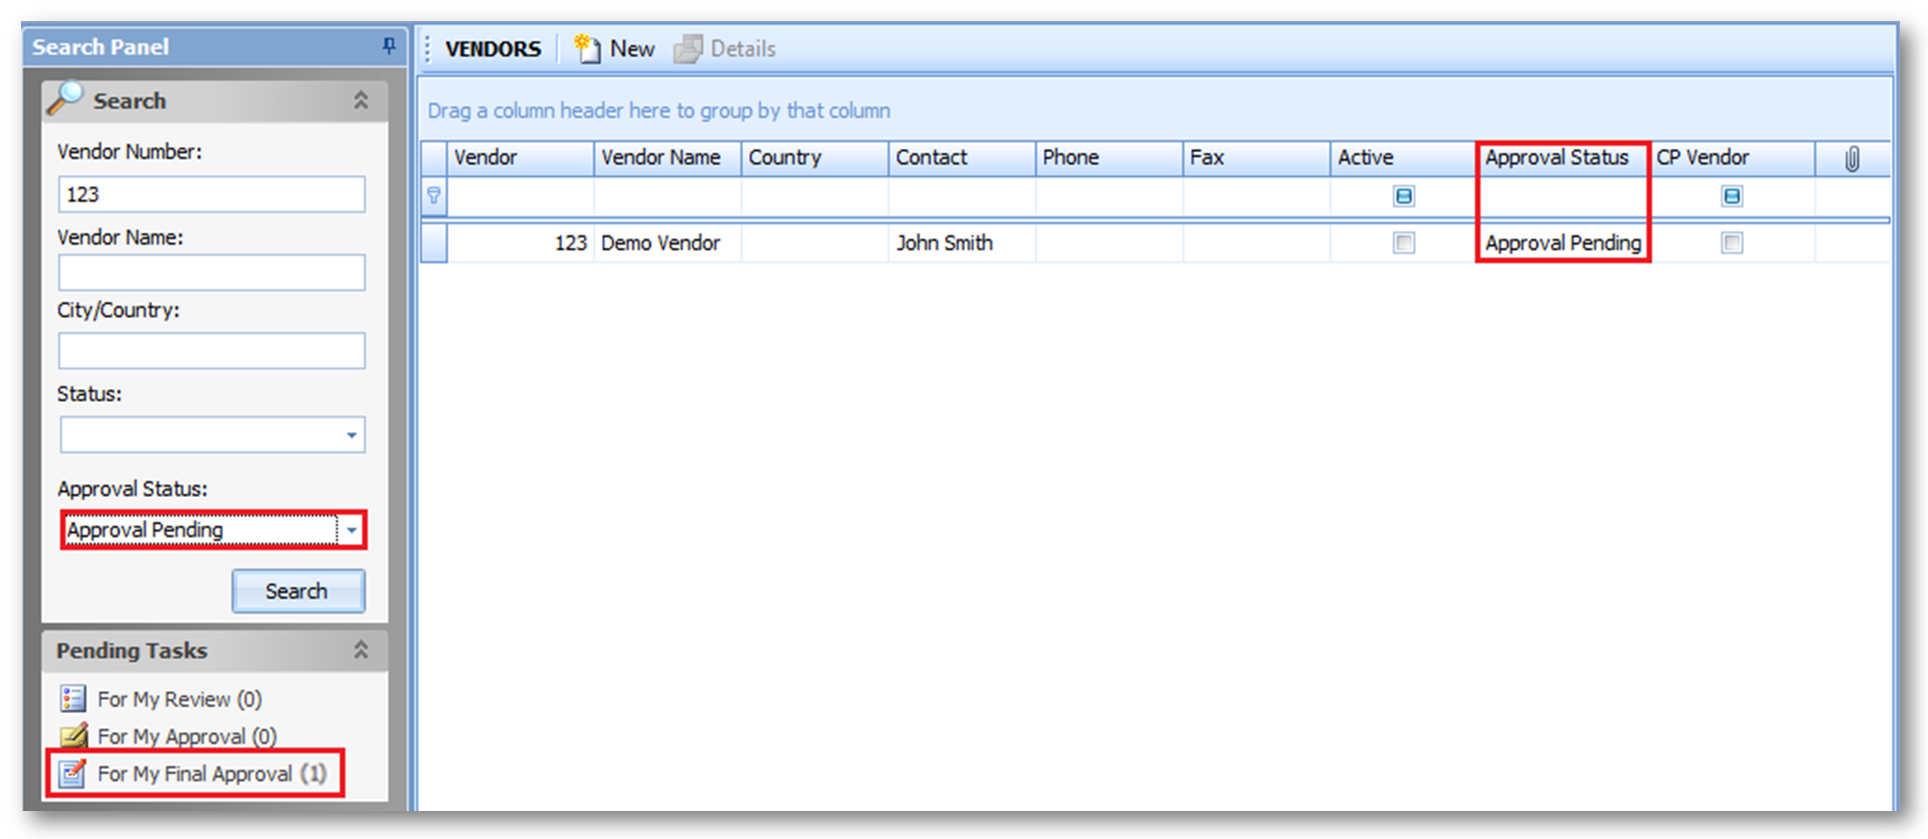
Fig.6 - Filtering for Approval Pending vendors and the 'For My Final Approval' Pending Task
Once the vendor is approved, its status will change from "Approval Pending" to “Approved” and the corresponding vendor status to "Active" at property level. The vendor can also be used in all transactions after Approval process and be pushed to other properties.
If the approver decides to Reject the vendor routing, its status will change from "Approval Pending" to "Unapproved" and "Inactive". Any modification made to a rejected vendor will need to go through the approval process.
Additional Notes
If a user attempts to un-tick the Enable Vendor Approval Process setting whilst there are vendors with "Unapproved" or "Approval Pending" statuses, then system will prevent them from doing so. Users can delete those vendors or go and approve them in order to turn off the Approval Process setting.
Vendors created via the Vendor Import and/or Import feature at Central Purchasing level will not go through approval process even if Enable Vendor Approval is turned on.
Any vendors created at property level will bypass this approval process.
When this functionality is enabled, every new vendor created in the system needs to go through the Vendor Approval process before they can be used.
The approval process is done at Central Purchasing level, or at property level for standalone Properties.
No special security is required for this process and no budget is required for vendor approval.
A setting does need to be enabled:
- Go to Property > Administration > Customization
- Tick the Enable Vendor Approval Process box (see Fig.1)

Fig.1 - The Enable Vendor Approval Process tick box
Routing Vendors Awaiting Approval
A vendor approval route first needs to be set up (if not already).
- Go to Property > Setup > Routing > Route Builder
- Select New > Vendor Route

Fig.2 - Selecting a new Vendor Route
- Select and Add a member of personnel and type a Route Name
- Save
- Log in and go to Property > Vendors
- Select Unapproved from the Approval Status drop-down on the left side of the page
- The Status drop-down can be left blank or set to Inactive

Fig.3 - Searching for unapproved vendors
- Double-click on a vendor to view its details
- Select the Approvals button to open the Routing/Approval window
- Route the vendor to the appropriate approval list, as per Fig.4

Fig.4 - Routing a vendor for approval
Once a vendor is submitted for approval, its status will change from "Unapproved" to "Approval Pending". When in this status, vendor details cannot be modified, only viewed.
Notifications
The approver will receive notification by email and/or a message on their home page (see Fig.5).

Fig.5 - Vendor approval message on home page
If an email notification is sent out, it will read as follows:
"You have a new Vendor for approval:
Vendor Number : 123
Vendor Name: Demo Vendor"
Approving Vendors
- Go to Property > Vendors
- Select Approval Pending from the Approval Status drop-down on the left side of the page
- The Status drop-down can be left blank or set to Inactive

Fig.6 - Filtering for Approval Pending vendors and the 'For My Final Approval' Pending Task
- Double-click on a vendor to view its details
- Select the Approvals button to open the Routing/Approval window
- Select the Review / Approval tab
- Highlight the vendor in question and select Final Approved
Once the vendor is approved, its status will change from "Approval Pending" to “Approved” and the corresponding vendor status to "Active" at property level. The vendor can also be used in all transactions after Approval process and be pushed to other properties.
If the approver decides to Reject the vendor routing, its status will change from "Approval Pending" to "Unapproved" and "Inactive". Any modification made to a rejected vendor will need to go through the approval process.
Additional Notes
If a user attempts to un-tick the Enable Vendor Approval Process setting whilst there are vendors with "Unapproved" or "Approval Pending" statuses, then system will prevent them from doing so. Users can delete those vendors or go and approve them in order to turn off the Approval Process setting.
Vendors created via the Vendor Import and/or Import feature at Central Purchasing level will not go through approval process even if Enable Vendor Approval is turned on.
Any vendors created at property level will bypass this approval process.

Comments
Please sign in to leave a comment.