
Entering a Receiving at the Receiving Center
- Go to Receiving > Receiving Center
- Highlight a Purchase Order and then select Details
Use this screen to review, edit, and receive the purchase order. During the receiving operation, the quantities and prices of the received products are recorded and posted. If the vendor supplies a separate invoice for each receiving, post each receiving separately using the multiple receiving option.
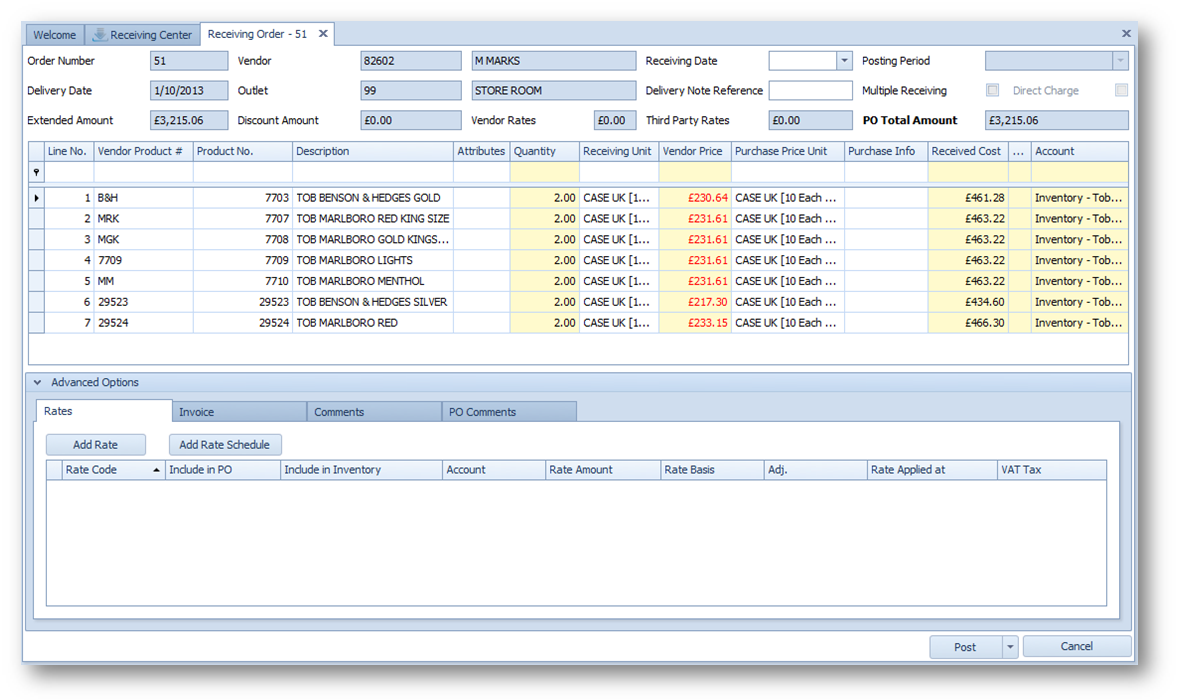
Fig.1 - Receiving Details
| Field Name | Description |
| Order Number | Displays the number of the purchase order. |
| Delivery Date | Displays the delivery date, specified on the Purchase Order Details screen during the purchase order creation. |
| Extended Amount | Displays the purchase order total amount, excluding rates. |
| Vendor | Displays the vendor number and name for the purchase order. |
| Outlet | Displays the outlet, for which the purchase order was created. |
| Discount Amount | If a discount is applied to the purchase order, the discount amount will be displayed in this field. |
| Vendor Rates | Based on the combination of the 2 Rate flags: Include on Vendor PO and Include Inventory:
|
| Receiving Date | Displays the date when the purchase order is open. Usually today's date. |
| Direct Charge | If this option is selected, the outlet will be charged directly. Otherwise, the products will be charged and shipped to the storeroom outlet. Note: For the storeroom outlet, this field is disabled because the storeroom outlet is always direct charge. |
| Third Party Rates |
Displays the amount of third-party rates. Include on Rate flags: Vendor PO (Unchecked) & Include Inventory (Unchecked) - this is called Third Party Rates:
|
| Posting Period | Displays the posting period. Generally, this field is read-only. However, if there are two open periods at the same time, you can choose if you want to post the purchase order to the inventory period or to the current period. |
| Multiple Receiving | Indicates whether this purchase order can be received in parts. A multiple receiving is a receiving that occurs in parts. A multiple receiving allows a purchase order to remain open if only some of products on the purchase order have been received. For example, a purchase order is for 100 wine glasses. On Friday, 50 wine glasses are received. The next Wednesday, the remaining 50 wine glasses are received. |
| PO Total Amount | Displays the purchase order total amount, including rates. |
| V | With this check box selected, only "checked" items are shown. If this check box is cleared, "all" or "unchecked" items are shown. |
| Line No. | Displays the number of the product in the purchase order list of products. |
| Vendor Product # | Optional. Displays the vendor product number assigned to the corresponding product. |
| Product No | Displays the Adaco product number. |
| Description | Displays the product description, entered at the Product Details screen. |
| Attributes | Attributes are additional characteristics defined for retail products at the Product Details screen (Retail tab). For example, if the product is a T-shirt, you can create the first attribute "size" with the values S, M, L, and XL, as well as the second attribute "colour" with the values "white", "green", "grey", "pink". |
| Quantity | Displays the product quantity to be received. |
| Receiving Unit | Same as Pack Unit assigned to the product at the Product Details screen. |
| Vendor Price | Displays the vendor price for the product in the vendor currency. |
| Purchase Price Unit | This field is populated automatically based on the product's purchase unit. |
| Purchase Info | This column displays the purchase information specified on the Product Details screen. |
| Received Cost | Displays the cost for the corresponding line item (for example, product) without rates. |
| Rate Schedule | Displays the name of the rate schedule applied to the corresponding product. If necessary, you can select another rate schedule from the drop-down list. |
| Sponsorship |
In this field, enter the sponsorship amount (full or partial quantity of the product). This field is available when the "Allow Sponsorship" check box is selected at Property > Administration > Property Preferences > Receiving. |
| Sponsorship Account | In this field, select the sponsorship account. This field is available when the "Allow Sponsorship" check box is selected at Property > Administration > Property Preferences > Receiving. |
| Account | Displays the account assigned to the corresponding product. You can change this value if needed. |
Comments
Please sign in to leave a comment.