The purpose of this article is to demonstrate how to create a Rate and Rate Schedule in Adaco. Both Rates and Rate Schedules are created in relatively the same area of the Adaco software and are used to apply various taxes, shipping, and other additional costs to products as receiving.
Depending on settings, Rates can either be managed by individual properties or centrally at CP.
To Create a New Rate
- Go to Property > Setup > Rates > Rates
- Click New as per Fig.1

Fig.1 - Creating a New Rate
Note: All fields with an asterisk (*) are required fields, as per Fig.2.
- Select whether the rate will be a Percentage or a Flat Rate
- Choose whether the rate will be Include on Vendor PO and/or Include Inventory
Please Note: If Include Inventory is not checked, an Account will need to be entered in the Account drop-down.
- If the rate is a VAT tax, select the VAT Tax check box and enter the VAT Code
- Select Save

Fig.2 - Entering Rate Information
Please Note: There are four behaviour possibilities based on the combination of the flags Include on Vendor PO and Include Inventory, the details of which are listed below.
- Include on Vendor PO (checked) and Include Inventory (checked)
- The rate amount will be included in the Receiving Total, and part of the amount to be paid to the Supplier
- The rate amount will be used to calculate the Inventory Price of the items of the receiving
- Include on Vendor PO (checked) and Include Inventory (unchecked)
- The rate amount will be included in the Receiving Total, and part of the amount to be paid to the Supplier
- The rate amount will not be used to calculate the Inventory Price of the items of the receiving
- Include on Vendor PO (unchecked) and Include Inventory (unchecked) – This is called Third Party Rates:
- The rate amount will be included in the Receiving Total, but will not be part of the amount to be paid to the Supplier. It will rather be paid to the 3rd party entity such as Customs/Duty, or in some scenarios paid to the deliver Supplier, not to the actual item Supplier
- The rate amount will not be used to calculate the Inventory Price of the items of the receiving
- Include on Vendor PO (unchecked) and Include Inventory (checked)
- The rate amount will not be part of Receiving or Invoice total
- The rate amount will be used to calculate the Inventory Price of the items of the receiving
To Create a Rate Schedule
- Go to Property > Setup > Rates > Rate Schedule.
- Select New as per Fig.3
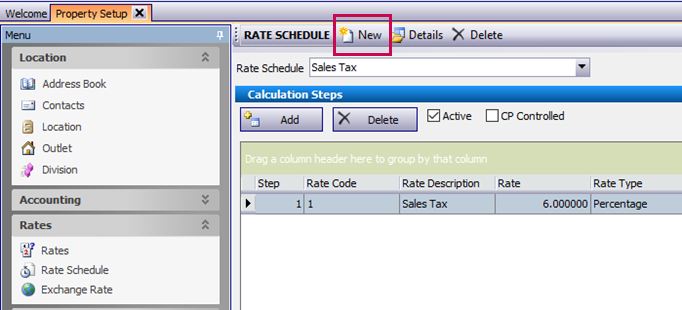
- Type the Rate Schedule name or number and the Rate Schedule Description in the corresponding fields, as per Fig.4
- Select Save
Note: All fields with an asterisk (*) are required fields, as per Fig.4.

Fig.4 - Entering Rate Schedule information
- Once created, make sure the correct Rate Schedule is selected in the drop-down as per Fig.5
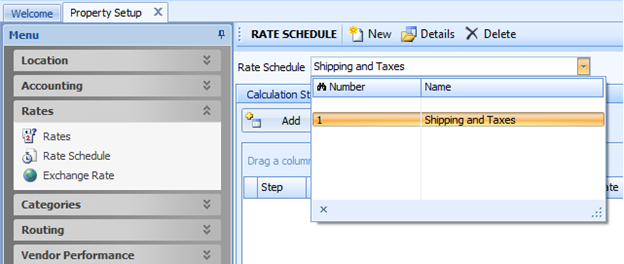
Fig.5 - Choosing a Rate Schedule
- Select Add to create a Calculation Step in the rate schedule, as per Fig.6
- Repeat this process for each Calculation Step that is needed in the Rate Schedule
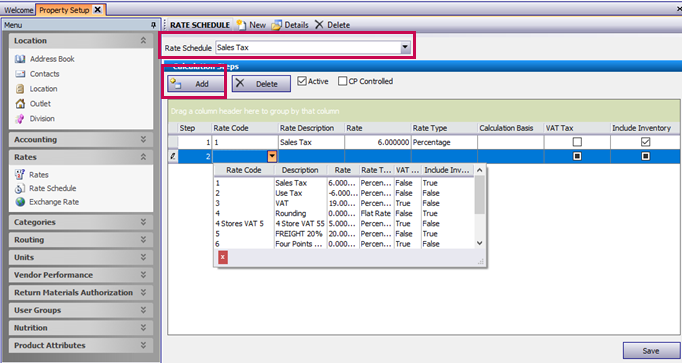
Fig.06 - Adding a Calculation Step in a Rate Schedule
- Select Save
Note: Only Rate Schedules can be assigned to Products in Property > Products or on Purchase Requisitions, Purchase Orders, or while entering Receivings or Receiving Corrections.
Managing Rates at CP
-
Go to CP > Property > Administration > Property Preferences > General > Allow Rates At CP. When ticked this option will:
- Enable a new section in Property > Set up called "Rates". From within this option Rates and Rate Schedules can be created in the CP in the same way they are in a Property
- In CP it will now be possible to assign a Rate Schedule to Products when created or edited at CP
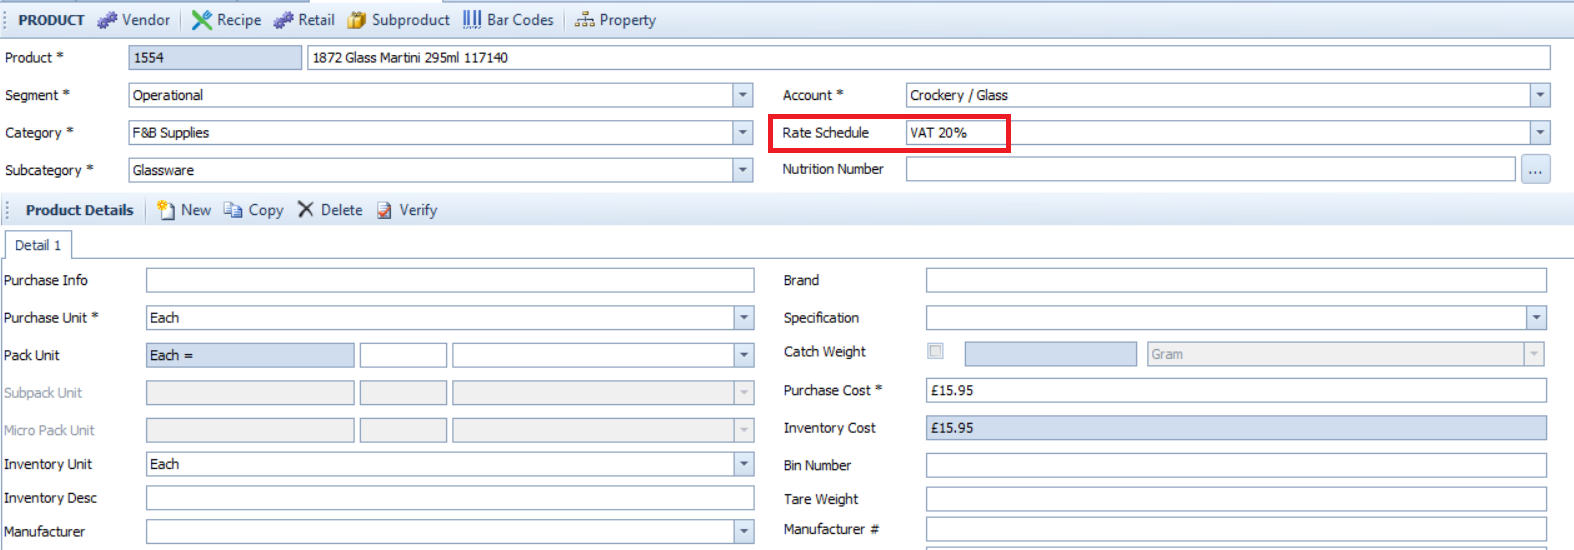
Fig.7 - Assigning Rates to Products at CP
Note: Rates and Rate Schedules created at CP must be created with unique codes not used in any of the associated properties (a warning will display if codes are not unique).
Sharing Rates and Rate Schedules with Properties
With Rates enabled at CP it is possible to:
- Push Rates and Rate Schedules from CP to selected properties (CP > Property > Data Synchronization)
- Pull Rates and Rate Schedules from CP to a Property (Property > Property > Data Synchronization)
- Select whether to synchronize Rate Schedules assigned to products at CP with the same products within a Property (Property > Administration > Property Preferences > Data Synchronization > Product)
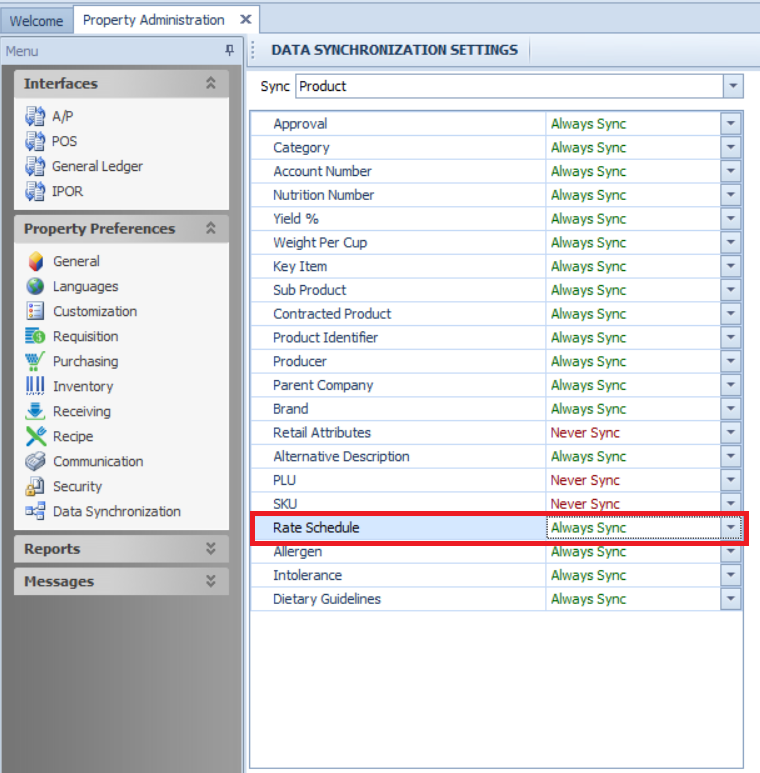
Note: When selecting the Always Synch option, all Rates and Rate Schedules within the property will be deactivated (existing transactions will not be effected) and the Rate Schedules assigned to Products will be replaced by those assigned to the same Products at CP.
Calculated Rate Schedules
Calculated rates schedules are typically used to manage multiple rates that affect each other when assigned to an invoice.
To set-up a Calculated Rate Schedule, follow the steps listed above to create a Rate Schedule.
The Calculation Basis lists the order the rates are added onto the invoice.
In the example below, the Handling & Shipping rate will be added first, then the VAT 20% will be added to both the product and the Handling & Shipping.

Fig.9 - Calculated Rate Schedule Set-up
The example below shows the Rate Schedule being applied in Receiving Centre. The Shipping & Handling fee is added making the Total Invoice £103.20. Then the VAT is added (including the Shipping & Handling) making the Total Invoice £113.52.

Fig.10 - Calculated Rate Schedule in Receiving Centre

Comments
Please sign in to leave a comment.