
Summary
Select the release feature from the table below to be taken directly to that section of the release note.
| Feature 1 | Feature 2 |
|
New functionality for creating approval workflows for vacancy requests. |
Vacancy List User Interface Changes Improvements to the Vacancy List user interface. |
Release date: September 28th 2022
Vacancy Approval Workflow
- Enabled by Default? - Yes
- Set up by customer Admin? - No
- Enable via Support ticket? - No
- Affects configuration or data? - Yes
What's Changing?
New functionality for creating approval workflows, meaning that new vacancies can be approved before they are published.
Reason for the Change
Currently, vacancies are created and published to the candidate portal or job boards immediately upon creation. Adding the ability to approve vacancies before they are published allows for Head Office to have greater control of all vacancies.
Customers Affected
All ATS customers.
Release Notes/Steps
The approval feature will be enabled by default. ![]() Once all workflows have been configured (see guidance below), please liaise with your Fourth contact to request for the setup to be completed.
Once all workflows have been configured (see guidance below), please liaise with your Fourth contact to request for the setup to be completed.
![]() A new permission has been applied to the 'Head Office' permission group, giving all users in it the ability to create approval workflows.
A new permission has been applied to the 'Head Office' permission group, giving all users in it the ability to create approval workflows.
Approval Workflows
Approval workflows are used so that new vacancies must be approved by specific users or permission groups before they are published to the candidate portal, job boards or talent attraction/recruitment marketing partners.
An approval workflow can consist of multiple 'steps', where specific users approve and progress (or reject) the creation of a vacancy.
Creating a New Approval Workflow
- Log in to the ATS and go to Set Up > Approval Workflow Builder
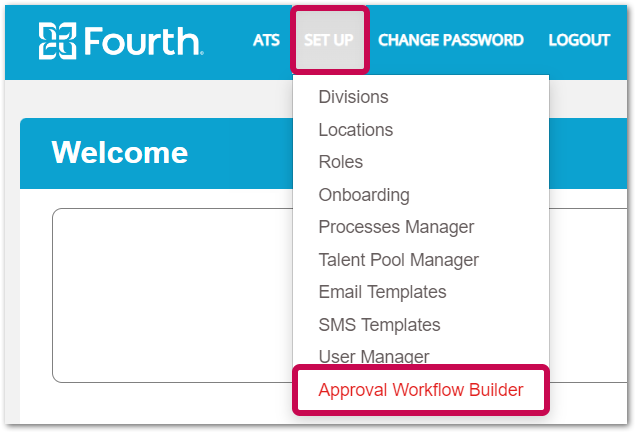
Fig.1 -Set Up > Approval Workflow Builder
Any existing approval workflows will be listed onscreen.
- Select + Create New

Fig.2 - '+ Create New' button
- Enter a Workflow Name to help make it easily identifiable, and a Workflow Description
Linking Roles
- Then select Link Roles
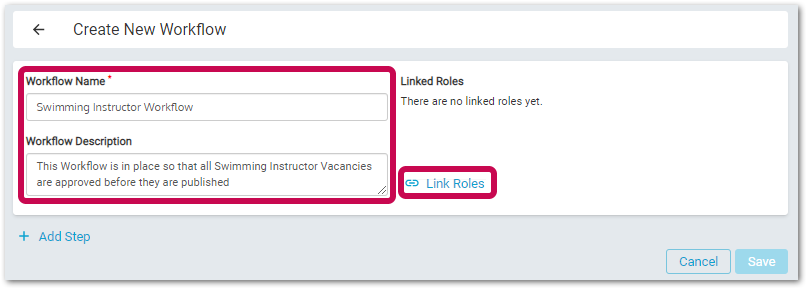
Fig.3 - Creating a new workflow - Link Roles
![]() When a role is linked to an approval workflow and a new vacancy is created for that role, the approval workflow is then activated.
When a role is linked to an approval workflow and a new vacancy is created for that role, the approval workflow is then activated.
The following actions are available:
- Select All - assigns all roles to the workflow
- Search - begin typing the role name for it to be filtered
- Division - see roles associated only with a specific division
- Assigned to workflow?
- Assigned - displays all roles currently assigned to a workflow
- Not Assigned - displays all roles not currently assigned to a workflow
When selections are made, the Link Roles button will become available, displaying the number of selected roles.
- To save the configuration, select Link Roles, or Cancel if necessary

Fig.4 - Link Roles side panel
A message will display confirming the roles have been linked successfully. The side panel will remain open.
- Close the side panel using the cross in the top right corner
The newly linked role(s) will then display on the workflow creation page.
![]() Roles can also be linked via the Roles page - guidance can be found further on in this release note here.
Roles can also be linked via the Roles page - guidance can be found further on in this release note here.

Fig.5 - Newly linked role on the workflow creation page
Adding Approval Steps
- To add an approval step, select + Add Step
As when linking roles, a new panel will appear on the right-hand side.
- Enter the Step Name
- Select the Permission Group(s) or Users that need to approve the vacancy
- At least 1 permission group or 2 users can be selected as approvers of each step
- Use the toggle (shown in Fig.6) to switch between Permission Groups or Users
- Use the Search box to find specific permission groups or users to select
- Select Apply to confirm the selections
- To add further steps, simply select +Add Step again and repeat the process
![]() There is no limit to the number of steps that can be added to an approval workflow.
There is no limit to the number of steps that can be added to an approval workflow.
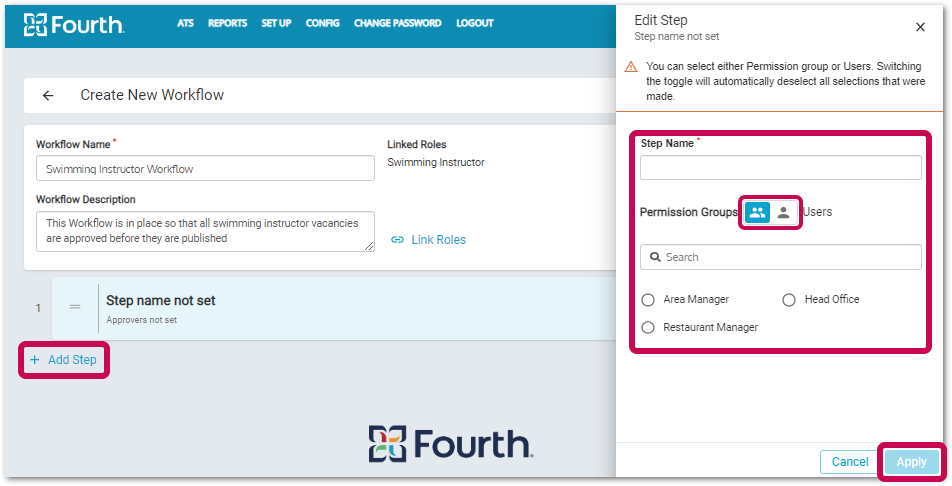
Fig.6 - Adding a step
- Once each step has been created, close the side panel using the cross in the top right corner
The 'Create New Workflow' page will display the new steps in the order they were created.
- To delete a step, select the dustbin icon next to it
- To rearrange the step order, drag and drop, as shown in Fig.7
- To keep changes select Save
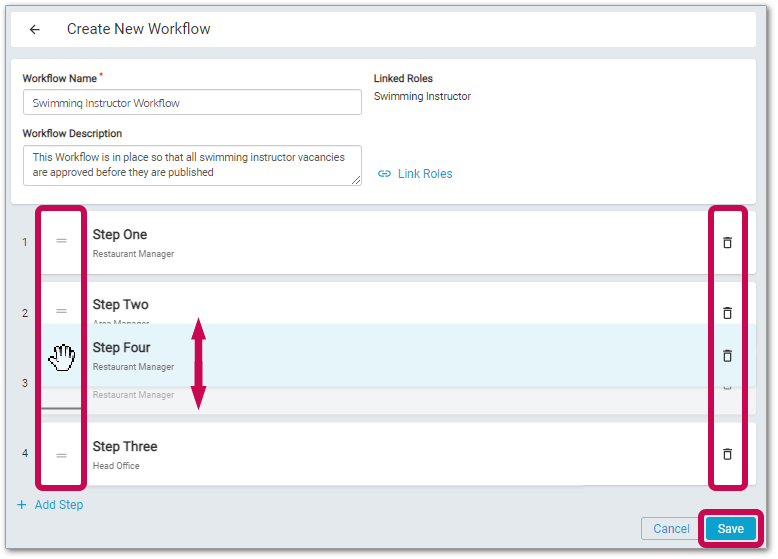
Fig.7 - Deleting, reordering steps
Once saved, the approval workflow will be visible as a new workflow card.
Modifying Existing Approval Workflows
Several actions can be completed from the workflow card.
- To view a preview of the approval steps, select Preview
- To link additional roles or update existing ones, select Link Roles
- To make an edit to the approval workflow (rename, change order of steps, change linked roles, etc), either select the workflow card itself or go to Preview > Edit (see Fig.9)

Fig.8 - Approval Workflow card - Preview and Link Roles options
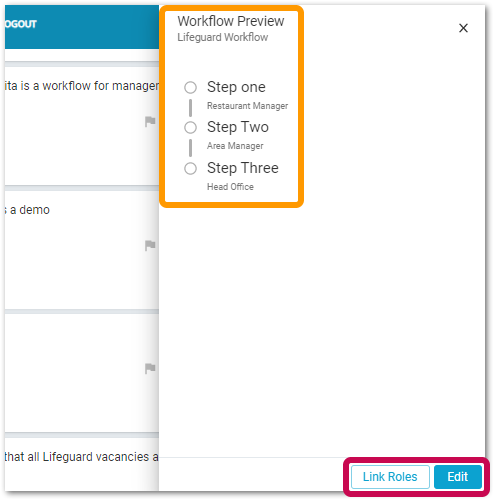
Fig.9 - Workflow Preview
 Any changes made to a workflow will come into effect for any new vacancies created for it. The changes will not affect the workflow of any existing vacancies.
- To duplicate an approval workflow, use the 'Kebab' Menu Icon from the top right of the workflow card and select Duplicate

Fig.10 - 'Kebab' menu icon > Duplicate
A new workflow card will be created underneath the original one, with the word 'Copy' added at the end.
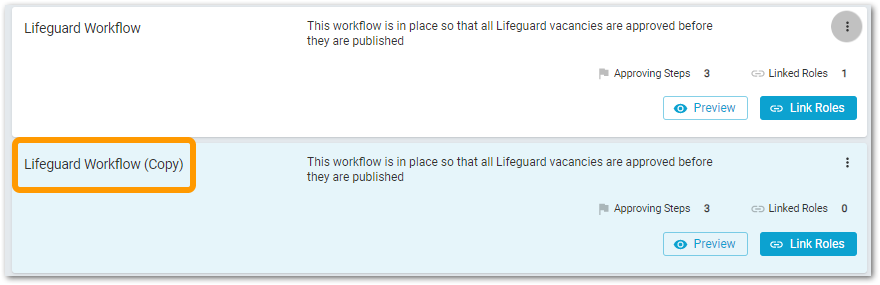 Fig.11 - A duplicated workflow
When an approval workflow is copied, only the title, description and steps will be duplicated. No roles will be linked to the new workflow.
- To delete a workflow, again use the Kebab Menu Icon and select Delete
- Confirm the deletion of the workflow

Fig.12 - Delete workflow
The card and workflow will then be deleted.
![]() Any existing open vacancies assigned to the deleted workflow will still have the original workflow steps assigned to them. These steps will need to be followed if the vacancies are to be published.
Any existing open vacancies assigned to the deleted workflow will still have the original workflow steps assigned to them. These steps will need to be followed if the vacancies are to be published.
Roles
- To view a role, go to Set Up > Roles > select role
Within the Role page, a new drop-down list has been added which displays the approval workflow assigned to the particular role.
- If a role has not been assigned to an approval workflow, it can be done so by selecting it from the Approval Workflow drop-down list
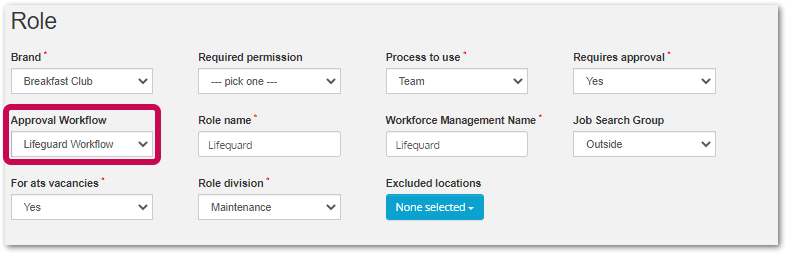
Fig.13 - Selecting Approval Workflow for a role
Once the workflows have been created, the Common Feature can be enabled to switch on the approval function.
![]() Contact your Fourth representative to arrange for the Common Feature to be enabled.
Contact your Fourth representative to arrange for the Common Feature to be enabled.
Creating a Vacancy
- To create a new vacancy, go to ATS > Vacancies > + Create New
- Complete the required details
- Select Request Approval
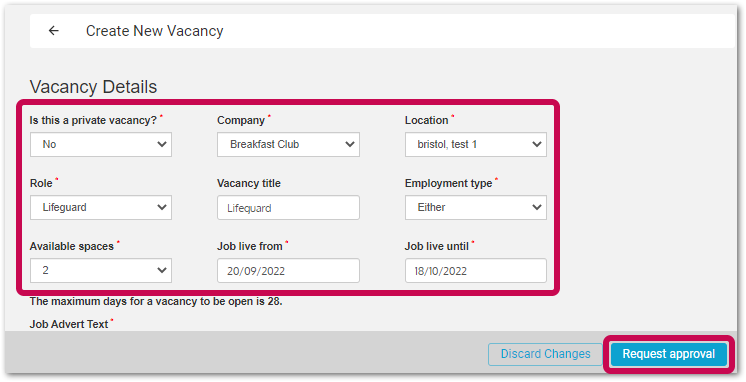
Fig.14 - Creating a vacancy
A new side panel will appear for any notes to be entered to help the approver to understand the requirements of the vacancy request.
- Enter the notes in the Requisition Note box
- Select Submit
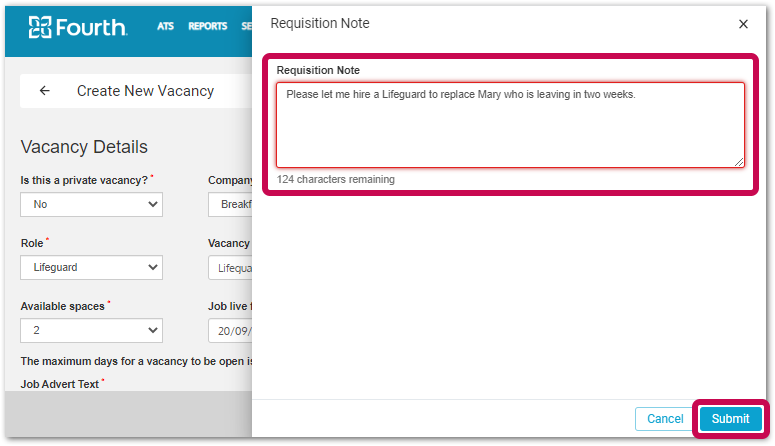
Fig.15 - Requisition Note
The vacancy will not be published until it has been approved by the allocated approver.
Viewing Vacancies
There have been changes made to the vacancy homepage which allows users to view open and closed vacancies, as well as those that have been requested but are not yet approved.
- To view the vacancy list page, go to ATS > Vacancies
The page is split into two sections; Active and Pending vacancies.
Both the Active and Pending view headers contain a small icon displaying numbers.
These numbers represent:
- In Active view - the number of active vacancies (114 in the example shown in Fig.16)
- In Pending view - the number of vacancies that are 'awaiting approval'
- Use the search criteria at the top of the list to find specific vacancies
- More search options (Role, Division, Status, etc) can be used by selecting Advanced Filter
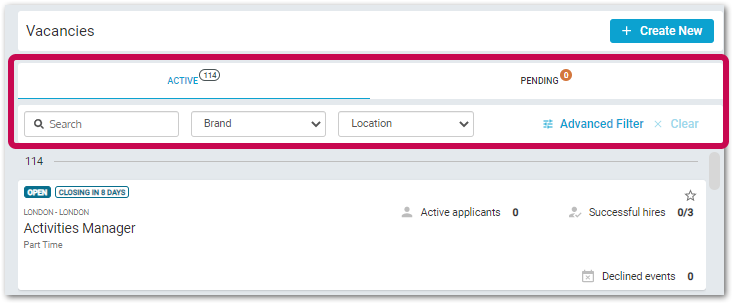
Fig.16 - Active/Pending vacancies
Active List
Under the Active Vacancy list, the following vacancies will be listed:
- Currently active
- Are due to become active
- Are closed but have active applications assigned
Each 'active' vacancy card will contain the following information:
- The vacancy status
- The number of days remaining on the vacancy
- The location of the vacancy
- The vacancy role
- The type of vacancy
- Number of active applicants
- Number of successful hires
- Number of declined events
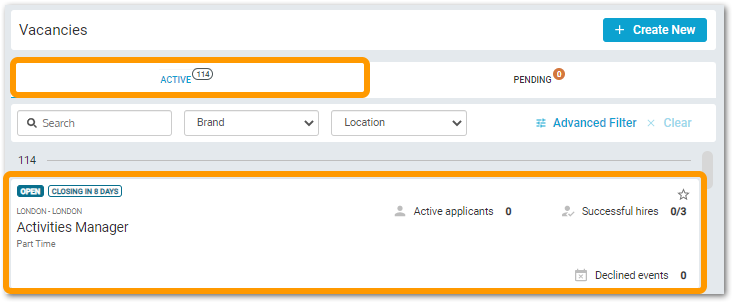
Fig.17 - Active Vacancy List and example vacancy card
Pending List
The pending list will display different vacancy statuses depending on whether the user is a vacancy requester or a vacancy approver.
For vacancy requesters:
- Pending - vacancies that have been requested, but are not yet approved
- Rejected - vacancy requests that have been rejected
The vacancy cards will contain the following information:
- The vacancy status:
- Pending
- Rejected
- The location of the vacancy
- The vacancy role
- The type of vacancy
- Requisition/rejection note
- Current Approving Step progress
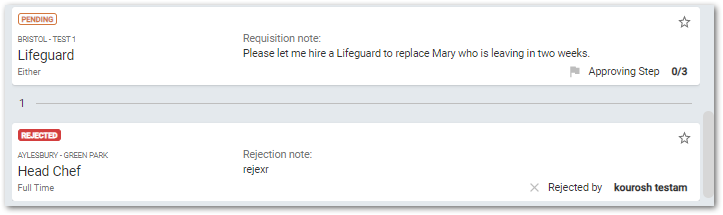
Fig.18 - Pending Vacancy List (requester view) - 1 pending, 1 rejected
- To view the progress of a pending vacancy through the approval process, select its vacancy card
A side panel will display information (as shown in Fig.19).
- To see more information about the vacancy, select View Details
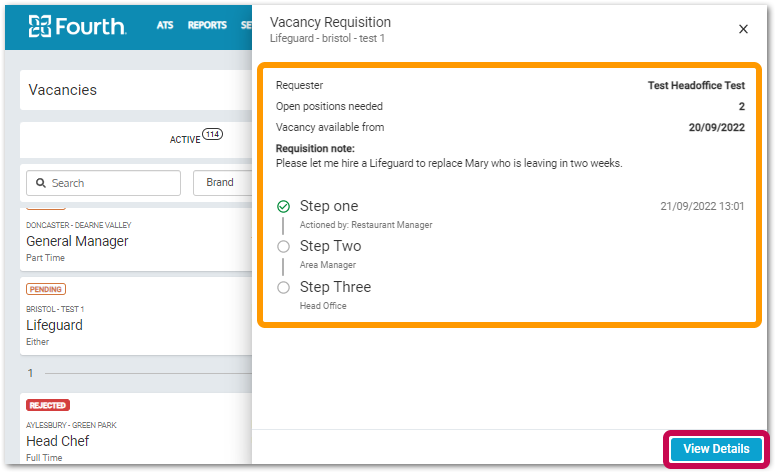
Fig.19 - Vacancy requisition approval step progress (requester view)
Details as shown below in Fig.20 will then be displayed.

Fig.20 - Vacancy Details (requester view)
- To view the details of a rejected vacancy, select its vacancy card
The red cross icon (see Fig.21) shows at which stage of the approval process the vacancy was rejected.
- As with pending vacancies, View Details can be used to see more information about the vacancy
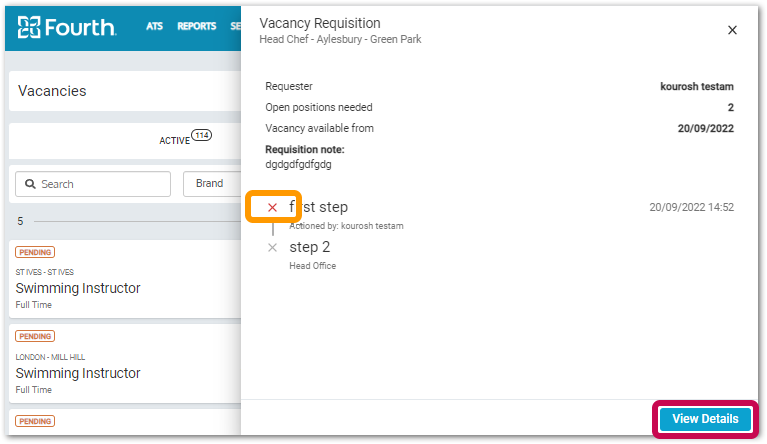
Fig.21 - Rejected vacancy approval step progress (requester view)
For vacancy approvers
Vacancy approvers will see an additional status of Awaiting Approval, which will be displayed for any vacancies that are awaiting their approval.
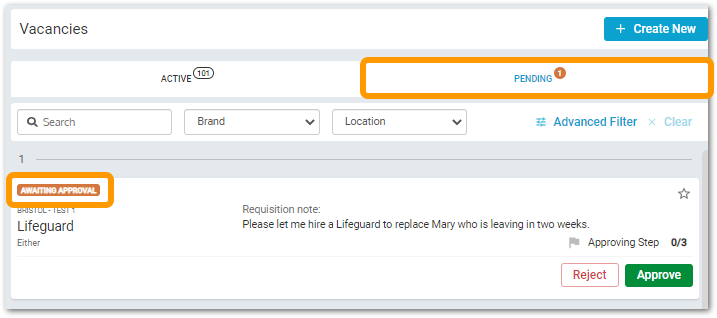
Fig.22 - A pending vacancy, awaiting approval
The Awaiting Approval status is assigned to a card once the approval process has reached the step assigned to the approver.
- To view the approval process, select the vacancy card
A side panel will open.
- Then select View Details
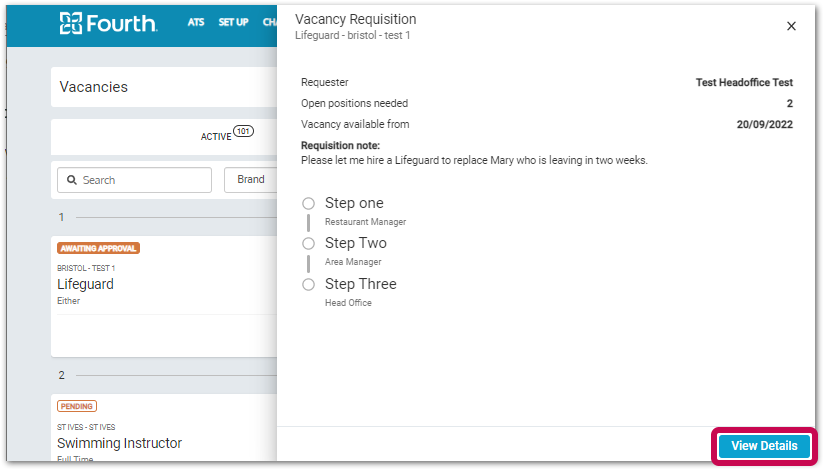
Fig.23 - Vacancy Approval Process side panel (approver view)
From the Vacancy Details page, the approver can choose to:
- Approve the vacancy
- The vacancy will move along the approval process
- If the approver is the final approver in the process, the vacancy will be published and moved to the Active view on the Vacancy homepage
- Reject the vacancy
- The vacancy will not progress through the remaining approval steps
- The vacancy will appear as Rejected in the Pending view on the Vacancy homepage
- View approving process
- user will return to the Approval Process side panel
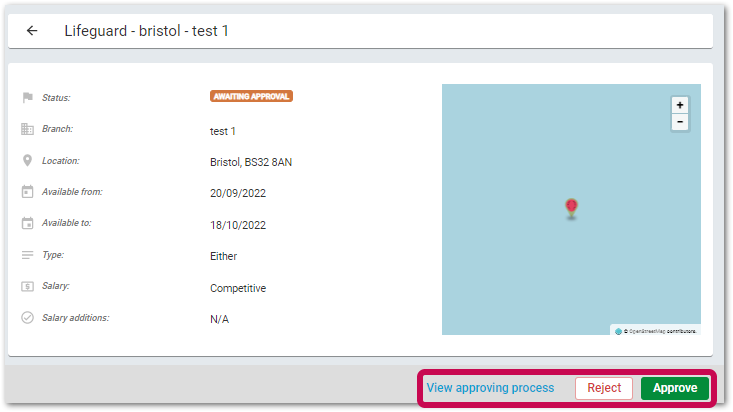
Fig.24 - Vacancy details (approver view)
- The approver can also Reject or Approve the vacancy straight from the vacancy card.

Fig.25 - Reject or Approve from a vacancy card
When rejecting a vacancy:
- Enter a Rejection Reason and then select Reject
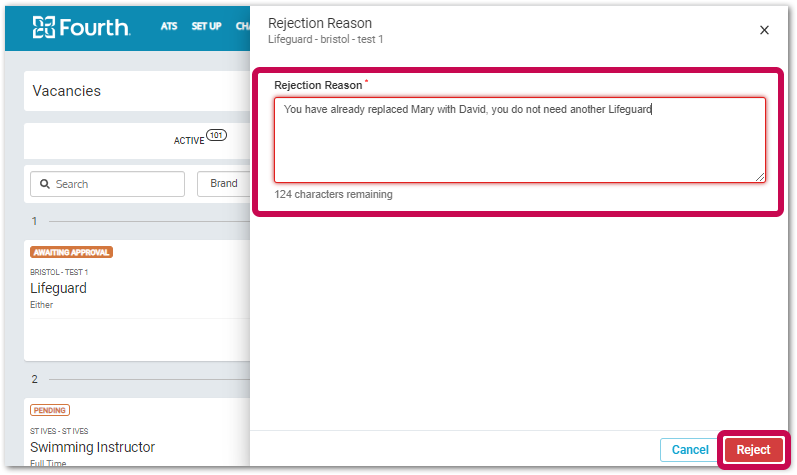
Fig.26 - Rejecting a vacancy
The vacancy will then remain in the Pending view within the Vacancy homepage with a status of Rejected. After 15 days, the vacancy will be archived.
When approving a vacancy:
- Enter an Approval Note and then select Approve
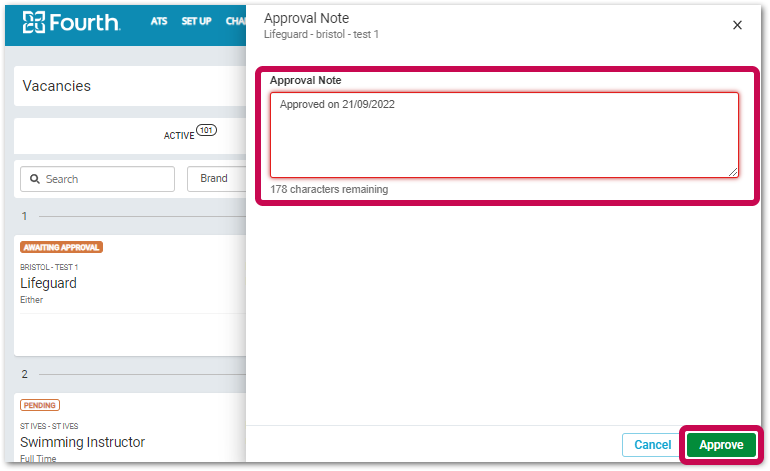
Fig.27 - Approving a vacancy
An approved vacancy confirmation message will appear.

Fig.27 - Vacancy requisition was successfully approved
If the approval is part of an approval request process, the vacancy will remain in the Pending view within the vacancy homepage with a status of Pending
If the approval is the last step in the process, the vacancy will move to the Active view within the vacancy homepage and will be published
Additional Notes
- Vacancies that have been created before the workflow has been enabled will not require approval to be published
- Vacancies assigned to a workflow which is subsequently deleted will still have to follow the original workflow approval steps that were assigned to the deleted workflow
- Vacancies that have closed can only have their dates amended to reopen. No changes can be made to the content of the vacancy
- If changes to the vacancy description, salary etc are required, a new vacancy will need to be created and approved before it can be published
- A role can only be assigned to one approval workflow
- Approval workflows do not need to be created for all roles
Vacancy List User Interface Changes
- Enabled by Default? - Yes
- Set up by customer Admin? - No
- Enable via Support ticket? - No
- Affects configuration or data? - Yes
What's Changing?
Redesign of the ATS user interface.
Reason for the Change
To give the product a more modern look and feel, and to improve the overall user experience.
Pages Affected
Vacancy List homepage.
![]() Please note: These changes form part of a wider project to update all pages within ATS. Further pages will be updated and released over the next 12 to 18 months
Please note: These changes form part of a wider project to update all pages within ATS. Further pages will be updated and released over the next 12 to 18 months
Release Notes/Steps
- To view the Vacancy homepage, go to ATS > Vacancies
The current Vacancy homepage displays all vacancies on a single view, see Fig.28.
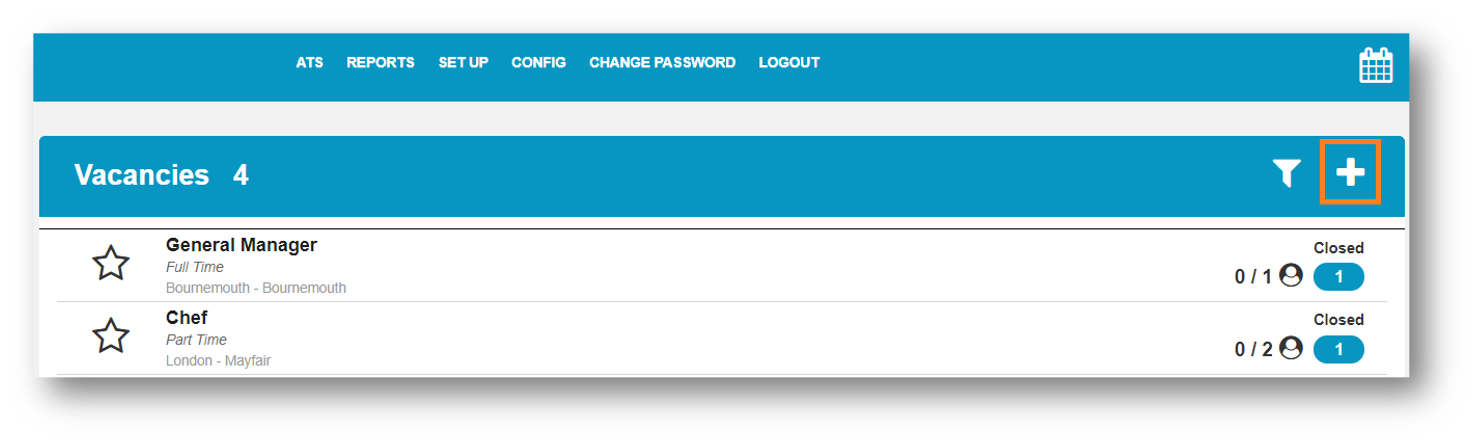
Fig.28 - Existing Vacancy homepage
The new Vacancy homepage is split into two views
- Active Vacancies
- Pending Vacancies
This change is to accommodate the addition of a new Vacancy Approval Process
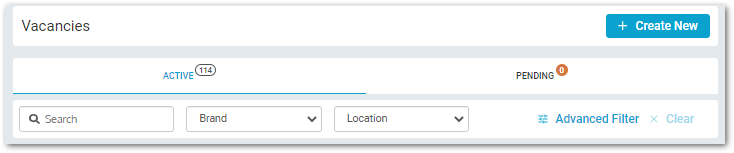
Fig.29 - New Vacancy homepage
The new vacancy homepage has been enhanced with the following:
- A new, clearer Create New button
- 2 views to see:
- Active Vacancies - all open vacancies and all closed vacancies with active applications
- Pending Vacancies - all vacancy requests pending approval or that have been rejected
- Better Search options
The individual vacancies are now shown as separate Vacancy Cards.
 Fig.30 - Vacancy card
Comments
Please sign in to leave a comment.