
Overview
When a new Location is created within Fourth's HR & Payroll product (formerly known as People System), it can then be configured for use within the Scheduling Module. This article provides guidance on the configuration options that are available.
The instructions given need to be carried out by a System Administrator who has the 'Permissions Updates' user-level. Please liaise with your Fourth contact to have this enabled.
For a list of all Revenue-Based Scheduling articles, please visit: WFM - Scheduling: Admin: Getting Started.
For guidance on creating/configuring Locations for use in other Fourth products, please seeWFM UK: Creating and Configuring a New Location - All Fourth Products
Process
After a new Location has been created (see WFM - Creating a Location for more information), the following steps can be taken:
- Log in to Scheduling and use the Location: drop-down
- Search for and select the required Location
Fig.1 - Using the Select Department... drop-down
- Go to the Settings tab
See the two menu options Locations and Departments options on the left-side menu.
Fig.2 - Settings tab with Location and Department options highlighted
![]() Please note: 'Divisions', as they are referred to in HR & Payroll, are known as 'Departments' in Scheduling.
Please note: 'Divisions', as they are referred to in HR & Payroll, are known as 'Departments' in Scheduling.
Location Settings
- Select Locations from the left-side menu
- Select Edit against the required Location
Fields displayed on the Edit Location page are:
- Name: Location name, taken directly from HR & Payroll
- Code: Accounting system code, taken directly from HR & Payroll
- Postcode: Postcode of the Location (used to populate weather forecasting), taken directly from HR & Payroll
- T&A ID: Time and Attendance ID from POS or T&A Clock. Enter the code as required. If Time and Attendance is not in use this field can be left blank
- Publish Shifts Enabled: If Publish Shifts are enabled for the organisation, please tick the box. This setting can be configured by each Location
- Open Shifts Enabled: If Open Shifts are enabled for the organisation, please tick the box. This setting can be configured by each Location
- Schedule departments as one: Tick this box to see just the one Location in the Select Department... drop-down in the top-right corner of all Advanced Schedules/Labour Productivity pages. Un-tick the box to make all Divisions available from the drop-down
- When all fields are complete, select Save
Please note: Referring to other existing Locations' configuration is a good way to ensure the settings being entered are correct and consistent.
Fig.3 - Edit Location screen
Updating Fields in HR & Payroll
If necessary, Location names, codes and postcodes can be updated in the HR module.
- Log in to HR and Payroll and go to HR > Company Admin > Locations
- Select the required Location from the list
- Updated required fields and select Save
Department Settings
Similarly to Locations, Department settings can also be viewed and updated.
- In Labour Scheduling, select Departments from the left-side menu
- Select Edit against the required Department
Values displayed on the Edit Department page are:
- Department Name - Taken directly from HR & Payroll
- Location - Taken directly from HR & Payroll
- Department Code - Taken directly from HR & Payroll
- Foreign ID - only used if the portal is integrated with a 3rd party HR system
- EPOS ID - Enter the EPOS provider ID used for sending sales data. This is the unique ID used for loading sales/wage budgets for this Department
- EPOS Enabled - tick this box to enable the sales feed from the EPOS provider
- T&A Enabled - If the Department uses Time & Attendance, tick this box to display the T&A clocks in the Schedule page
- Use Sales Type Grouping – Can be applied if the organisation uses Sales Type Grouping (please see below)
- Alphabetic Staff Sorting – Displays employees in alphabetical order and prevents moving their order in the Schedule page
If the Location setting: Schedule Departments as one is selected, only the first Department of each Location requires configuration.
Please note: Referring to another existing Department's configuration is a good way to ensure the settings being entered are correct and consistent.
Fig.4 - Edit Department screen
Sales Type Grouping
If Sales Type Grouping is in use, Sales Type Groups must be created.
- Log in to Scheduling and use the Select Department... drop-down
- Search for and select the required Location (likely to have been recently created in HR & Payroll)
- Go to the Settings tab and select Sales Types > Sales Types from the left-side menu
Fig.5 - Selecting Sales Types from the Settings tab
If the 'Sales Type Group' column has values in it (as per Fig.6), this confirms that Sales Type Grouping is in use.
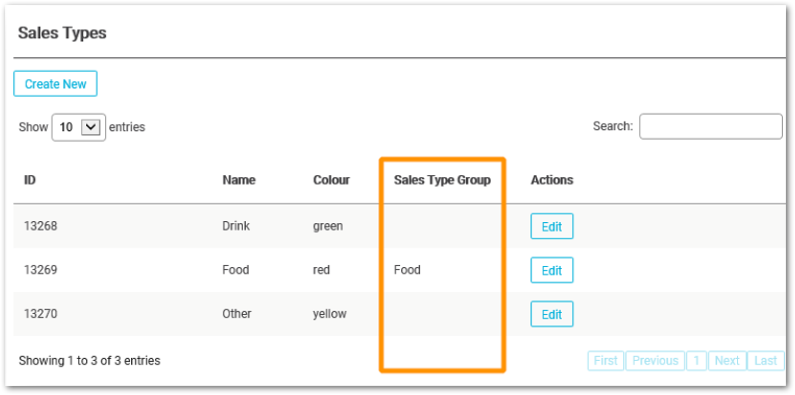
Fig.6 - 'Sales Type Group' column
- To create Sales Type Groups, select Sales Types > Sales Types Groups from the left-side menu
- Then select Create New
Fig.7 - 'Create New' button for Sales Type Groups
- Create a new Sales Type Group, using naming conventions from an existing Location
- Select Save once complete
- Then select Sales Types from the left-side menu and select Edit against the required Sales Type
- Use the Sales Type Group drop-down to link the Sales Type to the required Sales Type Group
Fig.8 - Linking a Sales Type to a Sales Type Group
If Sales Type Grouping is not in use please ensure Sales Type naming conventions are accurate, as this will prevent sales being loaded via a POS provider.
As before, referring to existing Locations' configuration is a useful way to ensure the settings being used are correct and consistent.
Next Steps
Please ensure Scheduling (formerly known as Labour Productivity) is enabled at Location Level in HR.
For guidance please see February 17th 2022, Release Note: WFM UK | Labour Productivity: User Access to Enable Locations for Use
Comments
Please sign in to leave a comment.