Overview
It is important when creating recipes to future-proof them so as to be able to easily edit them for transfer and yield. Future-proofing recipes involves creating them, in the same way, each time, ensuring that a fixed process is in place. This involves deciding on business standards and maintaining them, for example, ensuring that the recipe naming convention is consistent e.g. ‘Merlot –gls’, ‘Merlot –btl’ etc.
This article will outline the best practice methods for creating and maintaining recipes.
For a list of all Recipe and Menu Engineering articles, please visit RME - Article Contents Page.
Before Creating a Recipe
First, check to see if the recipe is already on the system.
To do so:
- Go to Recipes > enter the name (or a few letters) of the recipe in the Search field and select the arrow button
If the recipe exists, the system will display a record in the results field. If the recipe does not exist, move on to creating a new recipe.

Fig.1 - Searching for a Recipe
Creating a New Recipe
- Select Create a new recipe

Fig.2 - Create a New Recipe Button
A number of mandatory fields need to be populated so that the recipe can be seen and sold at site. Other fields can be populated but are not a requirement for stock - these have been ignored for the purposes of this article but can be populated for information purposes.
- Recipe Name - this will be the name that the sites will see
- It is advised to include sizes when creating a number of recipes for the same item e.g. vodka shot 25ml, vodka shot 50ml etc. Or, use a business-defined key e.g. WINE1234 to make searching for the recipe easier
- Product Type - select either Standard or Batch from the drop-down
- Standard - creates a standard recipe with a PLU and selling price. This type of recipe is sold on the tills
- Batch - batches are a product converted to a different form or a combination of products. Batches themselves are not sold but used as ingredients in standard recipes and are counted as part of a site's stock holding
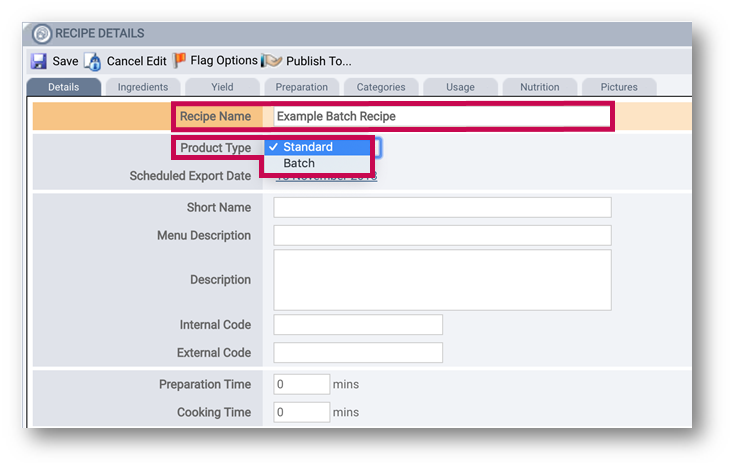
Fig.3 - Recipe Details tab
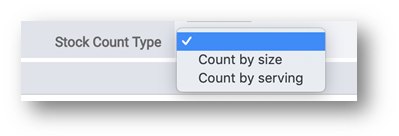
- When creating a Batch recipe, the Stock Count Type will need to be selected
- Count by size - indicates a recipe that will be counted by its overall size, e.g. "2kg"
- Count by serving - indicates a recipe that will be counted by the number of servings that the recipe creates, e.g. "14 portions"
Optional: Barcodes Field
The Barcode field appears in the Details tab of a Recipe.
The field is optional and can be enabled on request – please liaise with your Fourth contact to have this done.
-
Multiple barcodes can be added to a recipe
-
Valid barcode values:
-
Barcodes should contain only numbers
-
Multiple barcodes for the same recipe should be entered on separate lines - see Fig.5
-
No letters or special characters are allowed
-
-
Recipe barcodes will be available in the API
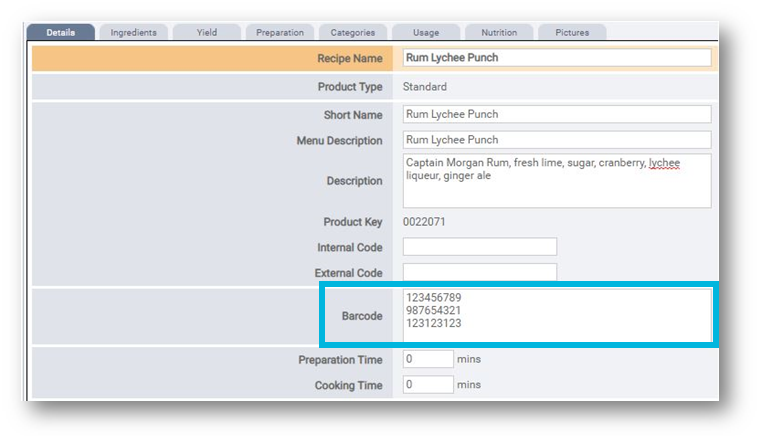
Fig.5 – Barcode Field with Multiple Entries, each on Separate Lines
Adding Ingredients
- Go to the Ingredients tab
There are two links available:
- click here to add ingredients to your recipe - launches a wizard to add ingredients, batches or other recipes to the recipe being created
- view ingredient cost model prices - launches a pop-up window that shows the cost price using each cost model. This will not show details until the recipe is created. Ingredient Cost Model in the Appendix shows detail on this pop-up window
- Select click here to add ingredients to your recipe
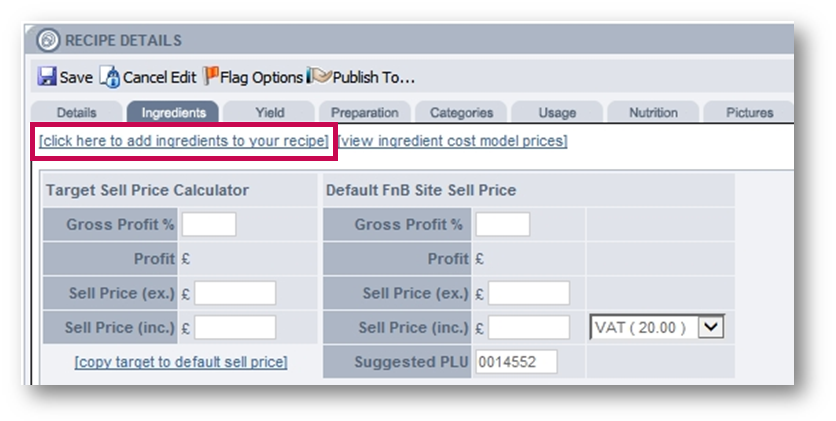
Fig.6 - Ingredients Tab
A pop-up window will appear.
- Use the Available drop-down and chose either Ingredients or Recipes
- Then type in the name (or a few letters) of the item in the Search field and select the grey/white search arrow button
A list of relevant items will be returned.
- Select item(s) from the Available items list.
The selected item will move across to the ‘Selected Items’ area on the right.
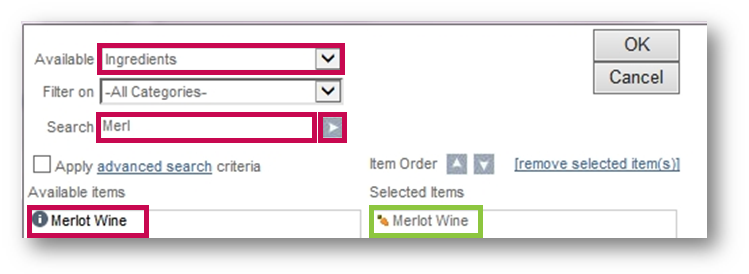
Fig.7 - Adding item(s) to Recipe List
- Continue to search for/add required items that are contained in the recipe
- To remove an item, select it and use the remove selected item(s) button
- Change the order in which the items appear on the recipe tab by using the grey and white up and down arrows
- Once all recipe items are correct, select OK
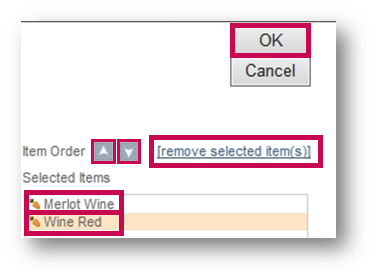
Fig.8 - Removing items and changing their display order
Note: The carrot icon: ![]() indicates the item is an ingredient, the yellow chef's hat:
indicates the item is an ingredient, the yellow chef's hat:  - indicates that it is a batch, while a white chef’s hat:
  - indicates that it is a standard recipe being added to the current recipe.
Adding Measurement to Items
The added item(s) will now appear on the Ingredients tab.
- Enter the quantity (Qty) and unit of measure (Unit) required for each item and select recalculate, located beneath the items. Selecting this populates the Cost information shown in Fig.9
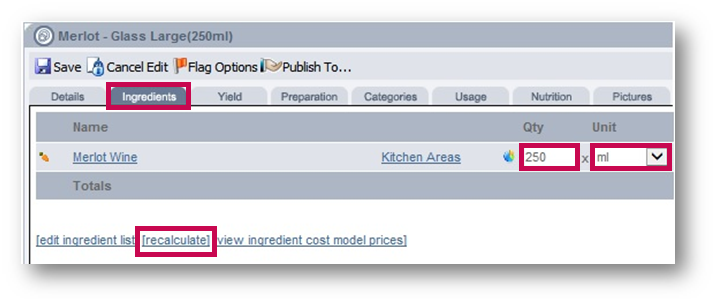
Fig.9 - Adding quantities and units to a recipe item
The list of Units available is dependent on the Unit of Measure (UOM) of the recipe item. Additionally, if conversions are set up against the item, UOMs related to the conversion will also be available from the Unit list.
Inputting Point of Sale (POS) Information
Cost and Servings
Once the quantity of the items is defined, the system can then calculate the cost of the recipe .This figure is reflected in the ‘Cost’ and ‘Portion Cost’ columns shown on the Ingredients tab - see Fig.10.
The system defaults the Servings value to 1 serving. Best practice is to leave it as 1 serving because this will be the recipe that is sent to site and links to POS. Values other than 1 may have undesirable effects when the recipe is exported to the stock system.
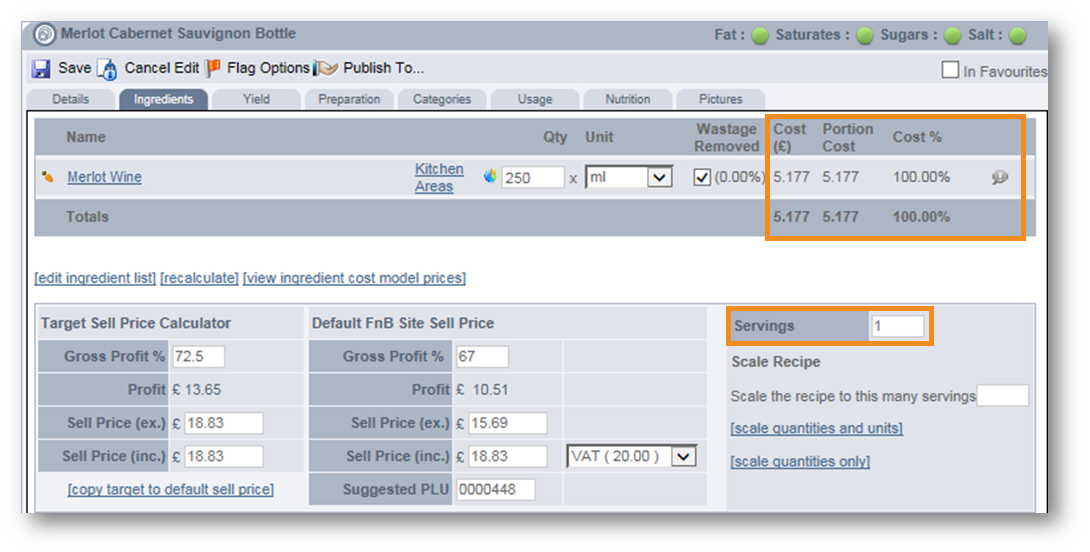
Fig.10 - Cost and Servings values on the Ingredients tab
Please Note: The recipe is linked to POS by the PLU number. This number must be the same as is entered on the POS (or till). When a sales file is received by the stock system, a theoretical Cost of Sale is generated based on the quantity of the recipe sold (according to the POS) multiplied by the recipe cost price assigned to site.
Target Sell Price and Default FnB Site Sell Price
The Target Sell Price Calculator is based on the cost of the recipe and the gross profit % figure. From these figures, the system will suggest selling prices with and without VAT. VAT in this instance is UK standard at 20%.
The Gross Profit % of 70.00 in this example is the default target for all recipes in the business. This is customisable per organisation.
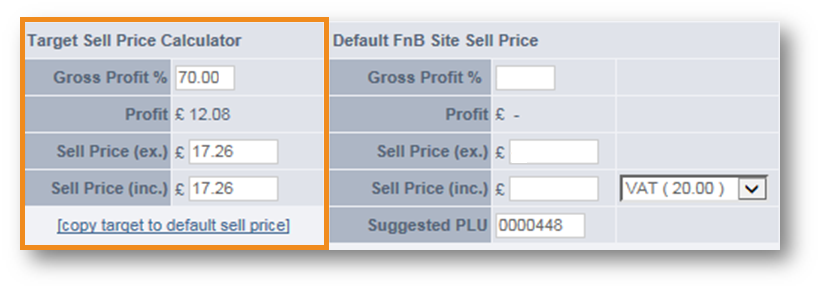
Fig.11 - Sales Price Calculator
- Under the Default FnB Site Sell Price heading, enter a selling price into either:
- Sell Price (ex.) - net selling price (excluding VAT)
- Sell Price (inc.) - gross selling price (including VAT)
- The Default FnB Site Sell Price area will display the Gross Profit % once a selling price is entered into either of these Sell Price areas
- The Gross Profit % is based on the cost price of the recipe and the net selling price
- The Cost Price of the recipe is based on the quantity of the items in the recipe and the ingredient cost model of these items, which is the Preferred Cost Model by default
- To copy the selling price across from the default, select copy target to default sell price
This will use the suggested prices used in the Target Sell Price Calculator.
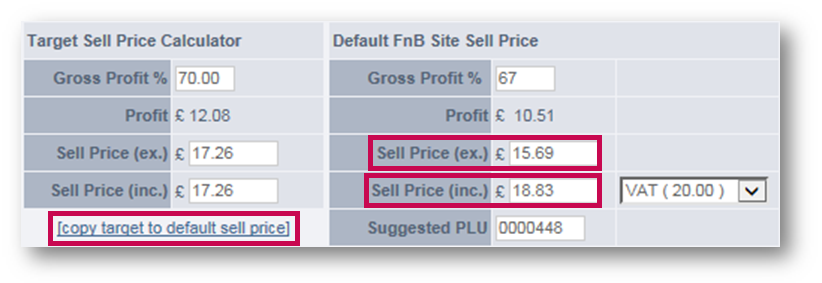
Fig.12 - Sell Price fields and copy target price button
Please Note: The selling prices in Master Data are for costing purposes. The actual selling price at site will be updated when adding the recipe to site. By default, the system will use the Default FnB Site sell price as the price that should be sent to site but this can be edited (as will be seen further on in this article).
Yield Information
The Yield tab shows the finished weight of the recipe and can be used to allow expansion or shrinkage of the dish. For example, pasta that expands and increases in weight when cooked, or a side of beef that decreases in weight during roasting.
The cooked weight of the recipe will control the overall size of the dish, and will be the reconciliation unit that the system uses when adding the recipe into future dishes.
- Raw Weight is the sum of all ingredients within the recipe. This will be automatically calculated if there is a common unit of measure between all ingredients or sub-recipes within the recipe
- Cooked Weight is the finished weight of the recipe. The example in Fig.12 shows 10.85kg of ingredients added, with the finished item yielding 10kg of usable product
- The Portion Size is the size of the average portion. The example recipe in Fig.12 yields a portion size of 100g
- The Alternative Issuing Unit fields are for counting/transferring within inventory and are optional fields

Fig.13 - Yield tab
On a batch recipe's Details tab, the Stock Count Type will be one of the below:
- Count by size - the count size is determined by the cooked weight
- Count by serving - the count size is determined by the servings
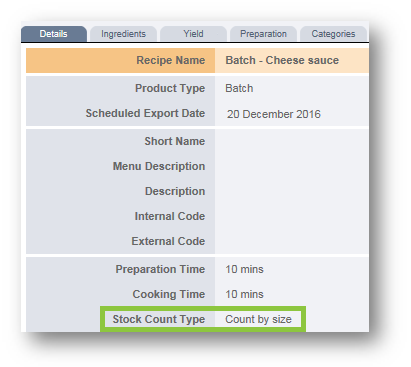
Fig.14 - Stock Count Type on Details tab
Adding Categories
The recipe will need to be added to a ‘smart’ category so that it can be exported to the stock system.
- Go to the Categories tab and select add new category

Fig.15 - Selecting Add New Category in the Categories Tab
The Category Selection pop-up window will appear with the list of available smart categories.
- Select a Category Type and then select the correct category from the available list
The selected category will move across to the ‘Selected categories’ column.
- Select Done once finished
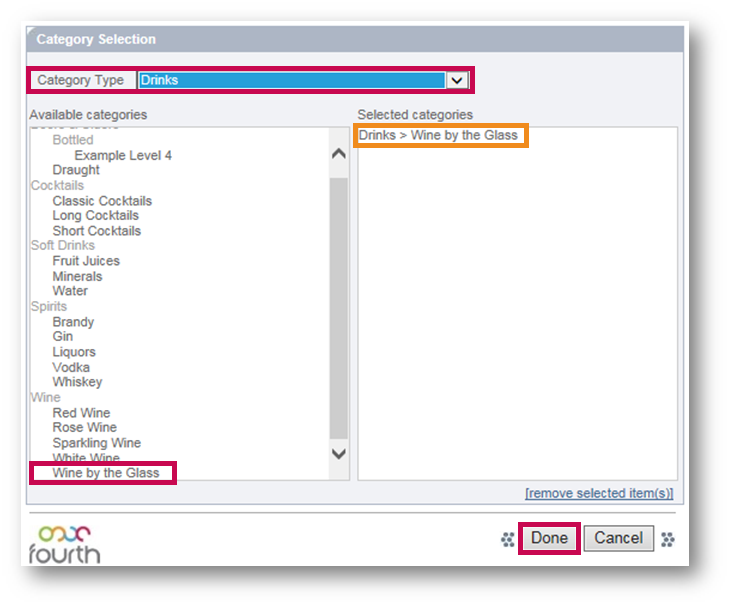
Fig.16 - Selecting a Category for a Recipe
The smart category is now added to the recipe.
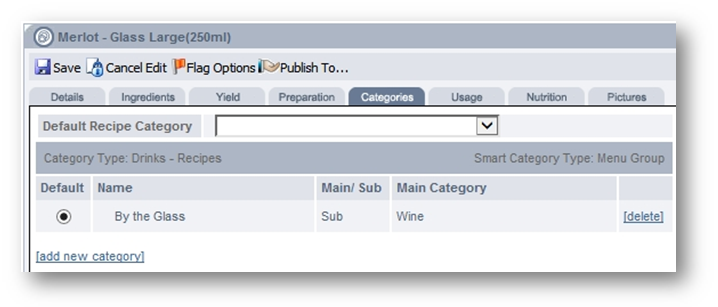
Fig.17 - Category Displaying on the Categories Tab
All mandatory fields have now been completed for stock purposes and the recipe can be saved.
- Select the Save icon -
 - from the toolbar
 - Select Save from the pop-up window that opens
Appendix
The ingredient cost model is used as a method of costing ingredients that are part of recipes. This only applies to ingredients that have multiple suppliers. It is for information purposes only.
There are three different models:
- Lowest: Uses the cost price of the lowest supplier
- Highest: Uses the cost price of the highest supplier
- Preferred: Uses the cost price of selected preferred supplier

Fig.18 - Ingredient Cost Model Prices
It is possible to view the breakdown of each on a recipe:
- Search for the recipe in question and go to the Ingredients
- Select view ingredient cost model prices

Fig.19 - Selecting view ingredient cost model prices from the Ingredients tab

Comments
Please sign in to leave a comment.