
Overview
A 'Location' is usually a customer site (a pub, a restaurant, etc) in which 'Divisions' (kitchen, bar, FOH, etc) are assigned.
This article provides a step-by-step guide for creating a new Location in the HR module of Fourth's Workforce Management solution.
For guidance on creating/configuring Locations for use in other Fourth products, please see WFM UK: Creating and Configuring a New Location - All Fourth Products
Please note - There are additional steps required for customers using Fourth's Engage platform and Onboarding App when creating a new Location. Guidance can be found at the bottom of this article.
Creating a Location
Locations are created within the HR module. Employees will be assigned to a Location that feeds through to the other modules, i.e. Payroll and Rotas, to ensure that hours and payslips are correct.
- Go to HR > Company Admin > Locations and then select Create Location from the top right corner
Fig.1 - The 'Create Location' screen
-
These fields need to be completed:
- Description - The name of the location which will appear within an employee’s record and on the rota
- Address for the location
- Postcode for the location
-
Other fields that can be completed:
- Location Code Prefix for accounting purposes
- Hide Tronc Rate From Employment Details Screen? - This hides the option to enter a tronc rate on the Employment Details screen for new employees and existing employees
- Use Location in Scheduling? - This enables the location in the Scheduling solution
- Enable Fourth Account Service - tick this if using Fourth's 'Engage', 'ESS', or 'Collaboration' platforms. When applied, any employees created within the new Location will automatically be activated and receive a welcome email for their Fourth account (the Location must also exist in Engage for this to happen - see the link at the bottom of this article)
- Display Rota tab within ESS? - This enables visibility of the Rota tab for employees within the ESS section of the Fourth app
- Display Holiday tab within ESS? - This enables visibility of the Holiday tab for employees within the ESS section of the Fourth app
- Show Employee Health Status on Rota? - This enables visibility of the Health Status for managers on the rota
- Accounting System Code – This is used if sales to be sent to Fourth by FTP. Within the FTP folder, the sales will be split by the accounting system code. This code will also be used for splitting the costs within the nominal ledger export. There is no rule for this code - it can be any sequence of numbers and letters
If, for any reason, the Location Accounting System code needs to be changed and Fourth Analytics is also in use, please raise a case through the Customer Community or contact Fourth Analytics support to identify any risks first. Fourth Analytics uses the accounting system code in some of its reporting
-
- Opening Date – This will be the first week the site opened. It can be backdated if the site was open before the company began using Fourth. Alternatively, it can be left blank.
- Is Non-Payroll Location? - Should be ticked when this location does not use Fourth's Payroll. If ticked, employees cannot be transferred within the employment details. They would need to be terminated and then rehired
- Include in Analytics? - if the Location's data is to be used in Fourth Analytics reporting (if selected, the Analytics Unit Code is mandatory)
- Freeport? - tick if the Location is within a Freeport site
- Investment Zone? - tick if the Location is within an Investment Zone
- When all required settings/fields have been completed, select Save
- Group Location - Make a selection from the Region drop-down (if visible - this option is set up as a User-Defined Group in Global Settings. Please see this article for more information)
Fig.2 - Group Location screen
- Once all of the above have been completed, select Save
Next, divisions need to be assigned to the location.
Fig.3 - Assigning Divisions screen
- Relevant Divisions need to be assigned to the Location by selecting the Division Name, and then the single arrow. For all divisions, use the double arrow
- Select Save as shown in Fig 3
Assign PAYE Company
Fig.4 - Assign PAYE Companies
- The same approach needs to be taken when assigning the PAYE Company. Move the relevant company for this location over to the Assigned section using the arrow button.
- Save changes to move forward to the next step
At the top of the Edit Location screen, the yellow drop-down arrow reveals more settings - see Fig.5.
These settings must also be completed before the Location can be fully set up. These buttons are indicated in Fig.5 and are listed below with further explanation.
Fig.5 - Edit Location Screen
Lieu Day Settings
Fig.6 - Lieu Day Settings
- Lieu Type can be either days or hours
- Do Lieu Days/Hours Expire Expire? and Are Negative Lieu Days/Hours Allowed? are options that will need to be discussed and agreed internally within the business
- Save changes
Assigning Job Titles
- Use the arrow buttons to assign Job Titles to the location
- Save changes
Assigning Shift Types
- Use the arrow buttons to assign shift types to the location
- Save changes
These shift types feed through to the rota and are available for employees to be scheduled onto.
Editing Holiday Settings
- The Holiday Year End Date can be configured here if locations have different end dates
Please Note: If the holiday year end date is changed in the Location settings, this will override the Global Setting.
Assigning Brands
-
-
- Select Assign Brands to assign a single brand to this Location
-
Fig.10 - Brand Assignment Table (to the Location)
Assigning to Company/Pay Basis Mapping
-
-
- Select this to assign a Company/Pay Basis Mapping to this Location (see Fig.11)
- If a Company/Pay Basis Mapping is set to ALL Locations, then this Location will already be included. If set to Bespoke then this assignment table can be used to assign the Location as one of those bespoke ones
-
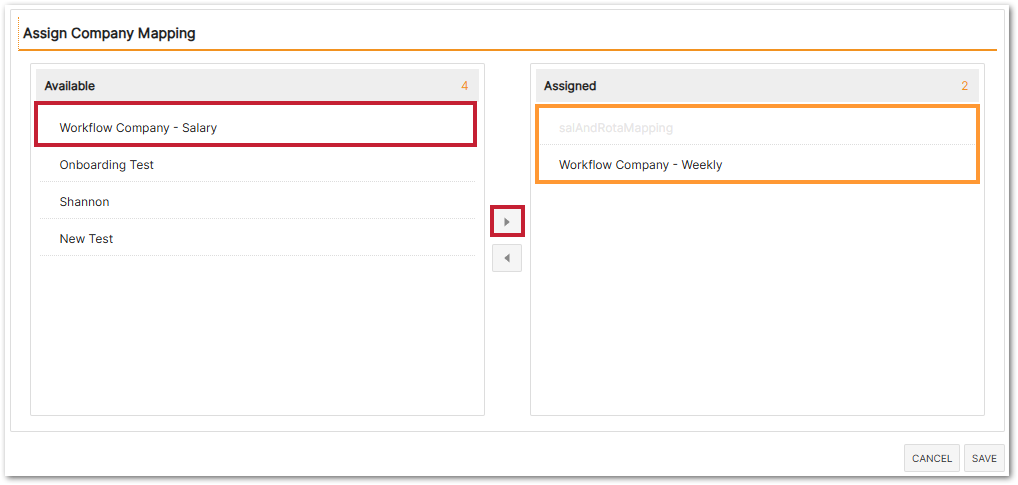
Fig.11 - Company/Pay Basis Mapping Assignment Table (to the Location)
Onboarding Template Configuration
-
-
- Select this to display and operate the Onboarding Template Configuration page within the Location details, without having to navigate away (see Fig.12)
- Access to these settings remains subject to the Onboarding Template Configuration user access permissions
-
Fig.12 - Onboarding Template Configuration (in the Location's settings)
Please use these links for more information on Brands, Company/Pay Basis Mappings, and Onboarding Template Configurations
New Locations in Fourth Engage
Customers who are using Fourth's Engage platform and have followed these steps will also need to create the new Location(s) in the Engage console.
Please see this article for guidance: Engage Mobile: Creating New Locations
New Locations in Fourth Onboarding
Customers who are using Fourth's Onboarding App and have followed these steps will also need to assign the Location(s) to the relevant contract and Pay Basis.
Please see this article for guidance: WFL UK: Onboarding: Preparing New Locations for Onboarding
Comments
Please sign in to leave a comment.