Rates Administration
If the user's role has the permission to administer Rates, two menu options will be available under 'Stock Admin':
- Addition Of Rates
- Addition Of Rates Schedules

Adding and Editing Rates
- Go to Setup > All Options > Stock Admin > Addition Of Rates
A list of all Rates set up against the organisation will then display.
 Fig.2 - List of all existing Rates
- To add a new Rate, select Add New Rate
- Populate the fields as required - see the table below for guidance
|
Value |
Mandatory? |
Notes |
|
Code |
Optional |
This is the unique code for the Rate |
|
Rate Name |
Mandatory |
Name for the Rate |
|
Rate Description |
Mandatory |
Description for the Rate |
|
Rate Type |
Mandatory |
Defines whether the Rate is percentage or fixed value |
|
Rate Amount |
Mandatory |
Amount for the Rate type - this can be positive or negative |
|
Include in COS |
Optional |
Indicates whether the Rate amount should be included in cost of sale, i.e. inflates inventory value including Rate amount |
- Once complete, select Save & Return or Save & New (to add another new Rate)
 Fig.3 - Adding a new Rate
- To edit an existing Rate, go back to the main list of Rates (Setup > All Options > Stock Admin > Addition Of Rates)
- Select the desired Rate
- Make the necessary changes and then select Save & Return
Assigning Rates to Site
- When viewing a Rate, select the Where Used tab
Here, the Sites where the Rate is currently used are shown, and a 'Rate Amount' if a Site-specific override is in place.
- To add the Rate to additional Sites, select Assign Rate to Sites

Fig.4 - The Where Used tab, and Assign Rate to Sites button
The organisation hierarchy tree structure will display.
If the Rate is assigned to all Sites, the message as shown below in Fig.5 will display. A green tick will indicate where the Rate is already assigned to Sites - again, see Fig.5.
 Fig.5 - Rate is assigned to all Sites message, and green tick against a Site
- To set a value for a specific Site, check the box for the Site in question from the hierarchy tree and select Save
- Enter a Rate Amount and select Save again

Fig.6 - Successful 'assigned to sites' message
- Go back to the Where Used tab and the the newly added Site(s) will appear in the list, along with the Site-specific Rate amount, if set
Updating Rates to Site
- Still on the Where Used tab, to update the Rate override value set against Sites, select Update Rate to Site
As with assigning Rates to Sites, the organisation hierarchy tree structure will display, this time only showing those Sites that the Rate is already assigned to.
- Expand the hierarchy tree to Site level, and check the box against a Site
- Select Next
- Enter the required Rate Amount against the Site and then Save

Fig.7 - Updating a Rate to a Site
Addition of Rate Schedules
A Rate Schedule is a collection of Rates to be applied in a sequence. Rate Schedules are the type that are applied to document lines.
- Back on the Home page, go to Setup > All Options > Stock Admin > Addition Of Rate Schedules
A list of Rates set up against the Organisation will display.
- To see specific details, select a Rate Schedule from the list

Fig.8 - Selecting a Rate Schedule

- To create a new Rate Schedule, Return To Rates Schedule List and then select Add New Rate Schedule
 Fig.10 - Add New Rate Schedule button
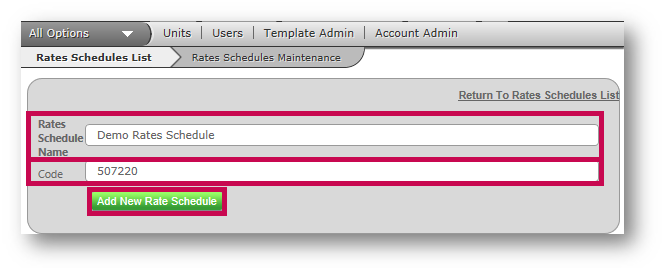
- Enter a Rates Schedule Name (must be unique)
- The Code should also be unique and align to the rate code set in Recipe and Menu Engineering
- Then select Add New Rate Schedule

Fig.11 - Adding a new Rate Schedule
Once the Rate Schedule has been created, it will display in the Rates Schedules list. Individual Rates can then be added to it.
- From the Rates Schedules list, select the newly created Rate Schedule
- Make a selection from the Select A Rate drop-down menu
- The Apply to Line Total checkbox indicates whether the Rate should be applied to the value from the previous calculation step. It will be applied in sequence cumulatively, rather than individually, relative to the base amount. So if there are 2 Rates in the schedule and a line with a net total of 10:
- Rate 1 = 10%, then 10 x 1.1 = 11
- Rate 2 = 5%, then 11 (as this is the outcome after the first line) x 1.05 = 11.55
- To add the Rate to the Rate Schedule, select Save Details

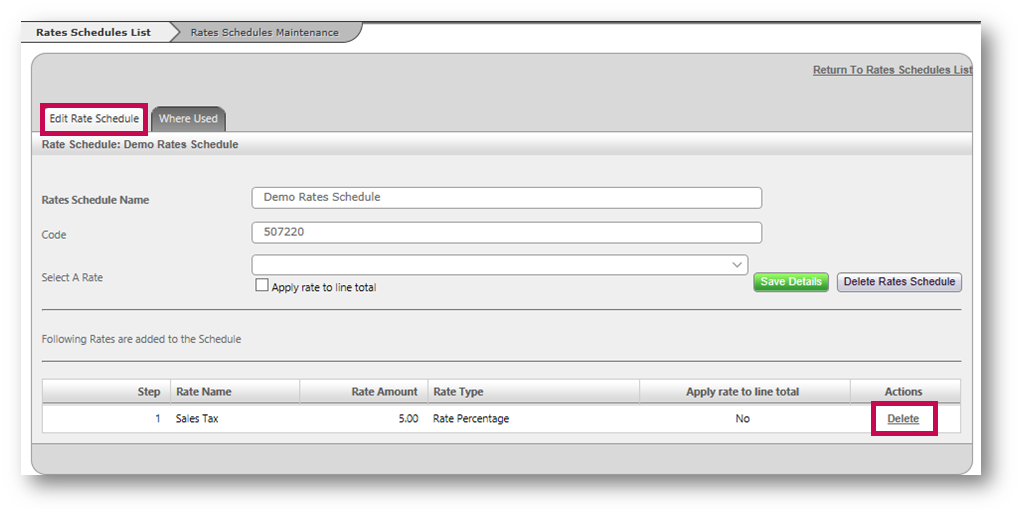
Rates added to a Rate Schedule are applied in the sequence they are assigned, and will appear in a list on the Edit Rate Schedule tab.
- To remove a Rate from a Rate Schedule, on the Edit Rate Schedule tab, select Delete against the required Rate
 Fig.13 - Deleting a Rate from a Rate Schedule
- To add a Rate Schedule to Site(s), go to the Where Used tab and select Assign Rate Schedule to Sites
- Follow the same steps as with assigning Rates to Sites (see Fig.5)
Where Rates exist in a Rate Schedule and are not assigned to the target Site(s), the Rate will be added automatically.
The following rules apply around removal of Rates and Rate Schedules, and their deletion.
- To remove a Rate or Rate Schedule from a Site, go to the Where Used tab and select Remove Rate/Rate Schedule from Sites
This will return the organisation hierarchy, showing only the Sites to which the Rate/Rate Schedule is currently assigned.
- Un-check the boxes against the required Sites and then select Save
 Fig.14 - Removing a Rate Schedule from a Site
A Rate Schedule cannot be removed from Site if it is in a:
- Goods Received Note in a 'Pending' status
- Invoice in a 'Pending' status
- Credit Request without a Credit Note
- Credit Note with a 'Pending' status
In such cases the checkbox will be disabled against Site(s), as shown in Fig.14.
Deletion of Rate or Rate Schedule
A Rate or Rate Schedule cannot be deleted if it is:
- Assigned to Sites
- Part of a Rate Schedule
In such cases the Delete option will be disabled, as shown in Fig.15.
 Fig.15 - Delete option disabled
Integration with Recipe & Menu Engineering (RME)
The Item Vatable code set against an ingredient in RME will map to the corresponding Rate or Rate Schedule code in Inventory. This will become the default Rate applied for the line when a Goods Received Note is created.

The value presented in the list is the description of the Rate. The value passed in the interface from RME to Inventory is the Rate code, which will need to match a code set against a Rate or Rate Schedule to be recognised.
In the event the code matches against multiple Rate or Rate Schedule records, it will be ignored.
Note: At present Rate types can only be applied via a data exercise in RME.
For additional information on Rates and Freight functionality, please see: Rates and Freight - Article Contents Page

Comments
Please sign in to leave a comment.