
Overview
Prior to completing the steps below, the Period End process should be started. Refer to Adaco: Preparing for Period End if not yet completed and run the Start Period Inventory process.
This article describes the processes of running a Period End.
Outlet Inventory Sheet
Inventory Sheets are required to record the physical stock on hand, and these are produced using the Outlet Inventory Sheet Report.
- To run the report, go to Report Center > Inventory Reports > Outlet Inventory Sheet Report
- Select the criteria which suit the requirements needed to take Inventory (see Fig.1)
One option that may be useful is the option to Sort by Sub Category if the stock in the storeroom or outlet(s) are physically arranged according to sub-categories (i.e. French wine followed by Australian wine, followed by Spanish wine etc).
When running the report, select whether to run for all outlets or for specific outlets and locations according to what will be counted, as per Fig.1.
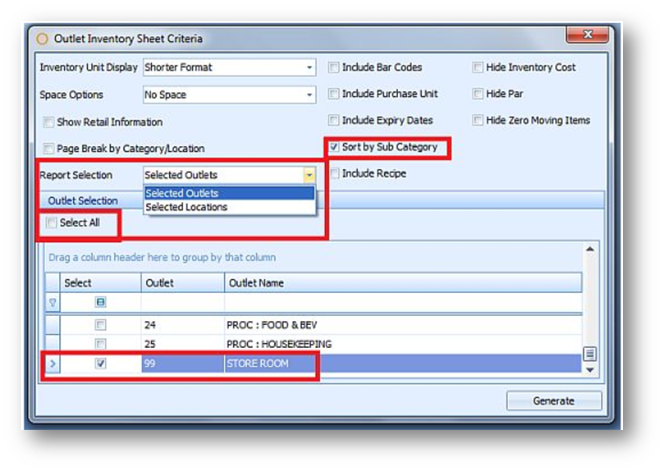
Fig.1 - Outlet Inventory Sheet Report Criteria
-
Once printed, use the Inventory Sheets to record the physical counts in storerooms and outlets
If the Outlets and Inventory Guides are set up correctly, the items should be listed on the Inventory Sheet in the same order that they are physically arranged. Refer to Purchasing & Inventory - Preparing for Period End for the steps required to set up Inventory Guides.
Entering Physical Inventory
-
To enter the inventory values, go to Inventory > Enter Physical Inventory
-
Double click an Outlet to enter the physical inventory count
-
In the ‘Enter Physical Inventory’ screen, select an Outlet from the drop-down menu
-
Depending on how the Outlet is configured, select either the Category or Location to enter counts, as per Fig.2.
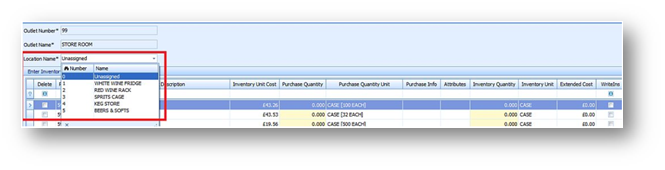
Fig.2 - Selecting the Category/Location for Inventory Count
-
Enter the physical inventory counts as needed according to either the Inventory Quantity or the Purchase Quantity, or a combination of both
For example, if a product is purchased in a case containing 24 bottles but is inventoried in single units, then it can be entered as 2 cases (Purchase Qty) and 5 single units (Inventory Qty). The system will then calculate the total inventory of this item as 53 (2 x 24 = 48 + 5 = 53).
-
Once all counts have been entered for the Location/Category, Save
Entering a Write In
If there are products that have been physically counted, but do not appear in the 'Enter Physical Inventory' screen (an item that physically exists but was not included in the Inventory Guide), it can be entered into the inventory as a Write In.
-
In the 'Enter Physical Inventory' screen, select Write Ins
-
In the ‘Item Search’ screen, search for and select the product(s) which need to be added to the inventory
-
Select OK
Please Note: When searching for items to add, any items that are already listed in the ‘Enter Physical Inventory’ screen will be shown in grey italics and cannot be added.

Fig.3 - Entering a Write In
Outlet Variance Report (Current Period)
Once all item counts have been entered (all Categories or all Locations), Outlets flagged as 'Perpetual' can run the Outlet Variance Report.
-
Go to Report Centre > Inventory Reports > Outlet Variance (Current Period) to run this report
-
Use the criteria to select the Period, Outlet(s), and sorting options to generate the report
The results of the report (see Fig.4) will show the Beginning Inventory, any movements either in or out (including Purchases, Requisitions, Inventory Adjustments and Sales / Recipes), and the calculated closing stock (System on Hand). This is the theoretical quantity that should be on hand based on the transactions that have been recorded for the item within the period.
The last two columns show the Inventory Unit Count and the Variance between Entered Count and the calculated System On Hand quantity.
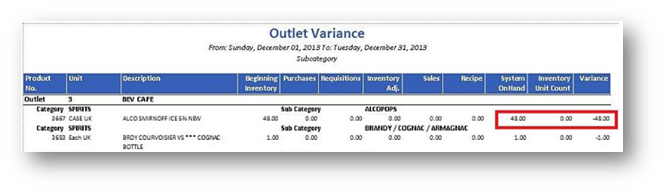
Fig.4 - The Outlet Variance Report
For an Outlet that is configured for Perpetual Inventory, there should ideally be no variance between the System On Hand count and the Inventory Unit count. Any variances should be investigated.
Variances will occur as a result of two possible reasons:
-
The physical Inventory Count entered may not be accurate. To solve this, the physical Inventory Count can be adjusted in the ‘Enter Physical Inventory’ screen. Each time the Physical Inventory count is changed, select Save and then Refresh on the Outlet Variance Report (Current Period) to see the impact of those changes
-
A variance can be caused as a result of transactions which physically occurred within the period but have not been accurately recorded in the system. Where such issues are identified then the transaction should be retroactively entered
When entering transactions retroactively, ensure that the correct period is selected so that the transactions are posted to the period when the transaction physically occurred. There is the option to post transactions either to the current or the previous period during the Period End process.
Inventory Valuation Report (Current Period)
Once all item counts have been entered, all outlets can run the Inventory Valuation Report (Current Period).
-
To run this report, go to Report Center > Inventory Reports > Inventory Valuation (Current Period)
-
In the criteria screen, select the Outlet(s), Sorting options, and other desired criteria
-
Select Generate
The results of the report (see Fig.5) will show the current counts in both the Purchase and Inventory count fields. The unit cost field will display the Inventory Unit Cost of the item, while calculating the extended cost based on the Entered Count.
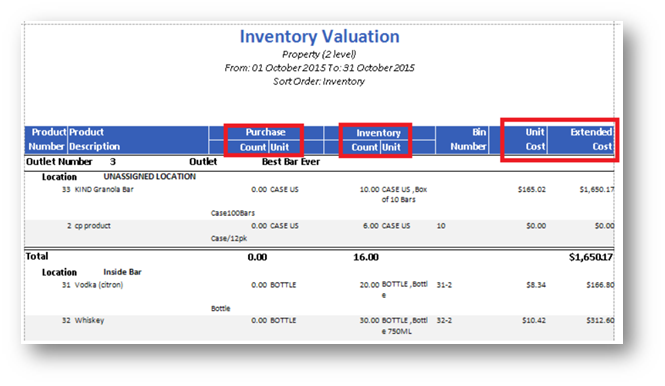
Fig.5 - The Inventory Valuation (Current Period) Report
Ability to Lock an Inventory Count Prior to Period End
To access the access right 'Lock/Unlock Inventory Counts':
-
Go to Property > Set Up > User Groups > Inventory > Enter Physical Inventory
The default setting for this access right is false (unchecked).
-
To enable the locking of outlet inventories, check the Edit box
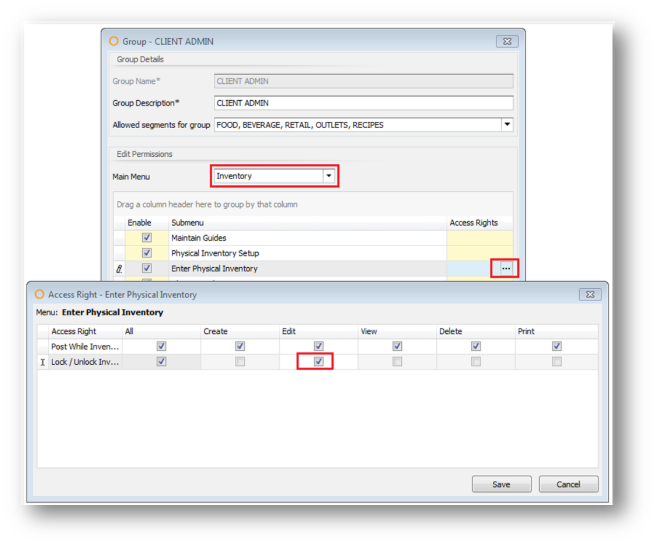
Fig.6 - Lock/Unlock Inventory Counts
When the Lock/Unlock access right is enabled, a button in the 'Enter Inventory' screen labelled Lock Inventory will be visible.
-
Select Lock Inventory
A pop-up will be visible asking to confirm the locking of the inventory.
When confirmed, the Inventory Count for the selected Outlet will be locked and no further changes can be made to it. The counts for all categories or locations within the selected Outlet will be locked.
-
To enter or amend counts for a locked inventory, select Unlock Inventory
Please Note: The locking or unlocking of a physical Inventory Count will not impact the closing of a period. A period can be closed when inventory counts are locked or unlocked.
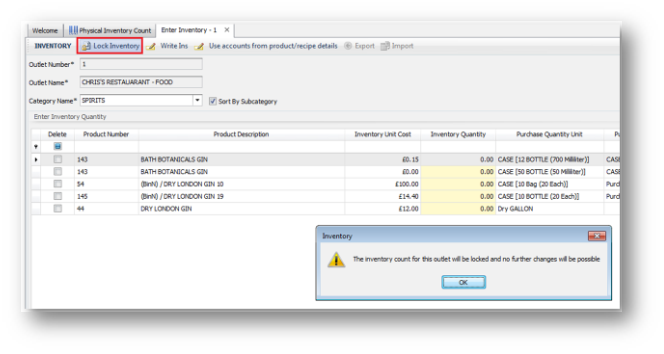
Fig.7 - Lock Inventory Button
The locked status of each Outlet’s physical inventory is shown on the main ‘Physical Inventory Count’ screen so that the progress of the Period End process can be monitored.

Fig.8 - Physical Inventory Count Screen
Closing the Period
Once all counts have been entered, all variances are resolved to satisfaction and valuations are acceptable, the period can be closed.
-
To close the period, go to Inventory > Close Period
-
Select Close Period
Once the period has been closed, both the Outlet Variance Report and Inventory Valuation Report can only be run as ‘(Historical)’.
Exporting General Ledger Journal Entries
Once the period has been closed, final General Ledger journal entries should be exported as outlined here:
Adaco: General Ledger Interface
Reopening the Period
- Within Property > Setup > User Groups > Inventory Menu there is an access right called Re-Open Last Period.
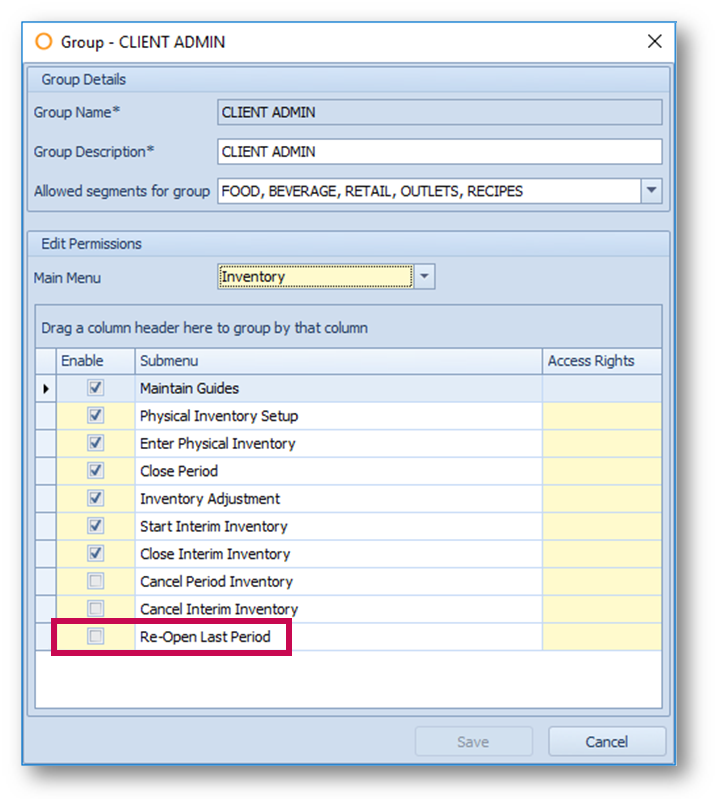
Fig.9 - Access right for re-opening the last closed period
If a user has this access right then there will be a new option within the main Inventory menu called Re-Open Last Inventory Period.

Fig.10 - Option to re-open the last closed period
If the user selects this option whilst there is a new inventory period in progress (either full or interim), they will receive a message saying that it is not possible to re-open the last period whilst the next period end is in progress.
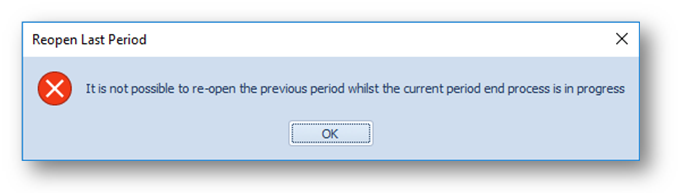
Fig.11 - Warning that the last period cannot be re-opened whilst the current period end is in progress
If the user selects the new option whilst there is no period end currently in process then they will receive a prompt asking them to confirm that they wish to re-open the previous period.
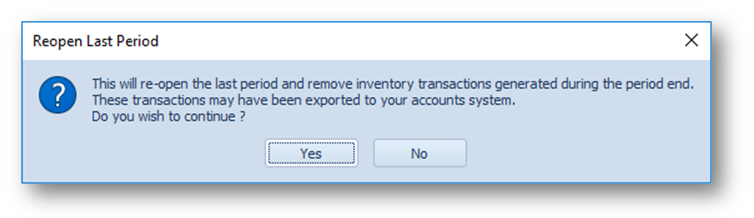
Fig.12 - Confirmation of re-opening the last closed inventory period
If the user confirms, the previous closed inventory period will be re-opened allowing a user to post additional transactions to the previous period.
Important: If a period is re-opened, any new transactions posted should be exported to the accounts payable or general ledger system. Once the period is closed a second time the Inventory Variance journal should be re-exported as the period end variances may have changed since the period was previously closed. However the exported Inventory Variance journal will contain all variances generated when the period is closed again (not just changes) so care should be taken if the Inventory Variance journal has previously been exported and imported into the general ledger system.
Comments
Please sign in to leave a comment.