
Preparing for Period End
Before a period end can be run the following steps should be completed.
Note: It is very important that these steps are performed in order before the actual period end is started.
Post Transactions
- Ensure that all transactions that have physically occurred within the period are entered and posted in Adaco. This should include:
- Any goods received (including the posting of an invoice where appropriate)
- Posting of Outlet Requisitions that have been issued, either internal or inter-property
- Posting of any Transfers, either internal or inter-property
- Resolving Point-of-Sale errors
Review and maintain the Inventory Guides
The inventory guides are the basis of the inventory sheets and will dictate what items are counted and in what sequence.
- To access the guides, go to Inventory>Maintain Guides
- To add products to a guide, click Add Product, search for the product which you want to add.
Note: Any products that have been received, requisitioned, or transferred to an outlet will automatically be added to the Inventory Guide for that Outlet.
For outlets set up by Location, these items can be moved between different Locations within the Outlet.
- To move an item to another location, in the Location list, click the Location When new location is selected, a prompt will display, asked to confirm the change.
Note: If a new item is posted into an Outlet during the period then the system will add this item to the Unassigned location. As part of your period end preparation,check to see if there are any items in the Unassigned location and if so move them to an appropriate location where they will be counted.
Also for outlet guide set up by Location, the sequence in which the items display in the Inventory Guide can be changed (this will also change the order in which they appear on printed inventory sheets).
- To change the order in which your items will appear simply change the number in the Sequence No. column and the system will re-sort the items accordingly, as per Fig. 1. For example if you enter “1” against an item it will appear as the first item in your inventory guide, if you enter “2” against another item it will appear second in the list, the item marked “3” will appear third and so on.
By using the Sequence No. you can ensure that the items are listed in the same order that they are physically stored in; this is referred to as “Shelf-to-Sheet” and makes the physical counting of inventory much easier.
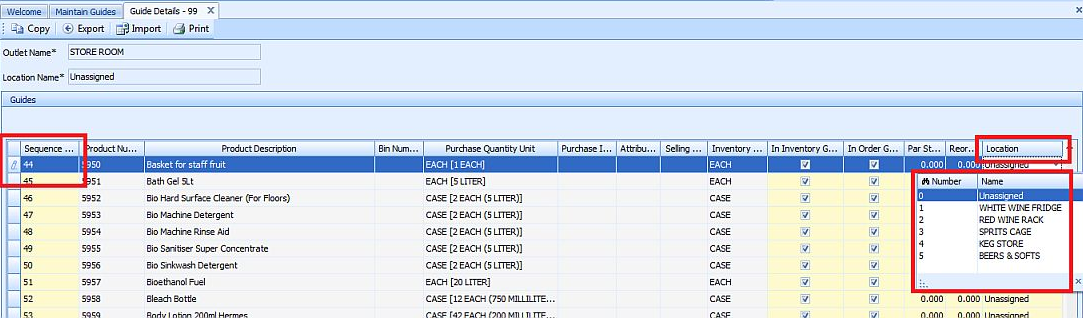
Fig. 1 - Maintain Guides screen
Review the Fiscal Calendar to makes sure the period end date is correct
- To review the period end date, go to the Property>Setup>Accounting>Fiscal Calendar.
- Change the period Ending Date to the date when the property will actually be closing the inventory period, as per Fig. 2.
Note: The date should not be changed to a date in the past.
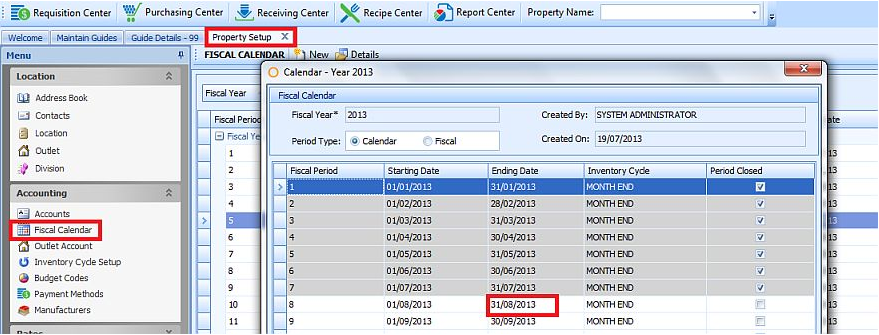
Fig.02 - Editing the Fiscal Calendar
Checking the Inventory Cycle to ensure that all Outlets and Locations that will be counted are correct
- To edit/check the Inventory Cycle, go to Property>Setup>Accounting>Inventory Cycle Setup, as per Fig. 3.
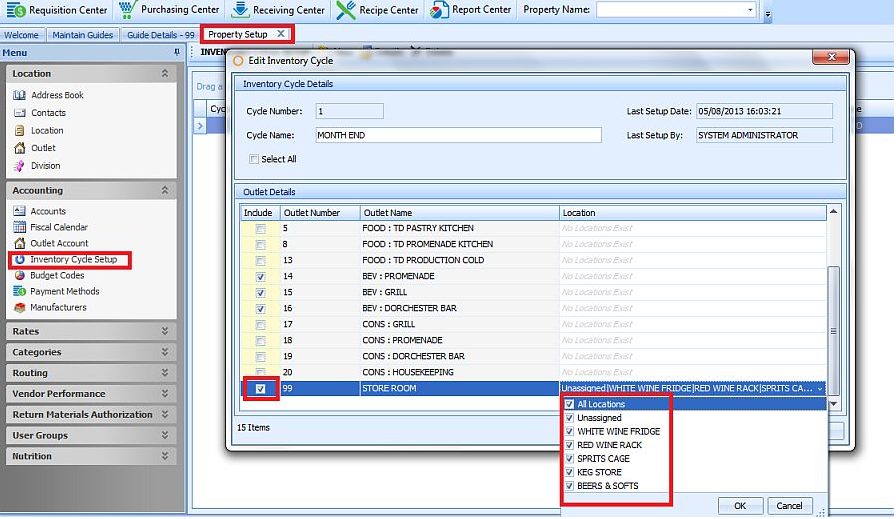
Fig.03 - Editing an Inventory Cycle
Comments
Please sign in to leave a comment.