
Structure Type: Property / CP
Navigation: Purchasing > Purchase Order Center > New Order / Details
Use this screen to create a new purchase order or modify an existing one.
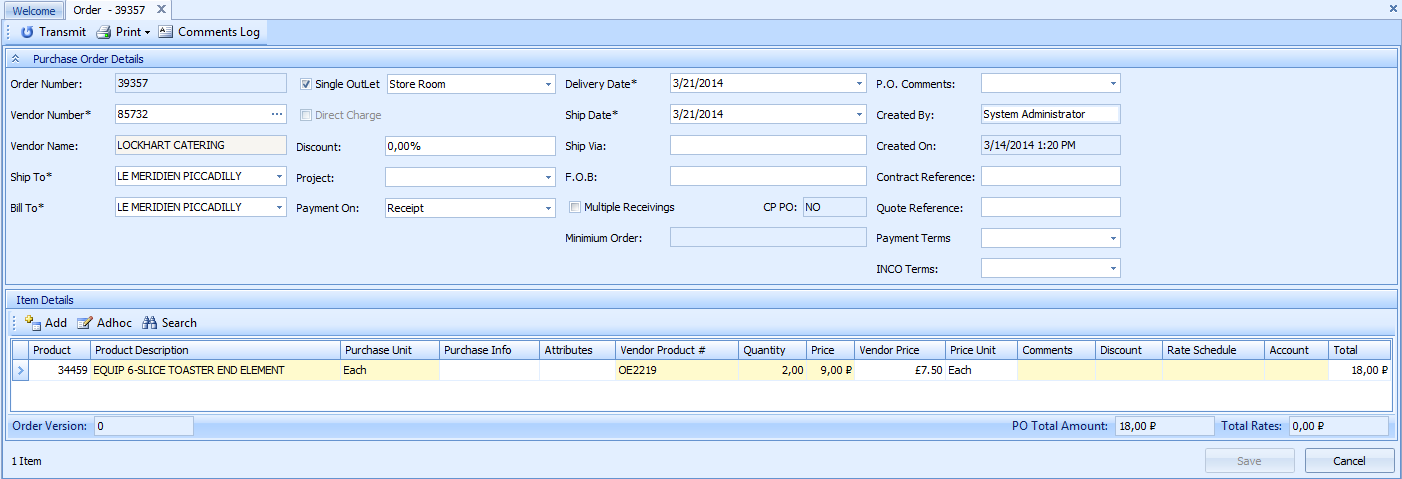
Fig 1 — Order — New / Edit
Order Header Toolbar
| Button | Description |
| Transmit | Click to send the current order to the vendor using one of the predefined transmission interfaces. |
| Click to print the current purchase order either in a current or custom format. | |
| Comments Log | This drop-down text field allows adding comments that relate to the whole purchase order. For example, a user can enter some directions to the person who will be receiving the purchase order on how and when the selected vendor usually delivers the product. Not to be confused with comments to the line items. |
Order Header Fields
| Field Name | Description |
| Order Number |
Displays the number of the purchase order. |
| Vendor Number | Click the Browse button to select the vendor either by name or by number. Alternatively, If you know the vendor number, you can simply type it in this field. |
| Vendor Name | Displays the name of the selected vendor. The field is read-only and displays vendor name according to the value set in the field above. |
| Ship To | Select the address, to which the order should be delivered. You can select this value only if several addresses were created for the current property at Property > Setup > Location > Address Book. |
| Bill To | Select the address, to which the order should be billed to. You can select this value only if several addresses were created for the current property at Property > Setup > Location > Address Book. |
| Single Outlet | If this check box is selected, the products will be delivered to the selected outlet (the outlet name is selected from the drop-down list to the right). By clearing this check box, you will be able to create a purchase order, according to which the products will be delivered to several outlets. In this case, you will need to select outlets and quantities for each outlet for each line item by right-clicking the corresponding field and selecting the Outlet Details menu item from the context menu. 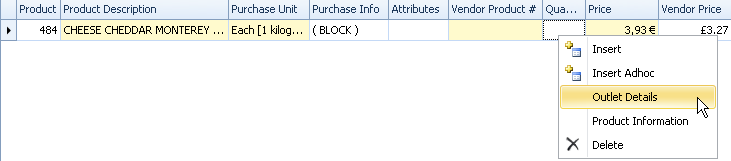 |
| Direct Charge | If this option is selected, the outlet will be charged directly. Otherwise, the products will be charged and shipped to the storeroom outlet. Note: For the storeroom outlet, this field is disabled because the storeroom outlet is always direct charge. |
| Discount | If the vendor offers a discount for all products, specify the discount percentage in this field. |
| Project | Optional. Choose a project to link this order. For example, if you are running redecoration, you may want to create a project for it and link the corresponding orders to this project. |
| Payment on | This drop-down list has two options for selection "On Order" and "On Receipt". In most cases, we use the "On Receipt" option . The "On Order" option is mostly used when we need to make an advance payment (for example, with a credit or debit card). |
| Delivery Date | Select the date when the order should be delivered. |
| Ship Date | Select the date when the order should be shipped. |
| Ship Via | Optional. Enter any text about the shipping method. |
| F.O.B | Indicates whether the buyer or the seller is responsible for the products transfer and costs. |
| Multiple receivings | A multiple receiving is a receiving that occurs in parts. A multiple receiving allows a purchase order to remain open after only a part of products on the purchase order is received. For example, a purchase order is for 100 wine glasses. On Friday, 50 wine glasses are received. The next Wednesday, the remaining 50 wine glasses are received. |
| CP PO | This field is read-only. When you open a purchase order for review, this field shows whether the purchase order was created at a property level (CP PO = NO) or at the Central Purchasing (CP PO = YES). |
| Minimum Order | Displays the value of the minimum order (if any) specified for the selected vendor on the Vendor Details screen. |
| PO Comments | Enter any text comment concerning the order. |
| Created By | The name of the user who created the order. This field is populated automatically by the system after you save the purchase order. |
| Created On | Displays the date when the order was created. |
| Contract Reference | Enter the number of a contract. This field is available when the "Custom Purchase Order Mode - M" check box is selected at Property > Administration > Property Preferences > Purchasing. This information is shown in the Custom PO report. |
| Quote Reference | Enter the number of a quotation. This field is available when the "Custom Purchase Order Mode - M" check box is selected at Property > Administration > Property Preferences > Purchasing. This information is shown in the Custom PO report. |
| Payment Terms | Select one of the terms for the payment of the ordered items. This field is available when the "Custom Purchase Order Mode - M" check box is selected at Property > Administration > Property Preferences > Purchasing. This information is shown in the Custom PO report. |
| INCO Terms | Select one of the terms for the delivery of the ordered items. This field is available when the "Custom Purchase Order Mode - M" check box is selected at Property > Administration > Property Preferences > Purchasing. This information is shown in the Custom PO report. |
Item Details Toolbar
| Button | Description |
| Add | Click to add a product to the order. After you click this button, a new empty row will be added to the Item Details table. Type the product number in the Product field and press Enter. Alternatively, type a part of the product description in the Product Description field and then select the product. |
| Adhoc | Click to add an adhoc product to the purchase order. After you click this button, a new "adhoc" row will be added to the Item Details table where you should specify the necessary details for the adhoc product. Note: An adhoc is a product that is created at the time when it is used in a purchase requisition or a purchase order. Usually, an adhoc product is created for one-time use. |
| Search | Use the Search screen to find and add a product by its number, description, PLU code, etc. |
Item Details Fields
| Field Name | Description |
| Product | Displays the product number. Note: You can double-click the product number to open the Product Details screen for this product. |
| Product Description | Displays the product description. |
| Purchase Unit | Displays the selected purchase unit for the product. (For example, a case of 24 bottles, roll, pack, etc.) If the product has several details, you should select the purchase unit in this field. |
| Purchase Info | Displays the information about the purchased product. (For example, if a purchase unit is case, the purchase information can contain "bottle" to specify that the case contains bottles). |
| Attributes | Attributes are additional characteristics defined for retail products at the Product Details screen (Retail tab). For example, if the product is a T-shirt, you can create a first attribute "size" with the values S, M, L, and XL, as well as a second attribute "colour" with the values "white", "green", "grey", "pink". |
| Vendor Product # | Displays the vendor product number for the current product (if any). |
| Quantity | In this field, you should specify the purchase quantity for the product. |
| Price | Displays the price for the selected current product. If the currency in the property is different from the vendor currency, the price in this field is calculated according to the currency exchange rate set at Property > Property Setup > Rates > Exchange Rate. |
| Vendor Price | Displays the product price in the vendor currency. |
| Price Unit | Displays the product unit with reference to its price. |
| Comments | Click this field to open a drop-down text box that allows adding comments for a specific line item. This may be some directions to the person who will be receiving the purchase order, for example, about the quality of the corresponding product or any other comments relating to the line item. |
| Discount | If the vendor offers a discount for this specific product, specify the discount percentage in this field. |
| Rate Schedule | In this field, you can select a rate schedule, which should be applied to the corresponding product. If a rate schedule is assigned to the product on the Product Details screen, this rate schedule will be applied by default (you can change this rate schedule if needed). |
| Account | By default, this field displays the account assigned to the corresponding product on the Product Details field. You can change this value if needed. |
| Total | Displays the total cost of the products excluding rates. |
Comments
Please sign in to leave a comment.