Overview
Global Enterprise holds all Product data for customers with multiple Central Purchasing sites. All regional specific information like vendors, account and rates need to be managed at CP.
Global Enterprise enables the cross regional products to be labelled under the same Purchasing & Inventory Product Number in order to enable clean reporting.
This article describes the process of managing Products at Enterprise level in Purchasing & Inventory (formerly known as Adaco).
Creating a Product at Global Enterprise
- Go to Property > Products
The Products screen will open.
- Select New
The 'Product - New' screen will display (see Fig.1).

Fig.1 - Product - New screen (at Enterprise level)
| Field Name | Description |
| Product | Product Number (auto-generated by system on saving) and Name (or Names using the drop-down if multiple languages have been configured). |
| Segment | Assigns the Product to a Product Segment. |
| Category | Assigns Product to Product Category. |
| Subcategory | Assigns Product to Product Subcategory. |
| Nutrition Number | Selecting  opens the Nutrition Database and allows the user to assign the relevant nutritional information to the Product. This will then pull down to any Recipes created using this Product. opens the Nutrition Database and allows the user to assign the relevant nutritional information to the Product. This will then pull down to any Recipes created using this Product. |
| Approval Required | When ticked, an approval route must be selected for the Product to be verified (this can be default set by Category). |
| Image Data | By right-clicking on this field, the user can paste a picture of the Product for ease of identification. |
| Status | If a Product is marked as active, it is available to requisition, transfer, order, etc. If a Product is marked as inactive, it does not appear in the Purchase Requisition or Purchase Order screens, nor by default for Outlet Requisitioning. Please Note: Product status can be changed multiple times. |
| Contracted Product | Denotes Product being available only reflected in Contract Tracking Report. Makes Product appear in Product search and Purchase Requisition in blue for demarcation purposes. |
| Created By | Name of the user who originally created the Product. |
| Modified By | Name of the user who modified the Product most recently. |
- Select Save and the tabs at the top of the screen will become available
The function of these tabs is described in further detail below.
Product Details
Product Details allow the recording of specific information about the Product. Multiple Product Details can be created by selecting the New button, in this instance, the information can differ but it is still all assigned to one Product. This is often used for a Product which is available in different pack sizes.
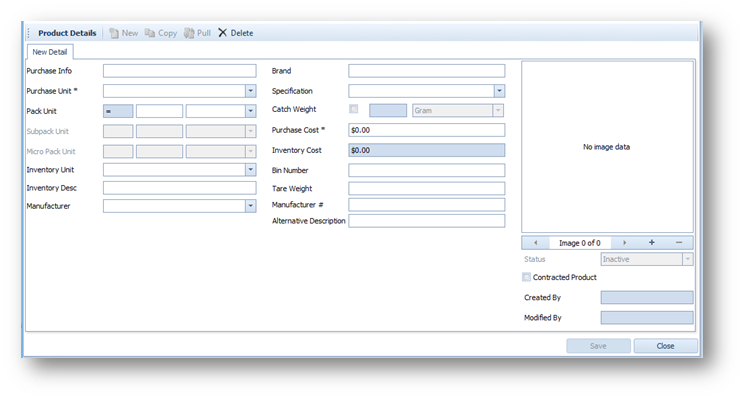
Fig.2 - Product Details as part of the New Product screen
| Field Name | Description |
| Purchase Info | Free-type field often used for summary of pack description, minimum order, quantities, and lead times. |
| Purchase Unit | Unit of measure used for Purchasing, Outlet Requisition, Transfers and Inventory. |
| Pack Unit | Primary unit for Inventory, Outlet Requisitions and Transfers. |
| Sub-pack Unit | Alternate unit of measure used for Recipes and retail. |
| Micro Pack Unit | Additional unit of measure used for Recipes and retail. |
| Inventory Unit | Denotes primary unit for Inventory, Outlet Requisitions and Transfers (must be either Purchase Unit or Pack Unit). |
| Inventory Desc | Used if an alternate description is used in Inventory. Will show on Inventory count sheet. |
| Manufacturer | Assigns a manufacturer to the Product as configured within Property > Setup. Searchable in Advanced Options. |
| Brand | Free-type field for Brand or Product. Searchable in Advanced Options. |
| Specification | Free-type field often used for Product origin and additional information not required in description. Searchable in Advanced Options. |
| Catch Weight |
If enabled, Quotations, Receiving and Inventory all use weight. A catch weight Product can be purchased in two ways, as shown below: The average catch weight is the conversion value from Purchase Unit to the Catch Weight unit. Purchase by CASE and pay by weight: 20 items at 8 ounces each = 10 pounds average catch weight Purchase by item (EACH) and pay by weight: One item at 1.5 pounds = 1.5 pounds average catch weight
|
| Purchase Cost | Cost assigned to the Product Detail when ordering. |
| Inventory Cost | Cost assigned to the Product Detail in Inventory. |
| Bin Number | Free-type area for identifying wine storage. |
| Tare Weight | Information-only field used to store the weight of the container. |
| Manufacturer # | Free-type area to add Manufacturer Number of Product. Searchable in Advanced Options. |
| Alternative Description | Alternative description for Product if configured in POS. |
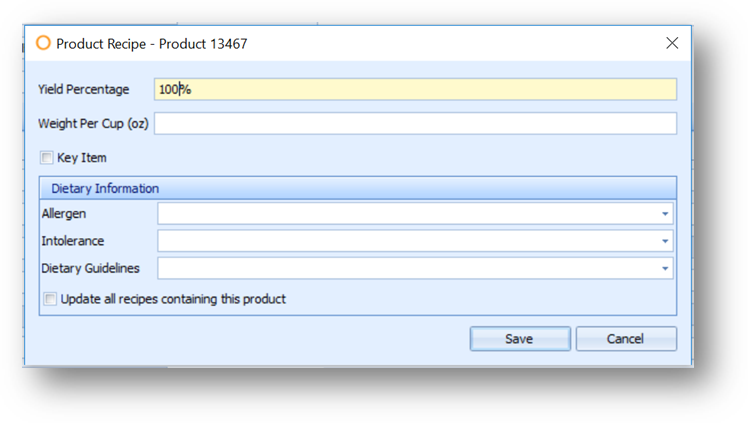
Fig.3 - Product Recipe screen
Product Tabs
Once the Product has been created, the Product tabs at the top of the page become available.
| Field Name | Description |
| Retail |
Opens Retail Product screen which allows Product to have 'Attributes', pricing and PLU codes assigned to it (see Fig.4).
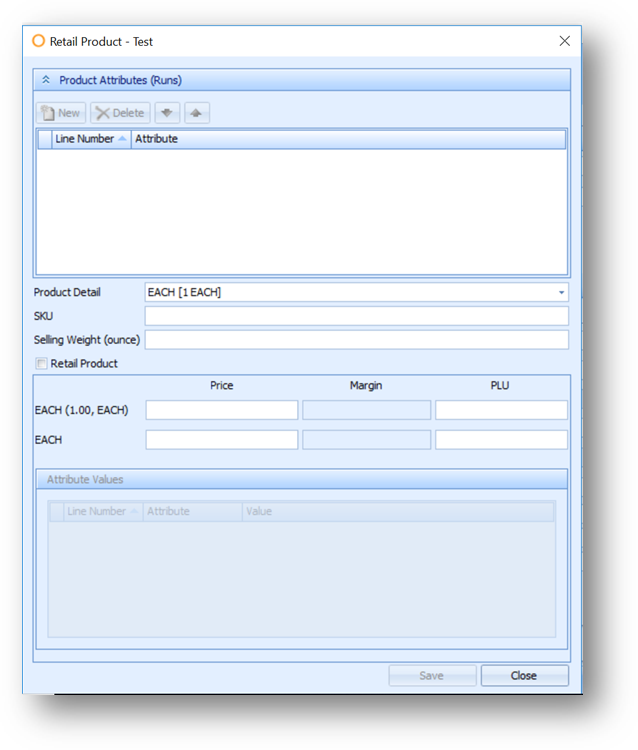 Fig.4 - Retail Product screen |
| Sub-Product |
Opens the 'Sub-product' screen where a Product can be linked to a different Product (see Fig.5). A sub-product is often used for a returnable container. To create a sub-product, create two products. For example: Milk, 5 Gallon Can with Spout (Product 500043) Empty 5 Gallon Can with Spout (Product 500044) In Product 500043, add Product 500044 as a sub-product. When Product 500043 is added to a requisition or to a Purchase Order, Product 500044 will also be added.  Fig.5 - Sub-Product screen |
| Bar Codes |
Allows bar codes to be assigned to the Product for scanning purposes. A Product can have multiple bar codes if required (see Fig.6).
 Fig.6 - Product Bar Codes screen |
| Approvals |
Allows the user to send the Product for approval, if enabled (see Fig.7).
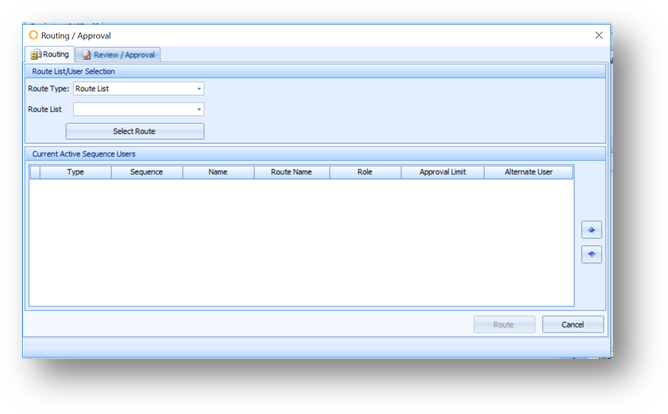 Fig.7 - Product Routing / Approval screen |
| Property | Selects which Properties the Product will be pushed to. When a specific Detail is selected in the Property Detail drop-down menu, the 'Is Active' column will show the status of the selected detail in each Property. When All is selected in the Product Detail drop-down, the 'Is Active' column will show a tick where all details are active within a Property, unticked where no details are active within a Property, and a partial tick (blocked out tick box) where some details are active and some are inactive. Selecting the specific details in the drop-down will show which details are active and which are inactive. |
Pushing Data from Enterprise to CP
The Product must be pushed to a CP.
- Go to Property > Data Synchronisation
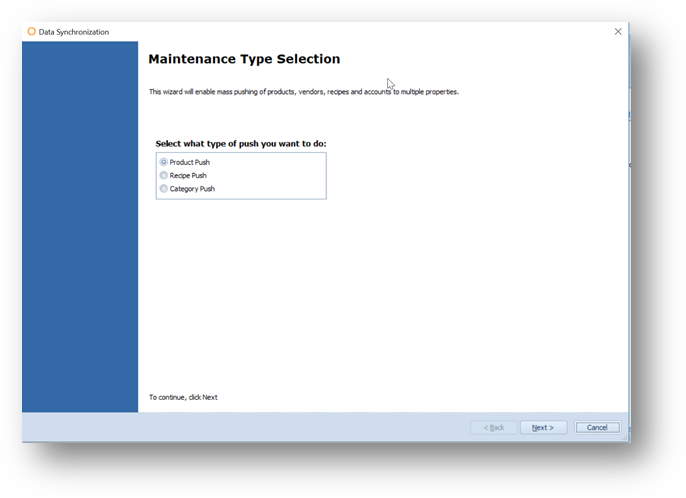
Fig. 8 – Data Synchronisation
- Select Next
- Select the Products which require pushing
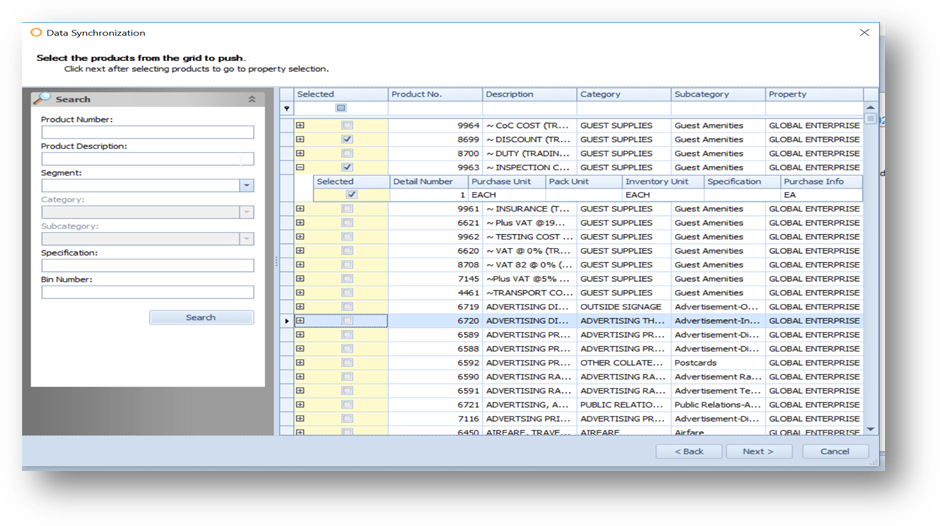
Fig. 9 – Selecting Products for pushing
- Select Next
- Select the appropriate CP
- Select Finish
Assigning Local Data at CP
- Change the Site to the CP which the Product has been pushed to
The missing local data can then be populated. To do so:
- Go to Property > Products
Update the fields detailed below:
| Field Name | Description |
| Account | Account for cost of Product to be posted to by default (can be changed when Requisitioning, Ordering or Receiving depending on settings). |
| Rate Schedule | Links a Rate Schedule to the Product. |
| Nutrition Number | Selecting  opens the nutrition database and allows the user to assign the relevant nutritional information to the Product. This will then pull down to any Recipes created using this Product. opens the nutrition database and allows the user to assign the relevant nutritional information to the Product. This will then pull down to any Recipes created using this Product. |
| CP Control |
If creating a Product at Property, this value will set to None. This is not editable. If creating the Product at CP level, the following options are available:
|
- Select the Property button to push the Product to all required Properties within the region

Comments
Please sign in to leave a comment.