Project Template Center
The Project Template Center is used to create a template that is used only by Projects in Adaco. When a Project Template is used, the products in the template will populate in the project. A project does not need to be created prior to the template being created. A project can be created by using the How to Create a Project article.
Creating a New Project Template
- To create a new Project Template, go to Purchasing > Project > Template Center
- Click New to create a new template, or search for and select an existing template and click Details
- In the Template Name box, type a name for the template, as per Fig.1
- In the Project Category list, select the category for the template. Typically, this is the same category used by the products within the project

Fig.1 - Project Template Header
Project Template Header fields
| Field | Description |
|---|---|
| Template Number | Sequentially assigned number by the system when the project template is created. |
| Project Category* | [Mandatory Field] In the Project Category list, select the Category that will be associated with the template. Typically the category selected corresponds to the category of the products in the template. When the template is selected for a project, the category from this field will display in the product line in the Project. |
| Template Name* | [Mandatory Field] A short text entered field describing the project. In the Template Name box, type the name of the template. |
- In the Project Template Products pane, click Add Products as per Fig.2
- In the Product Search screen, select the needed product(s), and click OK
- In the Quantity field, enter the needed quantity of the product. This is a required field as per Fig.2

Fig.2 - Project Template Products
Project Template Products:
| Field | Description |
|---|---|
| Product Number | Displays the Adaco Product Number. |
| Product Description | Displays the Adaco Product Description. This field can be edited as well. |
| Quantity* | [Mandatory Field] In the Quantity box, enter the quantity of the product that is needed for the Project Template. |
| Account Number | In the Account list, select an account number if required. Note: When the template is placed into a Project, the Account Number transfers over to the project, unless the product is already in the project, then it will retain the original account from the Project. |
| Lead Time | User entered field (in days), used to calculate the Delivery Date when using the Create Requisitions function from the Project screen. This field is carried over to the Project screen when the template is applied. |
| Rate Schedule | Displays the Rate Schedule, if available, as per the Product Details screen. This field can be edited if need be:
|
| Vendor Number | If the vendor is known for the product, it can be entered here:
|
 Attachment(s) Attachment(s) |
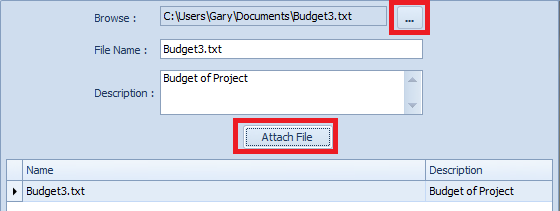
This field will display the paperclip icon if there is an attachment for the product. To add an Attachment:
 Fig.3 - Attachment screen To View an attachment:
|
- Once all products and information is entered, click Save
Adding the Project Template to a Project
To add a Project Template to a project, follow the below steps:- Go to Purchasing > Project > Project Center
- Create a New project or edit an existing project (see Related Articles)
- Click Template as per Fig.4 in the Project Products section of the project.

Fig.4 - Template button in Project screen
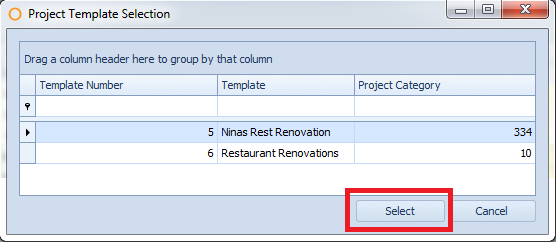
- Select the Project Template and click Select, as per Fig.5. The products from the template will populate in the project

Fig.5 - Selecting a Project Template
Related Articles:
Purchasing & Inventory - Creating a Project

Comments
Please sign in to leave a comment.