Overview
When creating new Accounts, they need to be ‘linked’ to the appropriate Outlets. This is done primarily to give users at specific Outlets a choice of only the Account required. Doing this avoids the incorrect Account being assigned to the wrong Outlet in the Receiving Center.
Assigning Outlets to Accounts
This will open the page shown in Fig.1. The Outlet drop-down menu contains a list of all the Outlets at the property.

An example is shown in Fig.2.

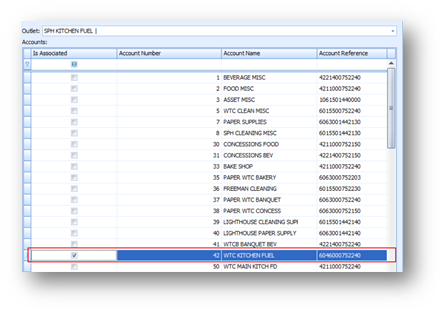
This will open the page shown in Fig.3, which contains a list of all the Accounts.
Any Accounts which this box checked will be linked to that Outlet.

Fig.3 – Account List
The Account will now appear at the Receiving Order of the Outlet, as seen in Fig. 4.

When creating new Accounts, they need to be ‘linked’ to the appropriate Outlets. This is done primarily to give users at specific Outlets a choice of only the Account required. Doing this avoids the incorrect Account being assigned to the wrong Outlet in the Receiving Center.
Assigning Outlets to Accounts
- Go to Property > Setup > Accounting > Outlet Account
This will open the page shown in Fig.1. The Outlet drop-down menu contains a list of all the Outlets at the property.

Fig.1 – Outlet Account
- Open Select an Outlet, and select the Outlet which needs an Account assigning to it
An example is shown in Fig.2.

Fig.2 – Outlet Selection
This will open the page shown in Fig.3, which contains a list of all the Accounts.
- To assign an Account to an Outlet, select the Is Associated check box
Any Accounts which this box checked will be linked to that Outlet.

Fig.3 – Account List
- Select Save
The Account will now appear at the Receiving Order of the Outlet, as seen in Fig. 4.

Fig.4 – Receiving Order

Comments
Please sign in to leave a comment.