Overview
When creating Products, it is important to future-proof them in order to be able to easily edit and update them when required.
Future-proofing Products includes ensuring that a fixed process is in place, and business standards are decided and maintained. This also means ensuring that the product name is not Supplier or Brand-specific so that alternative Supplier Purchase Quantities and Cost Prices can be added.
This article describes the best practice method for creating and maintaining Products.
Before Creating a Product
To check to see if the Product already exists in Master Data:
- Select the Ingredients tab
- Enter the name of the product in the Search field
The search pane will return any Products with the searched term in their name.
If the specific Product does exist, then an alternate supplier relationship can be added to it to show the alternative purchasing details.

Fig.1 - Searching for a Product
Creating a New Product
- Select Create a New Ingredient

Fig.2 - 'Create a New Ingredient' button
![]() Please note: Whilst entering information against the Product, the tabs can be moved between without saving, but the information must be saved before exiting the screen.
Please note: Whilst entering information against the Product, the tabs can be moved between without saving, but the information must be saved before exiting the screen.
Entering Product Details
- Enter the name of the Product in the Ingredient Name field
Where possible, generic names should be used, e.g. without a Brand or Supplier name, especially if the product can be purchased from more than one Supplier. For example, if Supplier A supplies their own brand mayonnaise and Supplier B supplies a branded name mayonnaise, then the product should just be called 'mayonnaise'. The reason for this is to ensure that the product is counted as one product regardless of the brand.
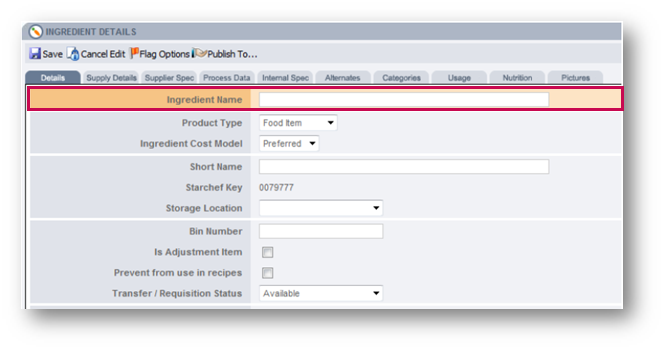
Fig.3 - Details tab
- Select the Product Type as either a Food Item or a Non-Food Item
Food Items are typically food and beverage items and will affect the Cost of Sale, whereas Non-Food items tend to be consumables and can still be added to recipes, but will be excluded from the nutritional calculation.
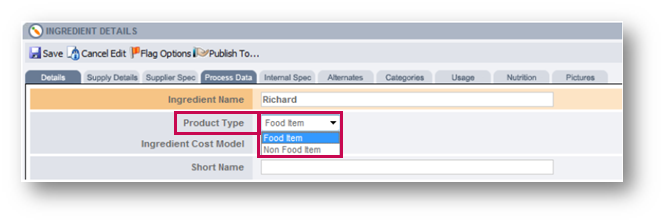
Fig.4 - Product Type drop-down list
- To add the Product to site, enter the Bin Number
Bin numbers are generally used for wines when stock counting, but these numbers can be used for any Product. The number must be unique per Product per Site.
- To remove the product from Ordering and Stock Counting, and for the product to affect the Cost of Sale, tick the Is Adjustment Item box
The Is Adjustment Item option affects how the Product behaves when it is allocated to sites for Purchasing and Stock Taking.
Adjustment Items are used when balancing Invoices or for Petty Cash purchases. As such, they are not treated as a ‘normal’ Products and it should not be able to be ordered or included in the Stock Count.
- Tick the Prevent from Use in Recipes box if this Product is an Adjustment Item or any product not to be included in GP calculations
- Tick the Exclude from GP Calc. box if this Product will not affect the GP calculation, but is to be included in a Recipe and added to a site. Any sales against this Product will not be included in the management figures
For example, a recipe for coffee sells for £2. The recipe is for 9g of coffee at a cost of 10 pence and a cup (not affecting GP) also at a cost of 10 pence. Therefore the cost is 50-50 coffee to cup. The sales that the system will account for towards GP will be only £1. To avoid this, ensure any Products that are ticked to not affect the GP calculation are also ticked to be prevented from use in recipes.

Fig.5 - Editable fields on the Product Details tab
Adding Supply Details
- Select the Supplier Name from the drop-down list
- Enter the Supplier Code, which is the code that the chosen Supplier uses to define the Product when ordering
- Enter the Cost Price, which is the total price for the amount outlined in Supply Quantity. This is also the Net Cost
- Enter the Supply Quantity
- The Unit Size is the Product’s counting size. Ideally it should be set at the most practical measurement, e.g. 1kg, 1ltr, 75cl etc. This measurement is mostly used for Stock Counting purposes
'Alternative Issuing Units' allow the Product to be stock counted and/or transferred in a different Unit of Measurement from the Unit Size. For example, a product with a Unit of Measurement of 1kg could require an alternative issuing unit of 400gr or 25kg for counting and transferring purposes.
![]() Please note: Supply Quantity Conversions are used for creating more recipe-friendly units of measurements, e.g. 'rasher', 'spoon' and 'dash'. The conversions will not be posted to the Stock System but will be seen on the Recipe Cards.
Please note: Supply Quantity Conversions are used for creating more recipe-friendly units of measurements, e.g. 'rasher', 'spoon' and 'dash'. The conversions will not be posted to the Stock System but will be seen on the Recipe Cards.
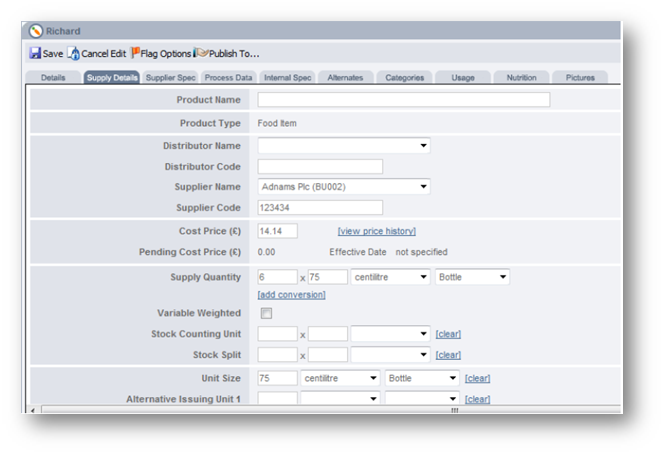
Fig.6 - Supplier Details tab
- Tick the Overhead? box for any products that should not affect the Gross Profit
These products usually would also not be included in Recipes.
- Enter the minimum quantity of stock that can be purchased from the Supplier in the Min Order Quantity field
- Enter the maximum quantity of stock that can be purchased from the Supplier in the Max Order Quantity field
- If checked, Splitable? will allow the stock to be counted against the lowest Unit of Measurement. For example, if the Supply Quantity is 11 gallons and Splitable? is ticked, the system will display 1 gallon as well as 11 gallons on the Stock System
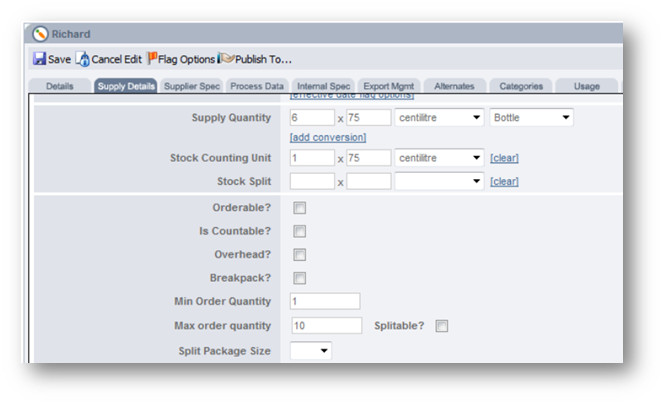
Fig.7 - Editable fields on the Supplier Details tab
Supplier Spec Tab
- Select Yes or No in the Item Vatable field
- Country of Origin is an optional field which can be used to define where a product comes from
- Vintage can be used for wines to record the year of the wine
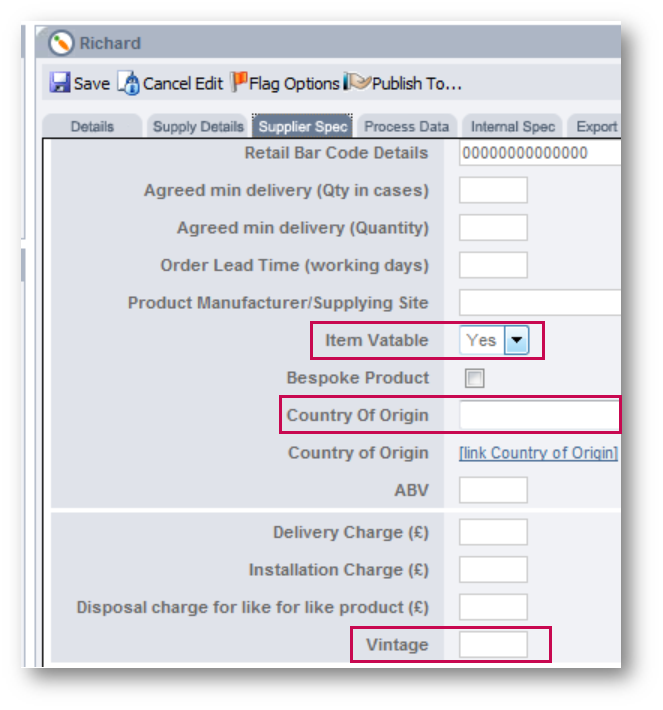
Fig.8 - Supplier Spec. tab
Internal Spec. Tab
- The Date 1st Delivery to Warehouse field is the only mandatory field to be populated on this tab
It is advised that the Date into Warehouse is accurate, as this is the date when the Product will be available to order in the Stock System.
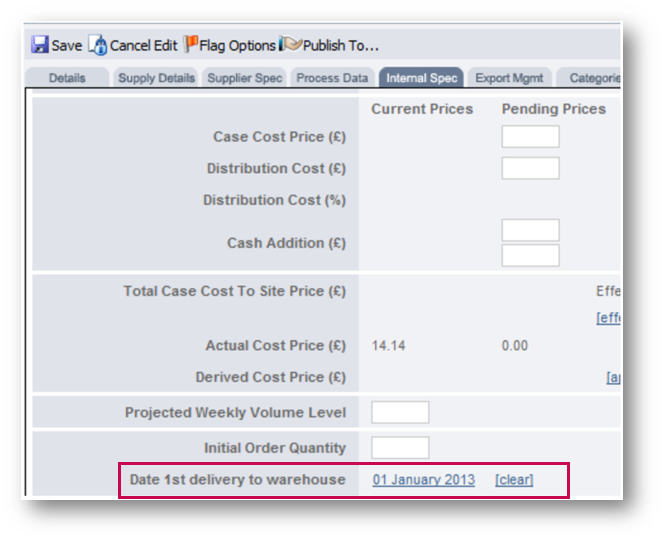
Fig.9 - Internal Spec. tab
Adding Categories
Within the ‘Categories’ tab, a Smart Category can be added to the product. This allows the product to be sent to the Stock System and will be the default category.

Fig.10 - Categories Tab
- Select [add new category]
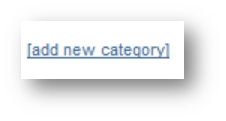
Fig.11 - 'Add New Category' Link
The ‘Category Selection’ screen will display.
- Choose the Category Type
- Choose the relevant Sub-Category
- Select Done to add this Sub-Category to the Product
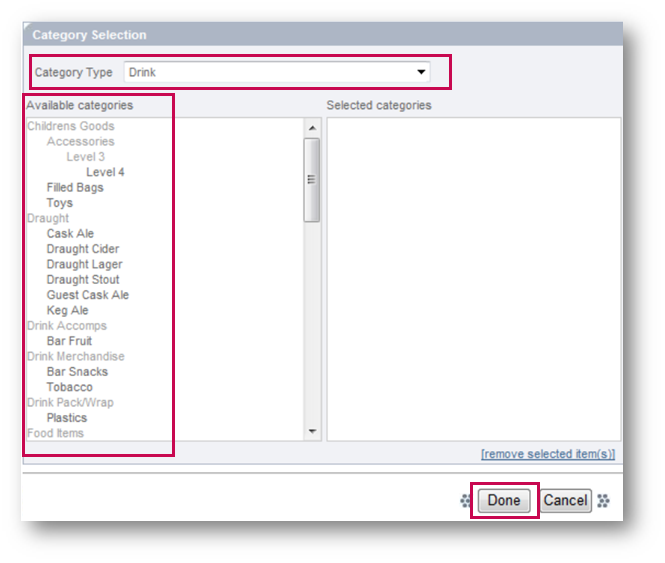
Fig.12 - Category options
- To remove the Smart Category, select Delete
A new Smart Category must be added to replace the deleted one.
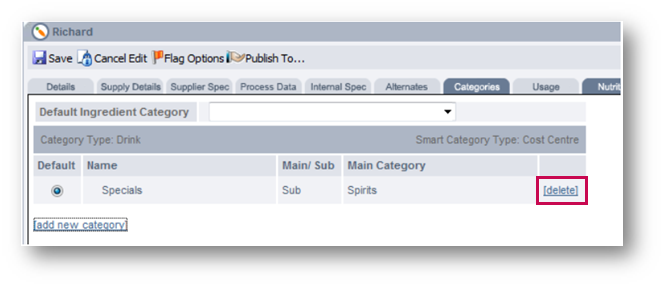
Fig.13 - Delete Category button
- Save the changes made to the product

Fig.14 - Category Assigned to Product/Ingredient

Comments
Please sign in to leave a comment.