Overview
Managers and Administrators can submit, accept, deny, and cancel transfer requests, depending on administrative rights.
- To request a transfer, an administrator must have full access to the location where the employee is being transferred from and an administrative role that allows them to transfer Team Member Records. To complete a transfer, an administrator must have access to the location where the employee is being transferred to.
- Financial Administrators and Primary Administrators have full access and permissions to all locations; therefore, they can complete the transfer quickly and easily and avoid the approval/denial process.
- Transfers may be accepted or denied between locations. The transfer process emulates what Managers need in order to perform transfers in a multi-location environment. This workflow is really helpful for Managers that do not have full access to both locations.
To take action on Transfer workflows:
All Transfer Workflows can be managed from the Transfers Dashboard, which can be accessed by:
- Click WorkSpaces.
- Under your organization's name, click Administrator.
- The Administrator WorkSpace or HOME tab will appear. Click Transfers.
A list of transfers appears on the left:
- You can search by the Team Member's Name or use the filters to narrow down the list.

To initiate a transfer request to another location:
- Click New Transfer.
- For Step 1, click Select/Edit Team Member.
- Select the Team Member from your list. Click Select this Team Member.
- Click Next.
- For Step 2, first click Select/Edit Unit for the location the employee is being transferred from.
- Select the unit from your list. Click Select Unit.
- For Step 2, next click Select/Edit Unit for the location the employee is being transferred to.
- Select the unit from your list. Click Select Unit.
- Click Next.
- For Step 3, enter Transfer Information:
- Use the calendar icon to select the Date Available for Transfer.
- Enter a Transfer Reason if needed.
- Click Transfer.
- Note: The request will now appear as Sent in the list. A notification and email is sent to the receiving location administrator. A link within this notification will take the administrator to the transfer information in their Manage Transfers List. The Team Member's Record is updated stating that a transfer request has been sent to the new location.

To complete a transfer request to another location:
If you have full administrative rights to both locations, you can complete the transfer request entirely. The process will begin the same as listed above for Step 1 and Step 2.
- For Step 3, enter Transfer Information:
- Use the calendar icon to select the Date Hired at New Unit.
- Use the drop-down arrow to select a Status of Full-Time or Part-Time.
- Click Select/Edit Positions to select a position.
- Enter Employee ID if used by your organization based on your company's policy.
- Click Next.
- For Step 4, enter a Pay Rate.
- Click Transfer.
- Note: The request will now appear as Approved in the list. The Team Member's Record is updated stating that a transfer request has been sent to the new location.

To approve a transfer request:
The administrator at the receiving location must approve or decline the transfer. They will receive a notification concerning the transfer and a link within the notification will take them to the Manage Transfers List.
- Click on the incoming Transfer Request.
- The Transfer Information will appear on the right.
- Click Approve.

- For Step 3, enter Transfer Information:
-
- Use the calendar icon to select the Date Hired at New Unit.
- Use the drop-down arrow to select a Status of Full-Time or Part-Time.
- Click Select/Edit Positions to select a position.
- Enter Employee ID if used by your organization based on your company's policy.
- Click Next.
-
- For Step 4, enter a Pay Rate.
-
- Click Transfer.
-
- Note: The request will now appear as Approved in the list. The Team Member's Record is updated stating that a transfer request has been sent to the new location.
To decline a transfer request:
The administrator at the receiving location must approve or decline the transfer. They will receive a notification concerning the transfer and a link within the notification will take them to the Manage Transfers List.
- Click on the incoming Transfer Request.
- The Transfer Information will appear on the right.
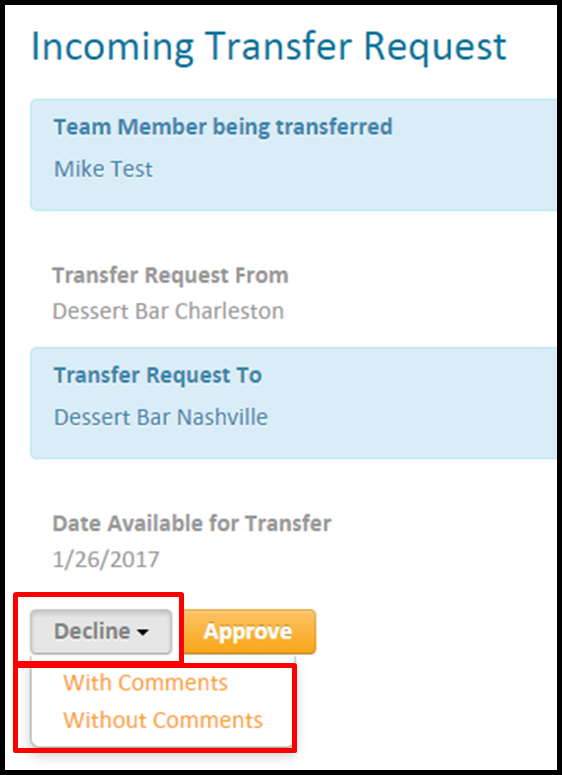
- Click the arrow next to Decline and select With Comments or Without Comments.

- Note: The request will now appear in the Denied filter, and a notification and email are sent to the administrator of the requesting location.
To cancel a transfer request:
Any incoming transfer may be canceled by the originating administrator, or any other administrator with access to the requesting location. Once a transfer is cancelled, the following occurs:
- Click on the incoming Transfer Request.
- The Transfer Information will appear on the right.
- Click Cancel Transfer Request.
- Enter a Cancel Reason if applicable. Click Cancel Transfer Request.

- Note: The request will now appear as Cancelled in the list. A notification and email are sent to the administrator of the requesting location. Neither the Team Member's record nor schedule is impacted if the transfer is cancelled.

Comments
Please sign in to leave a comment.