Overview
In Recipe and Menu Engineering, Ingredients are created and stored within the database. They are then used to create Recipes, which can then be used to build Menus. It is possible to input a wide range of data/information against an Ingredient, including cost, nutritional information, intolerance data, and more. This article will show how to create and administer Ingredients in the system.
For a list of all Recipe and Menu Engineering articles, please visit RME - Article Contents Page.
Creating a New Ingredient
Each Ingredient must have a name, supply quantity, and unit of measure. All other details are optional, but it is recommended that a Category (required for Nutritional Information calculations) and Supplier is selected for each Ingredient. A unique supplier product code and internal product code can also be entered if known.
Please note: UOMs compatible with inventory are listed below in Table 1.
Setting 'CASE' as the UOM will fail to publish to Inventory.
For customers using Inventory, the 'Unit Size' field cannot be changed once saved. If this needs to be changed, the Ingredient needs to be archived and a new one created.
Table 1 - UOMs compatible with Inventory
| Accepted UOMs |
|
| EA | QT (US) |
| CL | PT (US) |
| GR | MG |
| L | ML |
| KG | OZ |
| LB | FOZ |
| STONE | FLOZ (US) |
| CUP (UK) | SERVING |
| CUP (US) | PT |
| GAL (UK) | FLOZ |
| GAL (US) | GAL |
| GILL (UK) | PTN |
| GILL (US) | PNT |
| TSP (UK) | LBS |
| TSP (US) | PCS |
| TBSP (UK) | DZ |
| TBSP (US) | BDZ |
| QT (UK) | |
Once an Ingredient is created, it is possible to edit and update additional/existing values as required.
- Go to the ingredients tab and select Create a new ingredient

Fig.1 - The Create a New Ingredient Button on the Ingredients Tab
- On the Details tab, enter an Ingredient Name
- All other fields are optional but it is recommended to populate as many as possible
Entering Supply Details
- Go to the Supply Details tab and populate the Supply Quantity fields
In the example shown in Fig.2, quantity and measure details have been entered for a bottle of vodka.
Please Note: The second unit of measure drop-down (highlighted in orange) may not be visible for all users depending on their configuration - certain Fourth products do not utilise this field.

Fig.2 - Entering Supply Quantity details for a bottle of spirits
The example shown in Fig.3 could be used for a 'single' Ingredient, such as an individual vegetable (cabbage, squash, etc).

Fig.3 - 1x1 Quantities for a Single, "each" Ingredient
- To display fractions, use decimal places - so, a half is 0.5 and a quarter is 0.25
Unit Conversions
To give greater flexibility when using the Ingredient in a recipe later on, unit conversions can be applied. For example, 250g of flour could be converted into 1 Cup - this is known as a 'weight to volume' conversion. The Ingredient can then be used in recipes either as a weight (grams) or a volume (cups).
- On the Supply Details tab, after entering Supply Quantity values, select [add conversion]
- In the pop-up window that appears, enter values for Quantity, Pack Size and Unit Type
- Then select Save
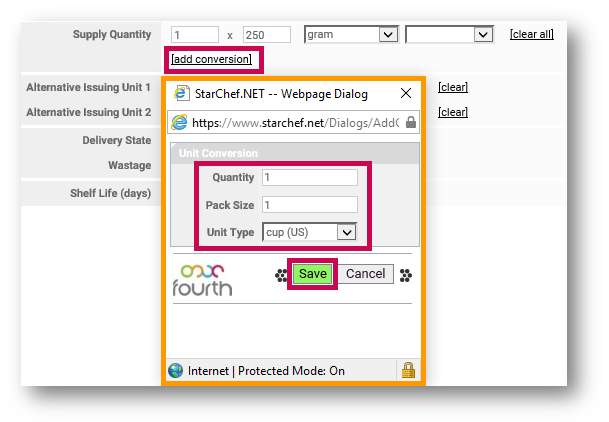
Fig.4 - Adding a Unit Conversion - 1 cup (US) for 1 x 250g
Please Note: It is not possible to enter a conversion for the same unit type (1000g = 1kg). This type of conversion is already built into the system.
- Back on the Supply Details tab, it is recommended to select a Supplier Name
This drop-down will only display Suppliers that exist in the database. Please see RME - Admin Functions for information on adding Suppliers.
Adding an Ingredient to a Category
The newly created Ingredient should ideally be added to a Category.
- Go to the Categories tab
- Select [add new category]
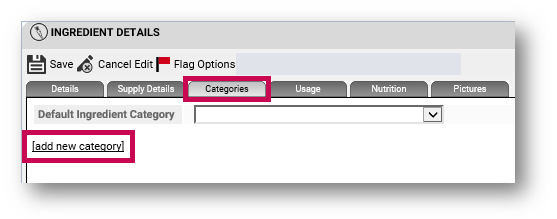
Fig.5 - Add New Category Button
A pop-up window will display.
- Make a selection from the Category Type drop-down
- Select the Category/Categories that the Ingredient is to be added to - see that they appear in the 'Selected categories' section
- Use the [removed selected item(s)] button to correct any errors
- Select Done when complete
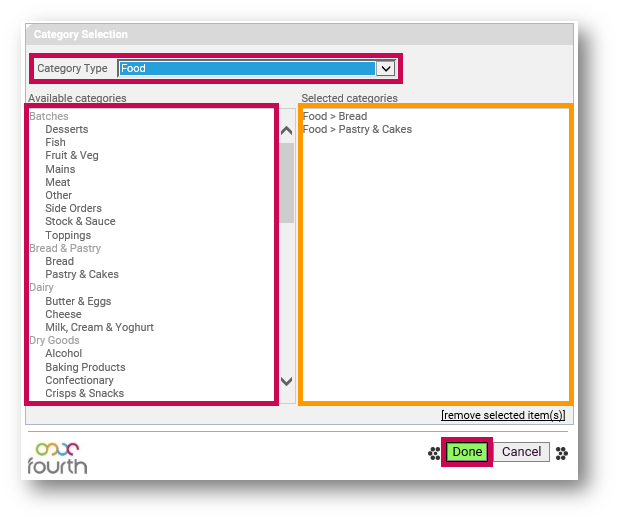
Fig.6 - Selecting Categories
The page will then refresh, with the selected Category/Categories displayed.
- If more than one Category has been selected, use the button to select the Default one
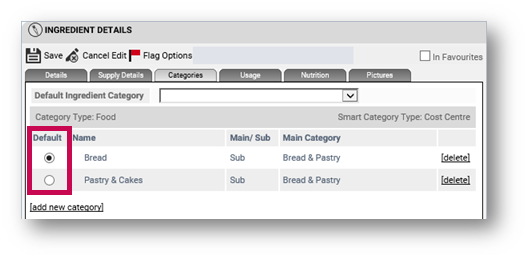
Fig.7 - Selecting a Default Category
Importing Nutrition Values
Recipe and Menu Engineering provides a link to two Nutrition Databases:
- USDA (USA's Dept. of Agriculture's Nutritional Database)
- McCance & Widdowson
To import nutritional values for an Ingredient:
- Go to the Nutrition tab and select [import nutritional information]
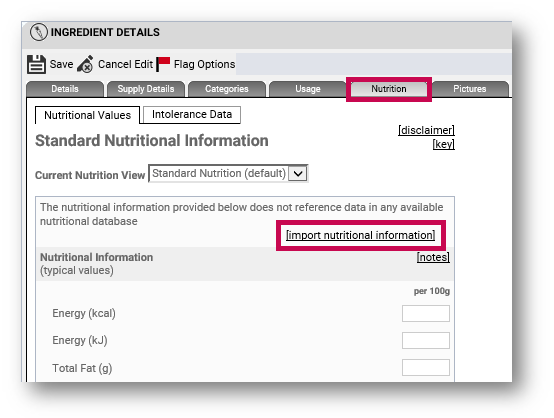
Fig.8 - Import Nutritional Information Button on the Nutrition Tab
A pop-up window will display.
- Select the required Nutrient Database and Food Group
- Enter some text to Search For (or leave the field blank) and use the arrow button to search
This is a full-text search and all items found in the chosen database containing the entered text will be returned.
- Choose the required product from the results and select Next
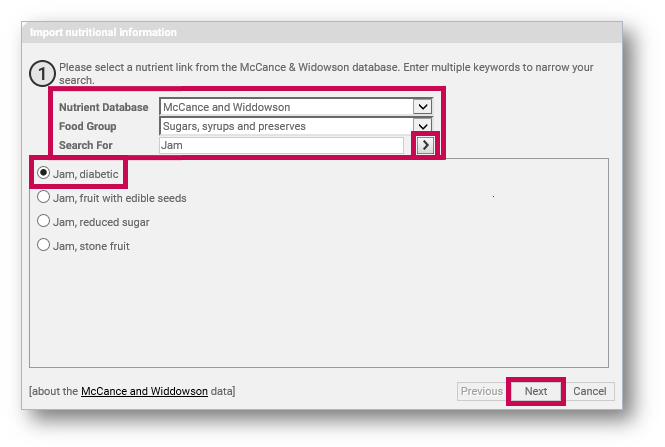
In some instances (usually with the USDA database), it is also possible to import a gram conversion for an Ingredient.
- In this case, on the next screen that appears, tick the Import gram conversion box and enter Convert from and to values
- Whether entering a gram conversion or not, select Finish to import the nutritional values
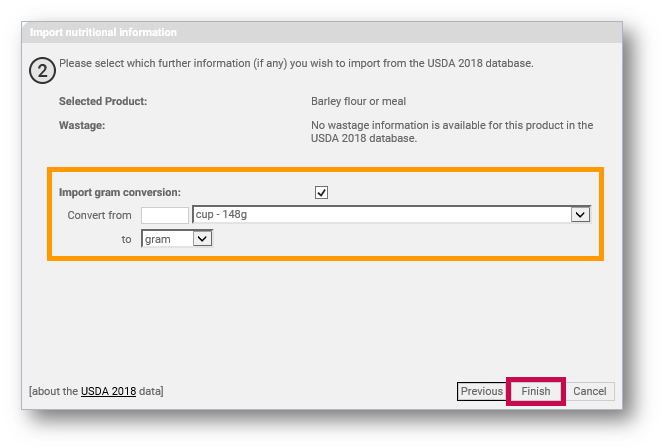
Fig.10 - Gram Conversion (If Applicable) and Completing the Nutritional Info Import
The main screen will refresh and the nutritional information for the Ingredient will then be displayed.
Reference information is also saved.
- To delete the reference, select [delete reference]
- To remove the nutritional values and the reference, select both [delete reference] and [clear values]
- To change the reference select [change reference]
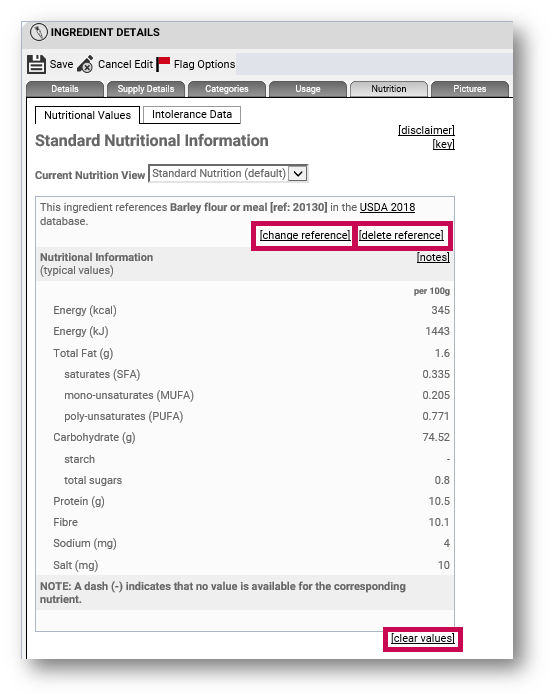
Fig.11 - Imported Nutritional Information, and Delete/Change Options
Entering Nutritional Information Manually
An alternative to importing nutritional information is to enter it manually.
- Go to the Nutrition tab and simply enter values into the provided fields
- Select Save once complete
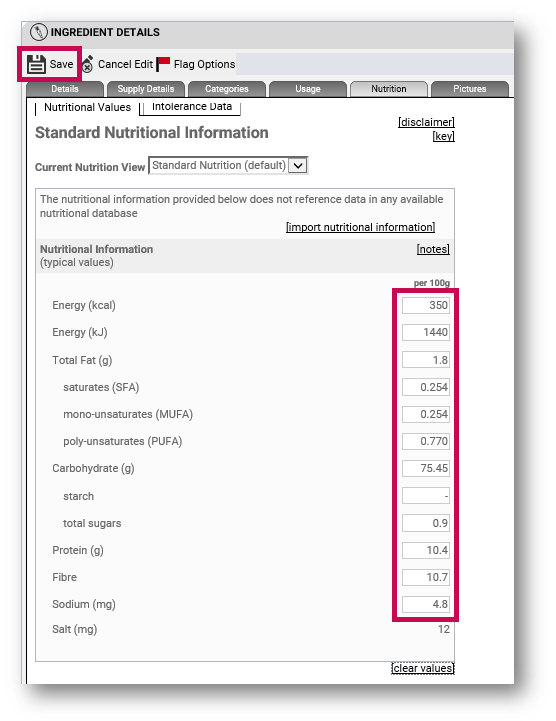
Fig.12 - Manual Input of Nutritional Information
Entering Intolerance Data
Recording intolerance data for an Ingredient will display the presence of specific properties found in it that may cause allergic reactions to certain people. For example, recording the presence of nuts or gluten.
- To enter intolerance data for an Ingredient, go to the Nutrition tab and select Intolerance Data
- Use the drop-downs to select Yes or No to the presence of the specified property
- Certain properties can be expanded into more detailed categories
- Select Save once complete
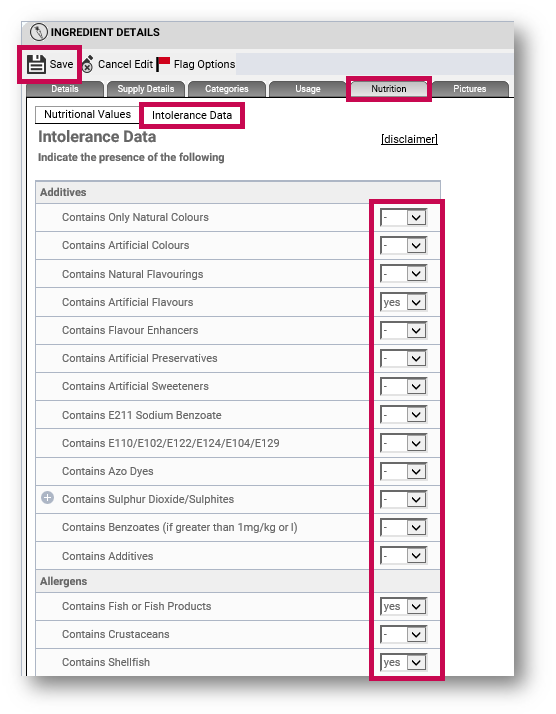
Fig.13 - Inputting Intolerance Data Against an Ingredient
If amending existing intolerance data, an on-screen indicator will display when an Ingredient or Recipe’s intolerance values are pending recalculation or that recalculation is in progress.
When the red indicator is displayed (next to the Ingredient or Recipe name - see Fig.14), this means that the Ingredient or Recipe has not yet had its intolerance values updated to the new ones.
Please note: The indicator does not automatically disappear from the screen when the calculation is finished. For the indicator to disappear, two conditions must be met:
- The intolerance recalculation operation must be complete
- The page where the indicator is displayed must be refreshed (i.e. the browser is triggered to show the most updated version of the page)
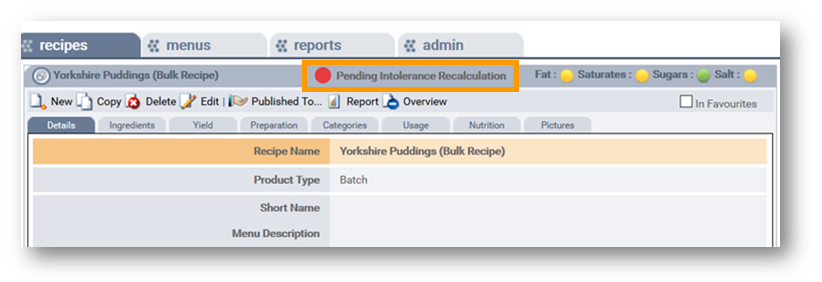
Fig.14 - Pending Intolerance Recalculation indicator
Adding an Image to an Ingredient
It is possible to link multiple images to each Ingredient that is created. Compatible image file formats are bitmaps (.bmp), JPEGS (.jpg) and GIF(.gif). The maximum filesize for images is 2MB and an ideal width for images is 400 pixels.
- Go to the Pictures tab and select [upload image]
This will open the Image Upload Console window.
- Use the Browse... button to locate the image file
- Select the required file and use the Upload button
The image will be displayed on the right-hand side of the window.
- Finally, enter a brief description for the image and then Save
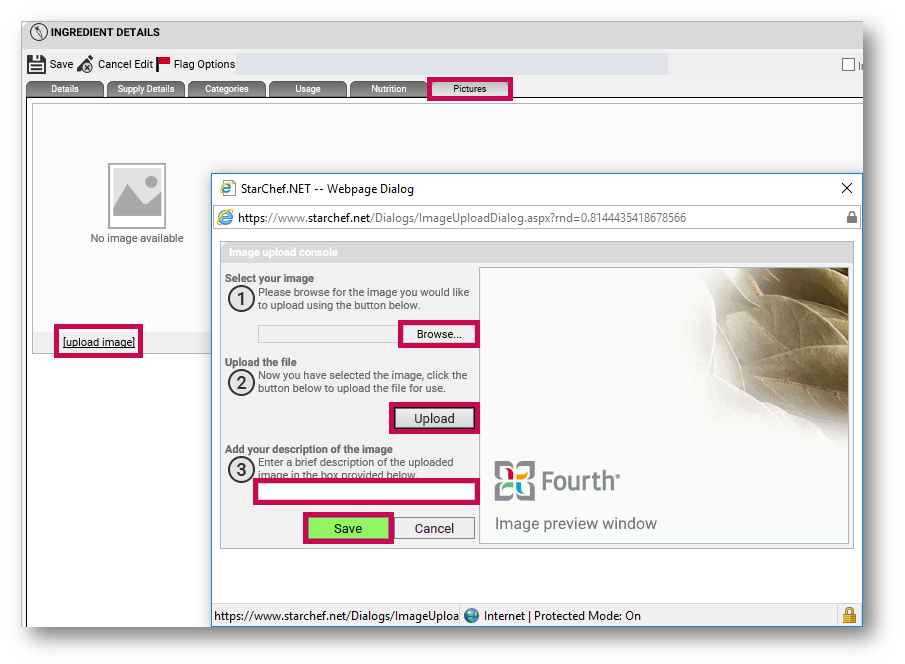
Fig.15 - Uploading an Image to an Ingredient
The screen will refresh to display the image on the Ingredient's Details tab.
- To enter multiple images, simply repeat this process
- For multiple images, the order can be specified using the order drop-down
- To specify which image will be the default picture use the Edit button, go to the Pictures tab and use the default tick-box on the required image
- Save once complete
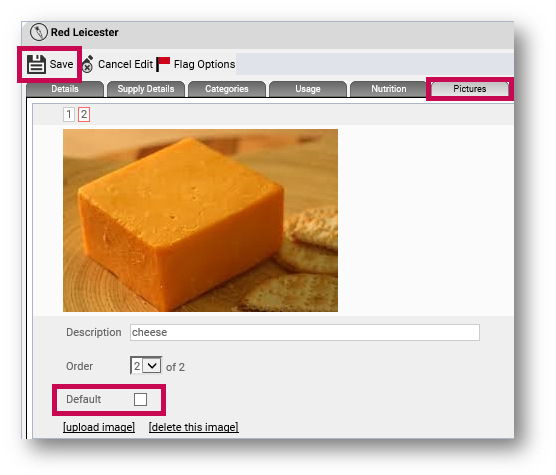
Fig.16 - Setting an Image as Default

Comments
Please sign in to leave a comment.