
What’s Changing?
Please note - this release note is an updated verison of a previously published one. It contains the same information, as well as the new functionality listed below.
The following enhancements are being made to the 'Furloughed' status page:
- Ability to switch Furlough functionality off for those who don’t require it
- Ability to edit start and end dates if entered incorrectly
- Ability to remove 'Furlough' status from employees if set up incorrectly
- Average Pay for the 2019 tax year is now shown within the page
- Ability to add multiple 'Furlough' status period for each employee, if required
Proposed Release Date: 9th April 2020
Reason for Change
To allow the 'Furloughed' satus page to be used more effectively.
Customers Affected
All Workforce Management customers.
Please visit Fourth Products and Covid-19 for a list of Fourth's Covid19-related articles.
Release Notes
A new Global setting has been added to the HR module which allows for the Furlough status to be switched off if it is not required on portals.
- To turn off the furlough functionality on the portal, go to HR > Administration > Global Settings > Edit Employee Settings
- Tick the checkbox against Switch off Employee Furlough Functionality?
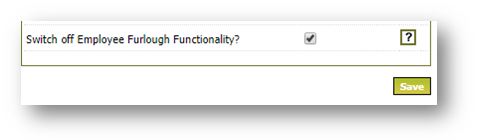
Fig.1 - Option to switch off Employee Furlough Functionality in Edit Employee Settings
When this Global Setting is un-ticked, the Furlough Functionality is available.
Furlough Status Screen
Within the Employee Summary screen, a new link has been added which will take users to a page where the employee status can be flagged as ‘Furloughed’
-
To view the new link go to HR Module > Employees > Employee List > select Employee
-
Select COVID19 Furlough Status

Fig.2 - COVID19 Furlough Status on the Employee Summary page
A new ‘Employee Furlough Status’ screen will appear.
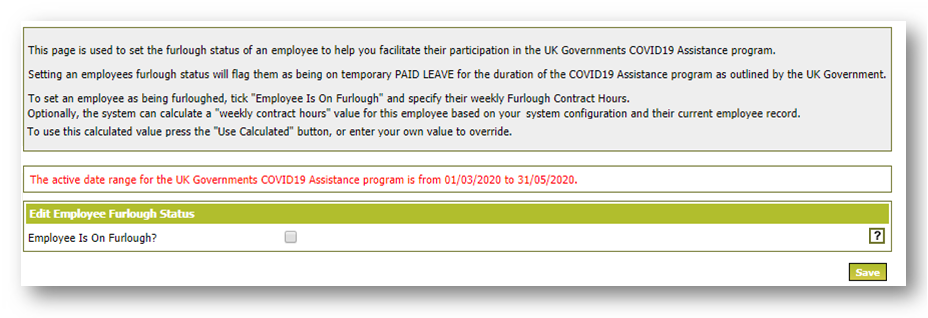
Fig.3 - Furloughed Employee Status page
Within this page, the following field is available:
- Employee is on Furlough? tickbox
Once ticked,the following fields will appear:
- Furlough Weekly Contracted Hours?
- Furlough Effective Start Date
- Earnings per Period
- Furlough Effective Stop Date
Contracted Hours
- To add the contracted Hours to this field, select Use Calculated

Fig.4 - Furlough Weekly Contract Hours
The field will be auto-populated with the following:
- If the employee is on a Flexible Employment status, the average hours calculation used in the Flexible Holiday calculation will be used to populate the average hours
- From the 6th April 2020, the Flexible Holiday calculation will be completed using 52 weeks For more information on the 52 Week Flexible Holiday calculation, please see the WFM Release Note - 52 Week Holiday Calculation Release Note
- If the employee is not Flexible, then the Weekly Contracted hours recorded within the Employment Details page will populate
- If Contracted hours are not recorded within the Employment Details page, the FTE Hours within the Job Title setup will populate
The Help Icon will indicate where the contracted or average hours have been populated from.
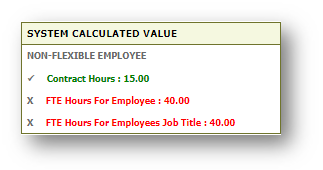
Fig.5 - System Calculated Value
The Contracted Hours value can be over-written and saved if the user chooses to display one of the other values rather than the automatically generated one.
- To view the contracted hours on the Employment Details page, go to Employee Info > Employment details
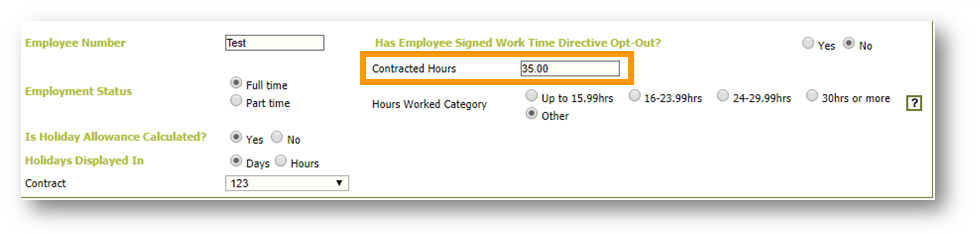
Fig.6 - Contracted Hours
- To view the FTE hours within the Job Title, go to HR > Company Admin > Job Titles > Select Job Title > Edit default holidays
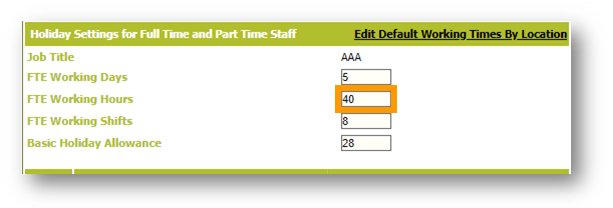
Fig. 7 Job Title FTE Hours
Earnings for Period
The Earnings for Period will show for employees who are paid by the rota. The amount has been calculated using the basic pay within the 2019/2020 tax year. This field is auto-generated and will not change so cannot be overwritten. The frequency that the employee is paid will also show, as the average amount is the ‘period’ amount and not the weekly amount.
Tronc, bonus, fees, commissions, overtime, additional pay, etc is not included in this calculation.
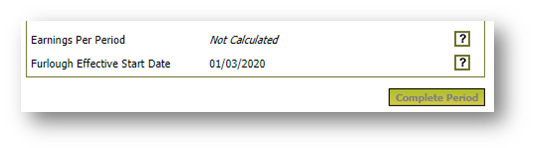
Fig.8 - Earnings Per Period
Please note: The data for this field is currently being calculated and is not yet ready to populate. Once it is ready, the data will show here for employees paid by the rota.
Effective Date
A 'Furloughed' status takes effect from the moment that the details have been agreed between employee and employer.
- When creating a Furloughed status for employees, the effective date should be entered into the Furlough Effective Start Date field
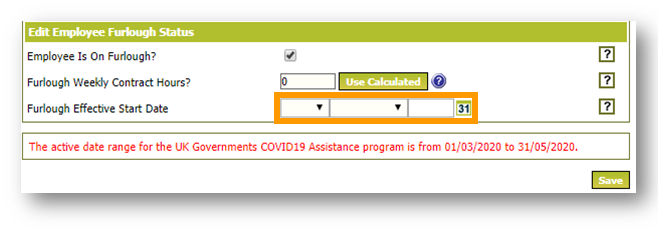
Fig.9 - Furlough Effective Start Date
The date must be within the current range set out within the HMRC Guidelines. A date outside of this will not be valid and so cannot be saved.
The current range for Furloughed as per the government guidelines is 1st March to 31st May 2020
-
Once the date has been entered, select Save
Upon saving the page, a pop-up message will appear.

Fig.10 - Furlough Status Information box
-
Select OK
The employee will then be flagged as Furloughed and a 'Furloughed' status line will appear at the top of the page.
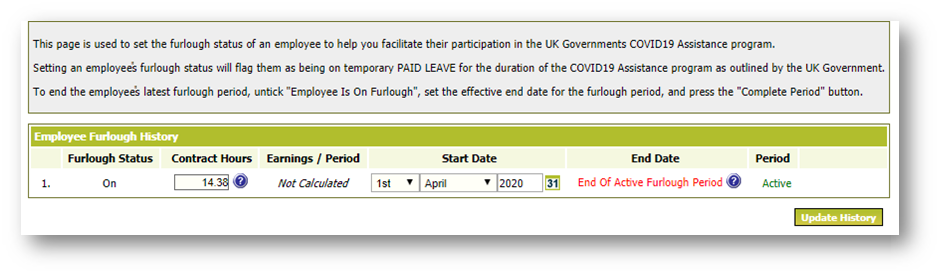
Fig.11 - Furlough Status Page
If the start date has been entered incorrectly, it can be updated within this record.
- Enter a newStart Date and then select Update
- Select OK on the information pop-up that appears
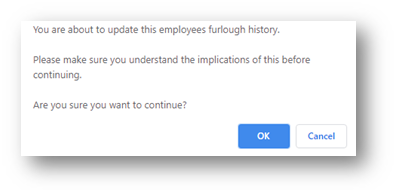
Fig.12 - Furlough Status Update information box
The Start Date will then update to the new date entered.
Ending Furloughed Status
Once the Covid-19 response is over, the Furloughed status can be ended.
- To end a Furloughed status go to Employee Summary > Covid19 Furlough Status
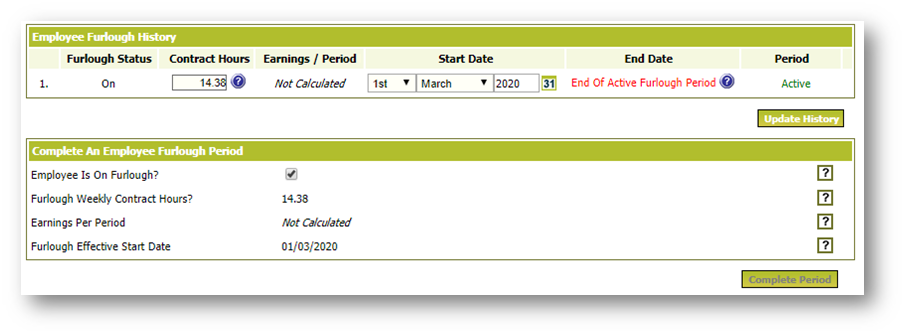
Fig.13 - Furlough Status page
- Remove the tick from the Employee is on Furlough? checkbox
The page will update and a new field for the effective End Date will appear.
- To end Furlough status, enter the end date in the Effective Date End Date field
- Select Save
The Effective Date will automatically populate with a date 3 weeks after the start date, as this is the minimum time an employee must be furloughed for.
- To end a furlough period, enter a date in Furlough Effective End Date
- Select Complete Period
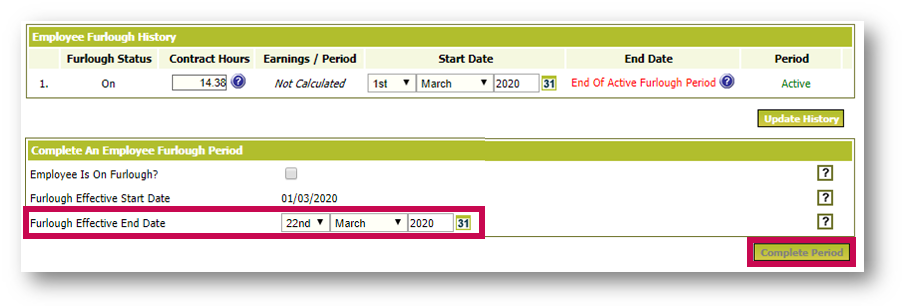
Fig.14 - Furlough Effective End Date
An information box will appear.
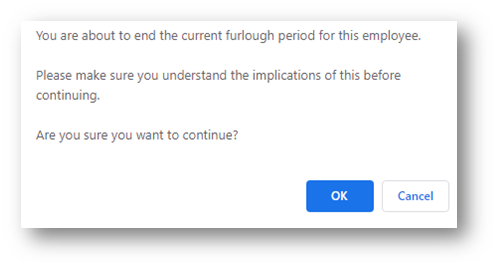
Fig.15 - Furlough Effective End Date Information Box
- Select OK
The 'Furlough status line at the top of the page will update with the end date.
- To amend the End date if entered incorrectly, enter the new date into the End Date field
- Select Update History

Fig.16 - Amending an End Date
- Select OK in the box that appears, and the end date will update to the amended date
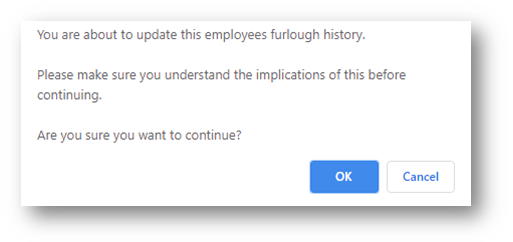
Fig.17 - Furlough history update information box
Removing a Furloughed Status
If an employee has been marked as Furloughed in error, the following steps can be used to remove any Furlough status assignments.
- To remove Furlough status, tick the checkbox against Clear this employees furlough status?
- Select Clear
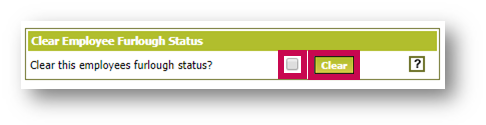
Fig.18 - Clear Furlough status
An information box will appear for confirmation that the furlough status should be cleared.
- Select OK

Fig.19 - Clear furlough status information box
The Furlough Status page will reset and remove all previous furlough status records.
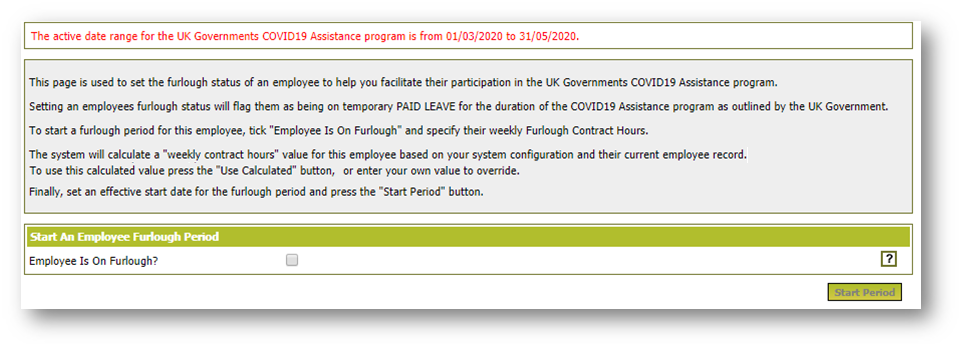
Fig.20 - Furlough Status page
Setting Multiple Furlough Periods
A furloughed period must be no shorter than 3 weeks. It is possible, however, to end an employee’s ‘Furlough’ status after a minimum of 3 weeks, and then furlough them again – as long as this is documented and has been agreed by the employee.
- To set multiple furlough periods, go to the Furlough Status page
When a period has been ended, a further period can be added.
- To add another furlough period, select Employee is on Furlough?
- Enter a start date > Start Period
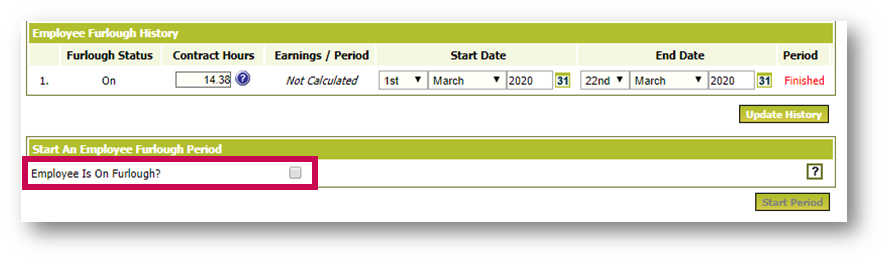
Fig.21 - Furlough Status page
A second furlough period will be added to the top of the page which can be managed according to the process above.
It is possible to set the furlough periods in advance or add the details as and when the dates occur.
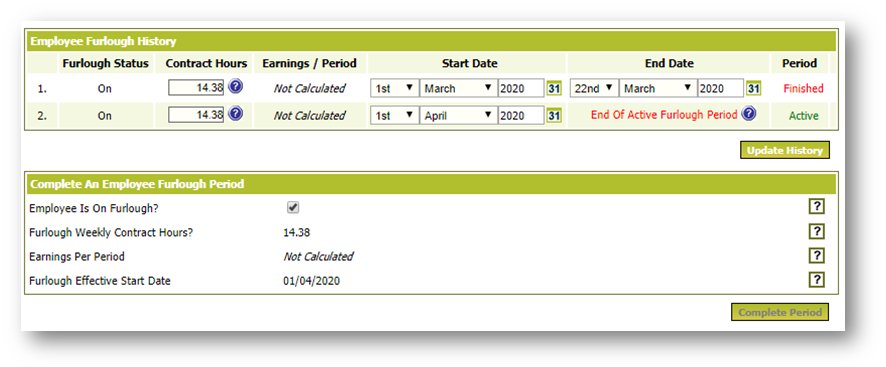
Fig.22 - Furlough Status page with second furlough period recorded
User Access
To release this page as quickly as possible, a new permission has been added to restrict access to edit Furloughed employee records.
To update access for individuals
-
Go to HR > Users > Assign User Access
-
Select Employee > User Profile
-
Enable the permission by adding a tick to the Restrict updating Furloughed Employee Status box

Fig.23 – Restrict Furloughed employee access
-
When saving the changes to access, select Next on each subsequent page to complete the process
To update a Permissions template
-
Go to HR > Users > Templates
-
Select Template > Assign Permissions
-
Enable the permission by adding a tick to the Restict updating Furloughed Employee Status box

Fig.24 – Restrict Furloughed employee access
Comments
Please sign in to leave a comment.