
Overview
This article first provides guidance on setting the required user permissions and then describes the process of rolling back a Tronc Period within the Tronc2 module.
To roll back a Tronc Period in the Tronc module, please follow the guidance in this article.
There may be instances when a Tronc Period is submitted in error, or changes need to be made to it after Tronc was submitted to Payroll. Tronc Periods can be rolled back and reopened so that changes can be made before resubmitting to Payroll.
Rolling back a Tronc Period should only be done as a last resort if it is not feasible to make changes to Tronc payments manually in the Payroll module.
A preview should be run before and after the rollback to ensure that the payments are taken out of Payroll
Permission Required to Roll Back Tronc in Tronc2 - Access Level Hierarchy
For users who require this functionality, a permission needs to be assigned to the Access Level hierarchy (this is the recommended option, though it is also possible to assign access to individual users).
To do this:
- Go to HR > Company Admin > Access Level Hierarchy
Fig.1 – Access Level Hierarchy in the side menu
- Select the Company Hierarchy
Fig.2 – Selecting the Company Hierarchy
- Select the Access Level that the user(s) in question belong to
Fig.3 - Access Level within the Company Hierarchy
- Under the 'Tronc2 Module' section, select the required template from the drop-down and select Edit
- Under the Tronc2 Module section, select Edit next to the required Template
Fig.4 – 'Edit' in the 'Tronc2 Module' section
- Under the Administration section, tick Rollback Period
- Select Save (and then Save again in the main browser window)
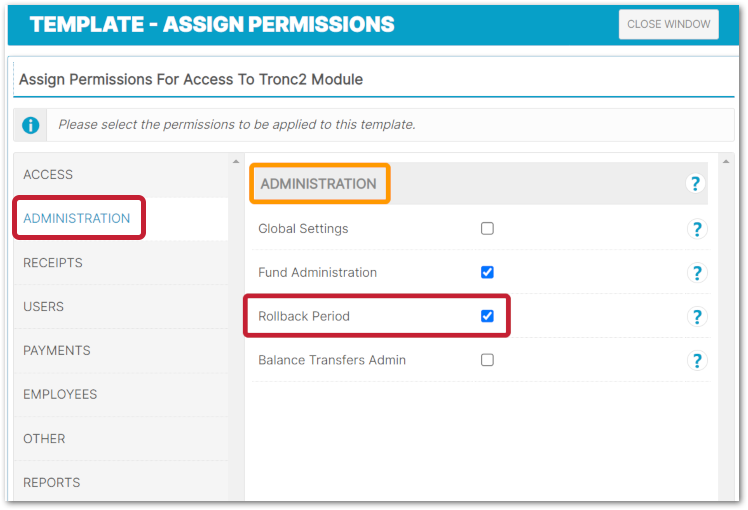
Fig.5 – Enabling Rollback Period Permission
Alternatively, a single user can be given this permission.
To do so:
- From the side menu, go to Tronc2 > Users > Assign User Access
- Search for and select the required Employee and go to User Profile
- Tick Rollback Period
- Select Next and Next (again)
The permissions will then be saved for that user.
Rolling Back a Tronc period in the Tronc2 Module
- From the side menu, go to Tronc2 > Administration >Rollback Period
Fig.6 – Rollback Period in the Administration Drop-Down
- Select the required Location and Tronc Period and then Rollback
Fig.7 – Location, Fund and Period Drop-Down Menus
- Confirm the rolling back of the Tronc Period by selecting OK
Fig.8 – Confirming the Rolling Back of the Tronc Period
Unless the Fund Administration settings are set to Pay When Rota Open (see Fig.9), then the Rota and Tronc must be rolled back following the below order.
Fig.9 – The Fund Administration setting to allow Rota to be Open when processing Tronc
Within Tronc2, if the Rota(s) are also being rolled back within the Tronc period or for the same Tronc period, this must be done in the correct order, please see below:
- Roll back the Tronc Period(s)
- Then roll back the Rota(s)
- Amend the Rota(s)
- Submit the Rota(s)
- Amend Tronc
- Submit Tronc
Comments
Please sign in to leave a comment.