Overview
The Talent Pool area within the ATS enables users to benefit from:
- Tags to allow managers to categorise and organise candidates
- A fast and responsive Talent Pool table view, built to display large volumes of candidates
- Pinning functionality that allows users to manage candidates better
- Filter functionality developed to offer efficiency when trying to narrow down on candidates
- Easy to use search functionality
Managing Talent Pool Tags
The Tags functionality can be used to meaningfully categorise and/or organise candidates added to the talent pool. Tags need to be defined by users on the Head Office/Administrator permission level within the Talent Pool Manager area for other users to be able to utilise tags when adding candidates to the Talent Pool.
- Navigate to ATS > Set up > select Talent Pool Manager (see Fig.1)
- Select the Search to create or delete tags field > begin typing a word or phrase to search for existing tags or to create a new tag
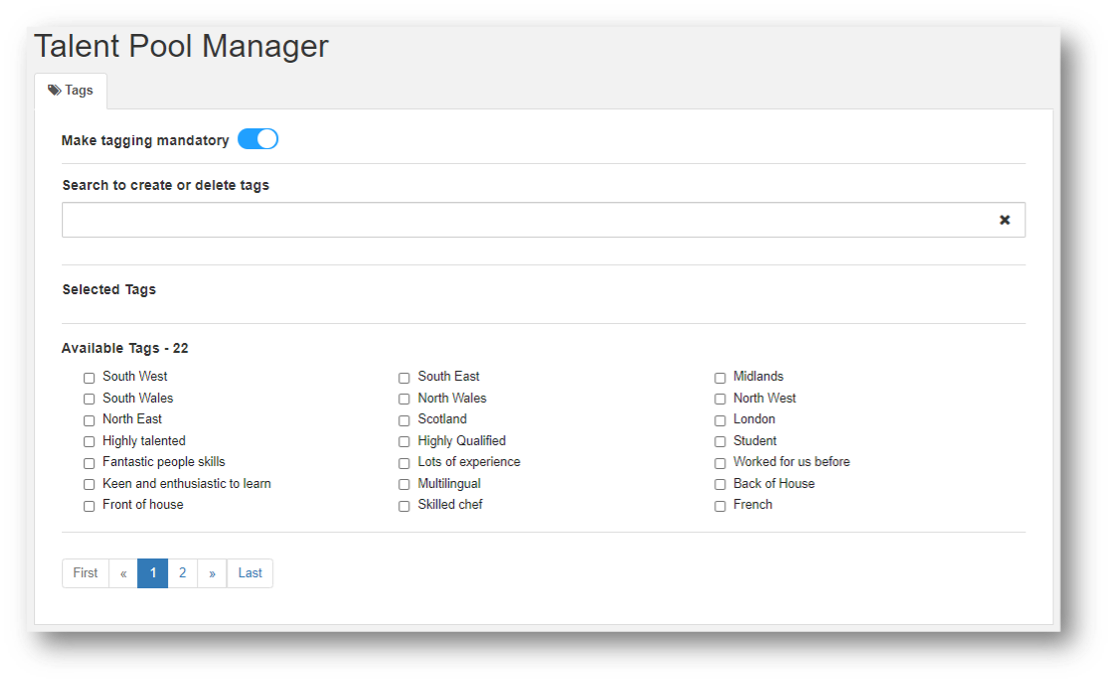
Fig.1 – Talent Pool Manager
- Select Create to create the word or phrase as a new Tag (see Fig.2)
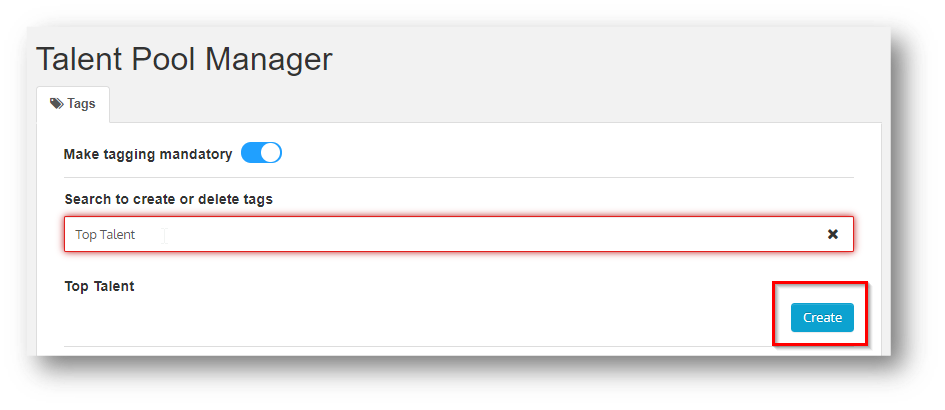
Fig.2 – Creating a new Tag
- To delete Tags, select the Search to create or delete tags field > type in the tag you wish to delete or select on the specific tag within the Available Tags area
- The tag will be moved to the Selected Tags area > select Delete to delete the tag(s) > select Yes to confirm the prompt
Please note: If tags are deleted which have been used in the past, these tags will subsequently be removed from any candidate profiles.

Fig.3 – Deleting a Tag
Assigning ‘Tags’ to Candidates
Users are presented with an Add to Talent Pool pop-up modal from which they can select one or more tags to assign to a candidate before adding them to the talent pool.

Fig.4 – Adding to Talent Pool pop-up modal
The Add to Talent Pool pop-up modal can be opened from the following areas:
1. Candidate application page via the cancel/regret application action

Fig.5 – Opening Add to Talent Pool pop-up from candidate application
2. Dashboard (and dashboard list view) via the Regret/Talent Pool bulk actions
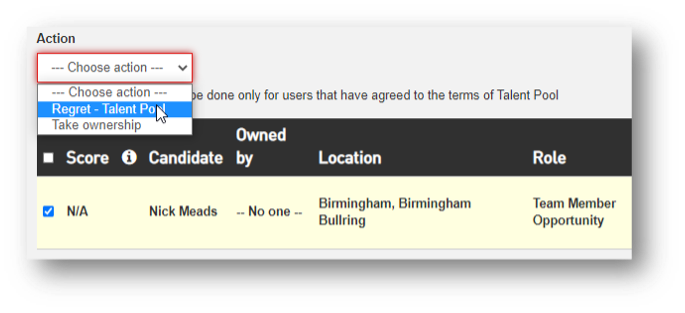
Fig.6 – Opening Add to Talent Pool pop-up from Dashboard Bulk Action
Making the Tag selection mandatory
Head Office/Administration users have the option to make the use of Tags mandatory.
- Navigate to ATS > Set up > select Talent Pool Manager > enable the Make tagging mandatory toggle
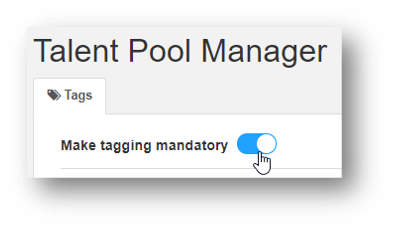
Fig.7 – Making the use of Tags Mandatory
If the Make tagging mandatory toggle has been enabled, all users are required to select a minimum of at least 1 tag from the available list within the Add to Talent Pool pop-up modal (see Fig.8).
A helpful prompt is also displayed within the pop-up modal to ensure managers are aware of this requirement before moving a candidate to the talent pool. The Add to Talent Pool button is disabled until the user has selected at least 1 tag.
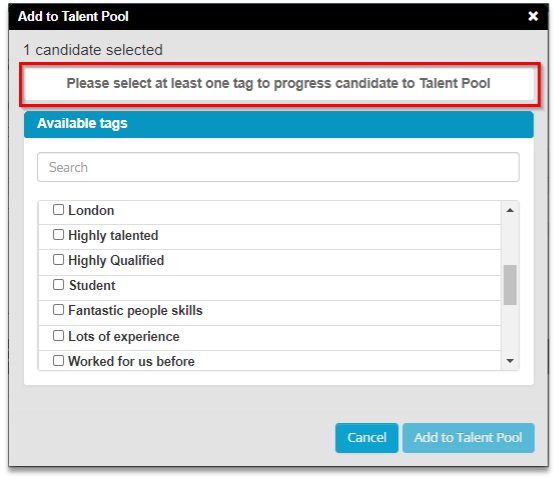
Fig.8 – Mandatory tagging validation
Please note: The tagging feature can be achieved by not creating any tags. If no tags have been created, candidates will be added to the talent pool without the Add to Talent Pool pop-up modal being displayed to users.
The Talent Pool Landing Page
Candidates added to the Talent Pool are displayed within a table view (see Fig.9) that provides a range of capabilities. These functionalities include:
1. Candidate records are displayed with only relevant information within the table view
- Candidate Name
- Date Added
- Talent Pooled Application
- Location/Role for Live Applications
- Tags
- Invitations to Apply for Vacancies
- CV
- Manager Notes
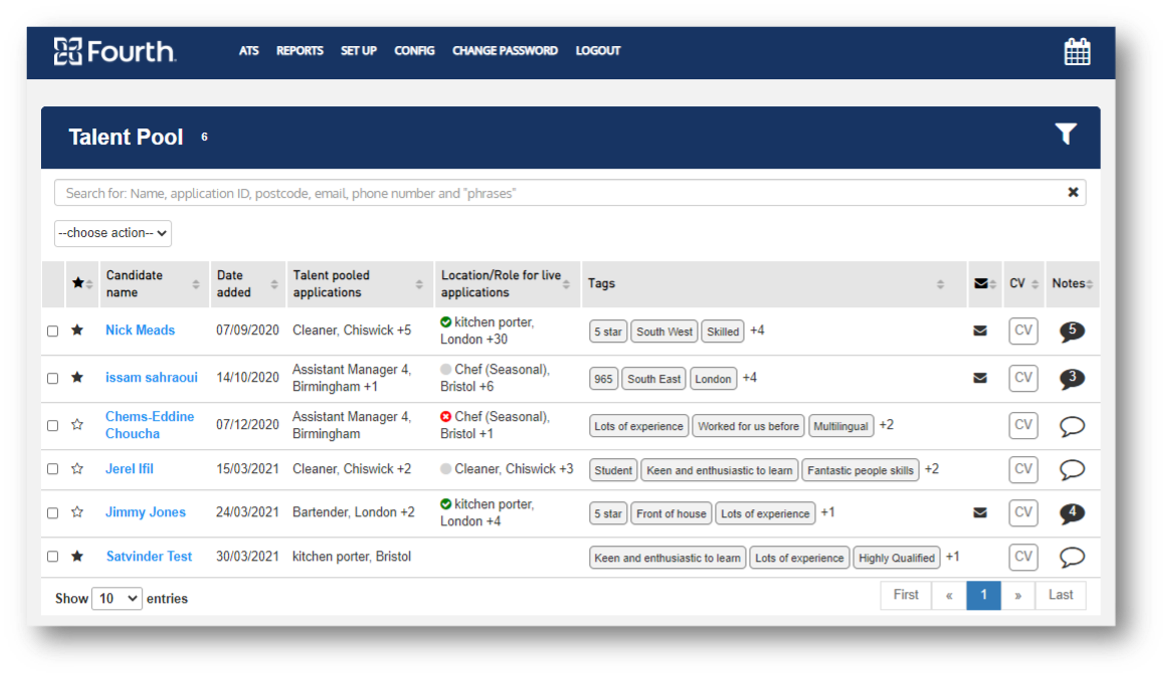
Fig.9 – Talent Pool & Table view
2. Sorting of records by any of the columns within the Talent Pool table view (see Fig.10)
Users can do this by selecting the column header to cycle through sorting by ascending order and descending order.
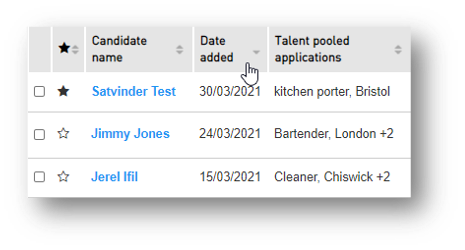
Fig.10 – Sorting candidate records in Talent Pool table view
3. Ability to change the number of candidate records (entries) displayed within the Talent Pool table view to view more or fewer records at a given time (see Fig.11)
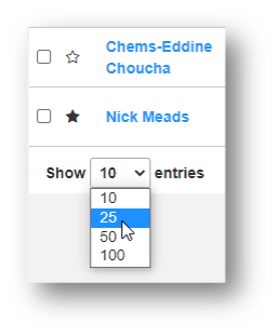
Fig.11 – Changing number of records to view in the Talent Pool table
Please note: Multi-brand customers will have a Talent Pool shared across all brands meaning candidates added to the Talent Pool from different brands are visible to all users across all brands.
Pinning Functionality
Users can Pin candidates within the Talent Pool to mark candidates that are of interest but not yet ready to be invited for any open vacancies.
To pin a candidate:
- Navigate to ATS > select Talent Pool from the drop-down menu > select the star icon next to the candidate name to pin the candidate
- The star is marked in black to signify the candidate has been pinned (see Fig.12)

Fig.12 – Pinning Candidates
Please note: Any candidates that have been pinned by one user are only pinned for their personal view. Once one or more candidates have been pinned, the sorting functionality within the Talent Pool table view can be utilised to quickly sort all pinned candidates to the top of the list
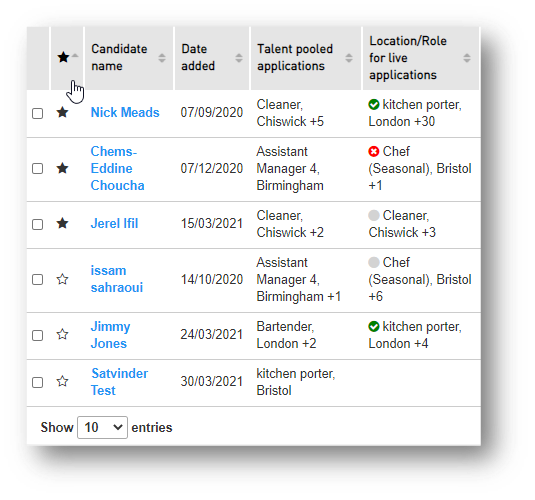
Fig.13 – Sorting pinned candidates
Talent Pool Filter Functionality
The filtering functionality has been designed to enable managers to find suitable candidates quickly and easily.
Managers can filter by:
- Brands (applicable to a multi-brand customer only)
- Locations
- Roles
- Tags
To filter the talent pool:
- Navigate to ATS > select Talent Pool from drop-down menu > select the filter icon to open the Filter View
Please note: The filter view can be opened and collapsed by clicking on the filter icon
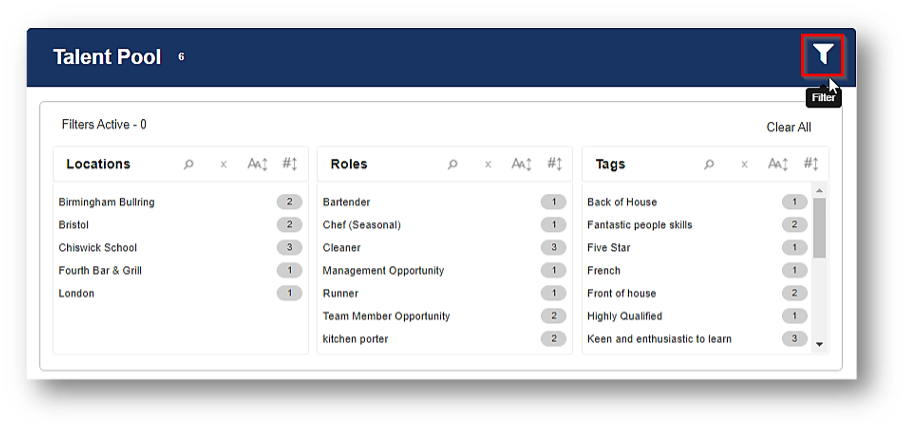 Fig.14 – Opening Filters in Talent Pool
Users can utilise the built-in functions within each filter to quickly find and sort the filter option entry that is relevant to them:
- Filter search can be used to search for filter options
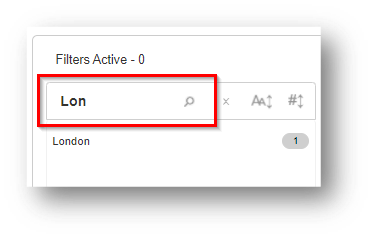
Fig.15 – Searching within a filter
- Sorting by alphabet can be used to sort the filter options in ascending or descending order alphabetically
- Sorting by number of records can be used to sort the filter options based on the number of records associated with each filter option in ascending or descending order
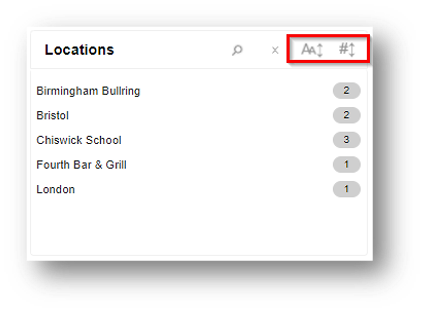
Fig.16 – Sorting functions within a filter
- Selecting an option in one filter will subsequently reduce the list of filter options available in all other filters
- Users can also select multiple filter options
- A count of all filter options selected is reflected in the Filters Active section within the Filter View
- All selected filters can be cleared by selecting on the Clear All button within the Filter View
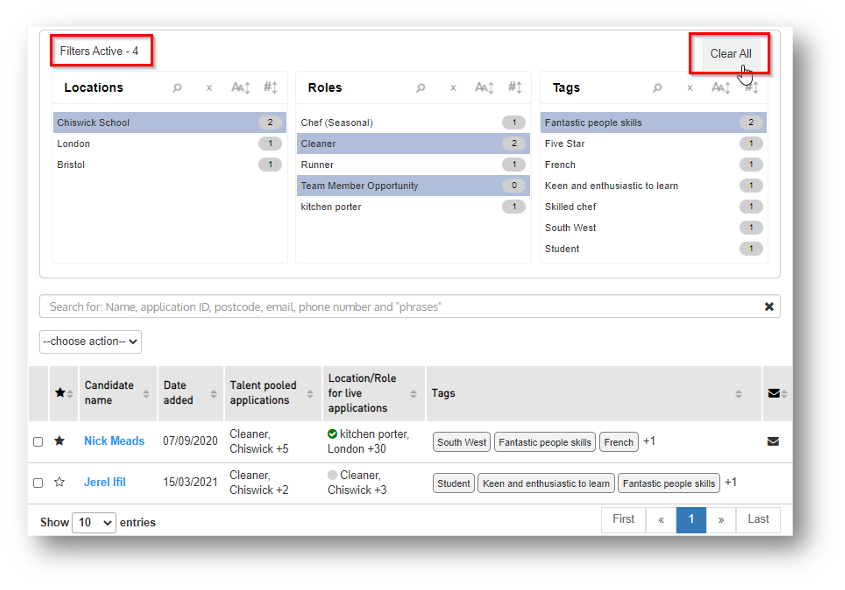
Fig.17 – Filter View functions (count, clear all & multiple selection)
Search Functionality
Users can search by:
- Name (First Name and/or Surname)
- Application ID, search by the IDs of both live and talent pooled applications
- Postcode, search by candidates address postcode
- Phone number
- Phrases, use a collection of words within quotation marks to search candidates – (see Fig.18)
Please note: The search function is not case sensitive and therefore returns results containing any characters entered within the search box. The Number of results found from the search is displayed in the Talent pool header (also see Fig.18). This is also true when filters are applied.
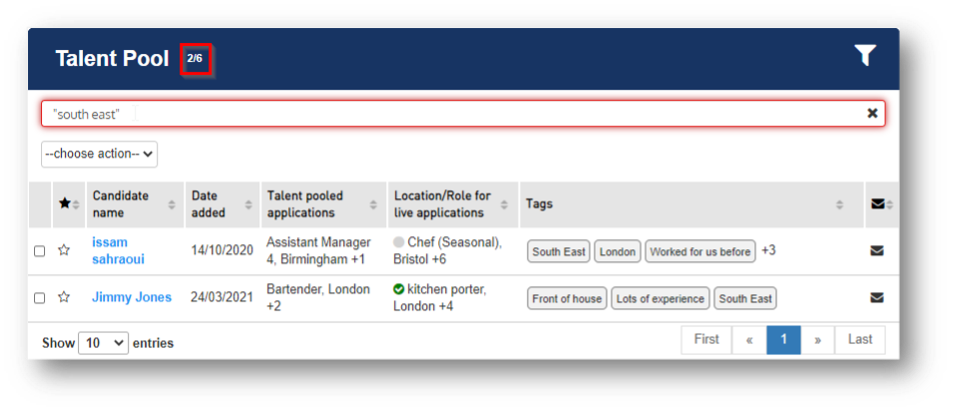
Fig.18 – Searching phrases and results displayed
In addition to the above, the search functionality can be used in conjunction with the filters to further narrow down specific candidates within the talent pool (see Fig.19). This provides even more precision and control to managers when trying to locate specific sets of candidates within a large pool.
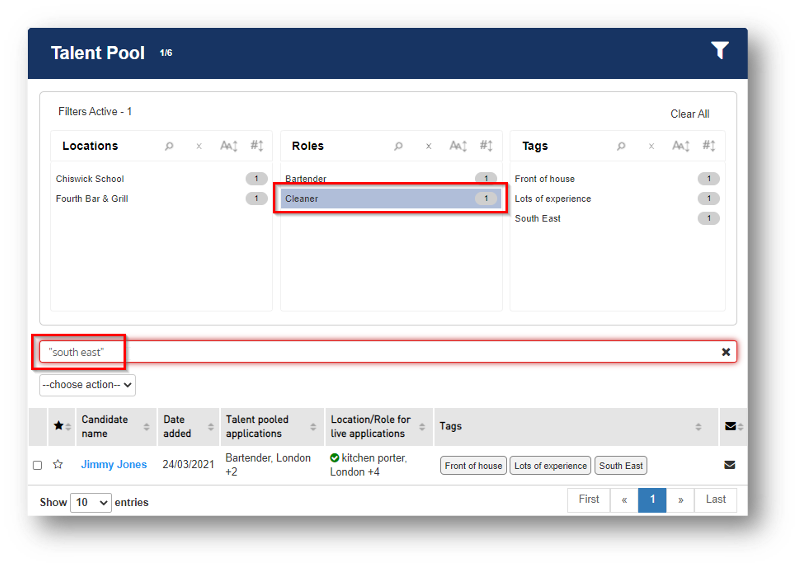
Fig.19 – Using search and filtering simultaneously
Candidate Profiles within the Talent Pool
To access the Candidate Profile:
- Navigate to ATS > Talent Pool > select the candidate name to open the Candidate Profile
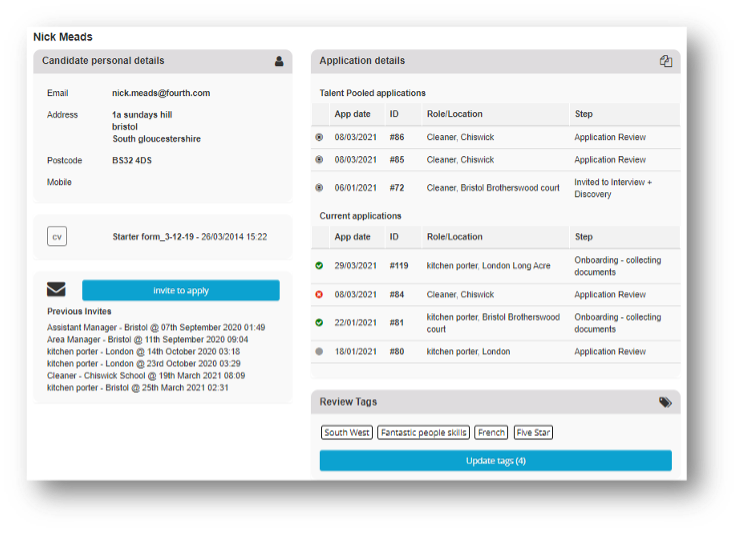
Fig.20 – Candidate Profile in Talent Pool
The Candidate Profile provides a single area for candidate information to be stored. Users can easily ascertain the quality of a candidate before deciding whether they should invite them for an open vacancy or not.
The details displayed within the Candidate Profile include:
- Personal details
- Name, E-mail, Address, Mobile Number and last CV uploaded
- Application details
- Talent Pooled Applications displays a list of all application the candidate was talent pooled from
- Current Applications displays a list of all current applications made the candidate has applied to
All applications details include:
- Application Date
- Application ID
- Role/Location the candidate applied to
- Step details which step of the process the candidate was either talent pooled from (for talent pooled applications) or the step the candidate has been progressed to (for current applications)
4 different icons are displayed next to the applications to help users quickly understand the status of the applications.
Table.1 – Icons representing the status of applications
 |
Candidate has been offered the job |
 |
Candidate Regretted or withdrawn |
 |
Candidate application in progress |
 |
Candidate application talent pooled |
- Previous Vacancy Invites audit trail of invitations sent to the candidate to apply for open vacancies
- Tags list of all tags linked to the candidate across all their applications
- Manager comments list of all comments added to applications by managers
Updating Tags within the Candidate Profile
Tags assigned to candidates can be reviewed and updated from within the candidate profile page.
- Navigate to ATS > Talent Pool > select the candidate name to open the Candidate Profile > select Update Tags to open the pop-up modal
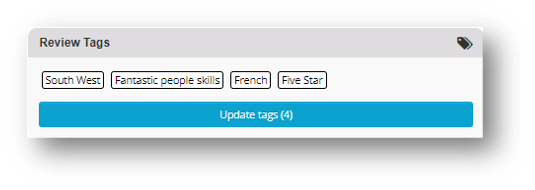
Fig.21 – Updating tags within candidate profile
- Add or remove tags using the pop-up modal
- Save the changes
Inviting Candidates to Apply
Candidates can be invited to apply for open vacancies from the following areas:
- Candidate profile page
- Talent pool table view
To invite candidates to apply from the Candidate Profile:
- Navigate to ATS > Talent Pool > select the candidate name to open the Candidate Profile > select Invite to Apply to open the vacancy invitation pop-up modal
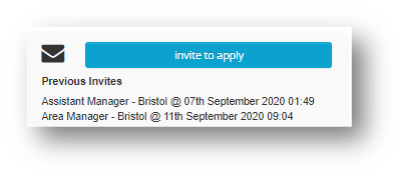
Fig.22 – Inviting to Apply from Candidate Profile
- Select the Select Job drop-down field
- Select the vacancy you would like to invite the candidate to
- Select Confirm
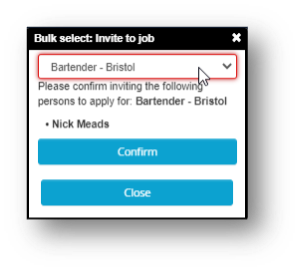
Fig.23 – Selecting vacancy for a candidate to apply
To invite candidates to apply from the talent pool table view:
- Navigate to ATS > Talent Pool > select the checkbox next to one or more candidates > select a Choose Action from the drop-down menu > select Invite to Apply

Fig.24 – Inviting candidate from talent pool table view
Dashboard Filters
Within the Dashboard details page, a filter option is available to allow managers to quickly identify candidates who have opted in to be added to the talent pool.
To find this filter:
- Navigate to ATS > select Dashboard
- Select any step within a process > Select the Opted in for Talent Pool filter drop-down
- Select Yes to only view candidates that have agreed to be added to the talent pool
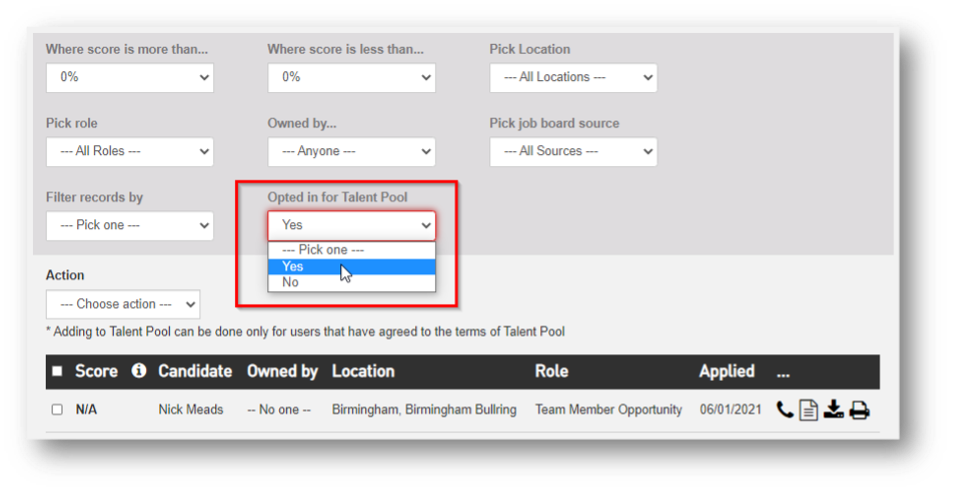
Fig.25 – Filtering candidates who have opted in to be added to Talent Pool

Comments
Please sign in to leave a comment.