This article continues from Workforce Management Training Module - Course Administration
Reports
There are three standard reports that come with the training module and there is also a flexible report writer, which allows all information on training courses and attendance to be exported.
Custom Report Writer
The customised reports functionality allows users to create their own reports, choosing which information will be displayed. This information can be filtered and sorted during the creation of the report, which will then be presented in an Excel document.

Fig.1 - Create Template button

Fig.2 - Creating a new report template
A list of fields will then appear. These can be selected so that they appear in the report.
An explanation of the condition symbols can be found on the right hand side of the screen (see Fig.3) and in the tables below.
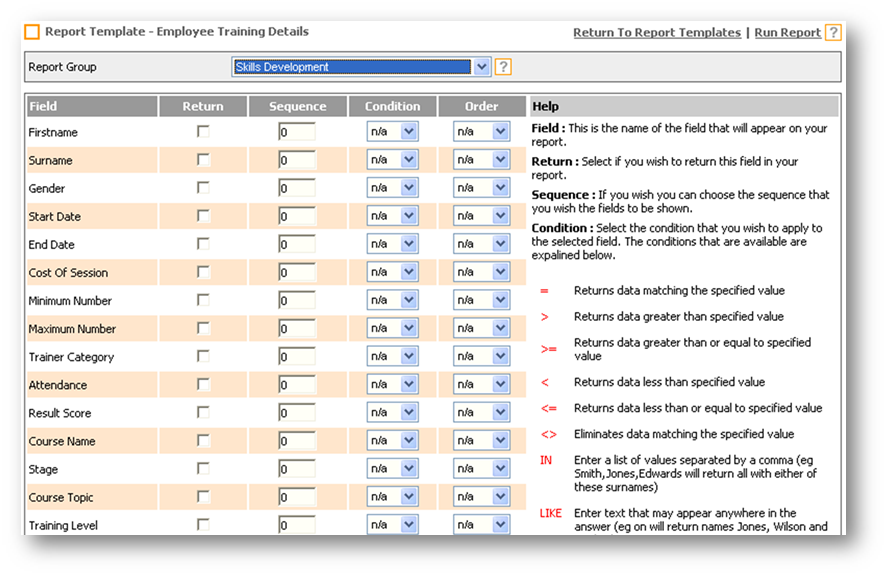
Fig.3 - Selecting fields for a report

Fig.4 - Adding conditions
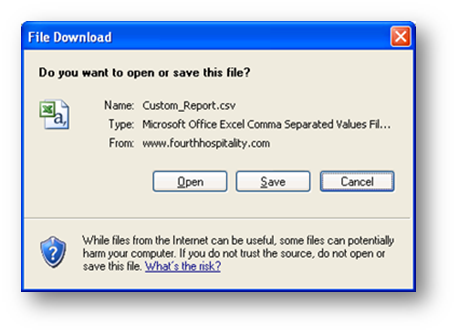
Fig.6 - Open or Save a report
Reports will save as a CSV (Comma Separated Values) file, which will open with Excel (see Fig.7).
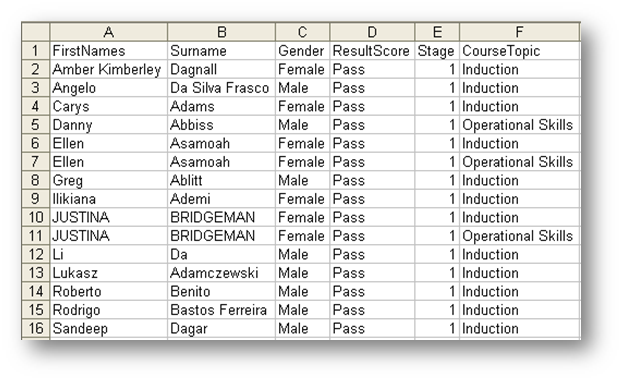
Fig.7 - Example CSV report opened in Excel
The report just created is now saved on the system.
Standard Reports
There are some standard reports available within the Training Module.

Fig.8 - Standard reports
Training Report by Status
This report was specifically designed to be able to pick up the sessions that employees are booked on and also any employees that have been recorded as a ‘no show’ for a session that they were due to attend.
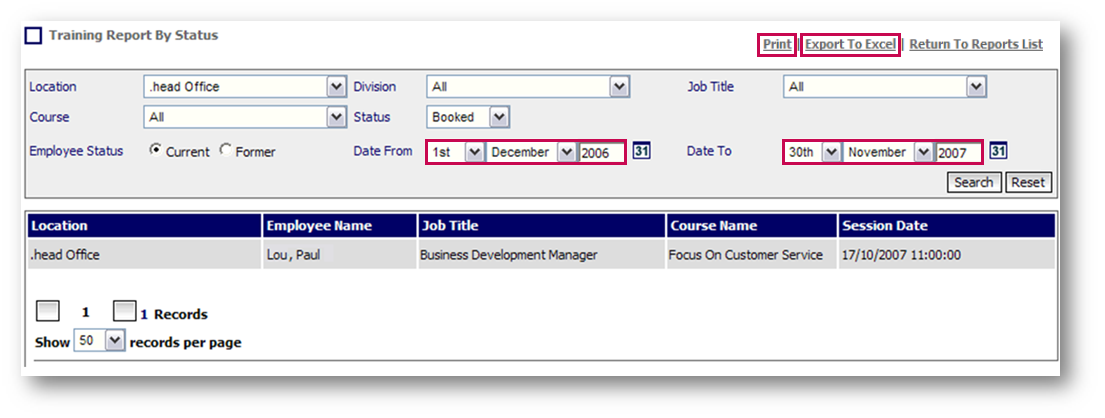
Fig.9 - Onscreen Training Report By Status Report
The export is in the exact same format as the onscreen version (see Fig.10).

Fig.10 - Training Report By Status Report - sample export
Training Report by Job Title
This report was designed to allow searching specifically by job title between two dates for how many people have attended training.
The report indicates employees who have booked in sessions for a particular course with a ‘B’ and those who were booked but did not attend with an ‘X’. Where an employee has attended it will be marked with a green tick.
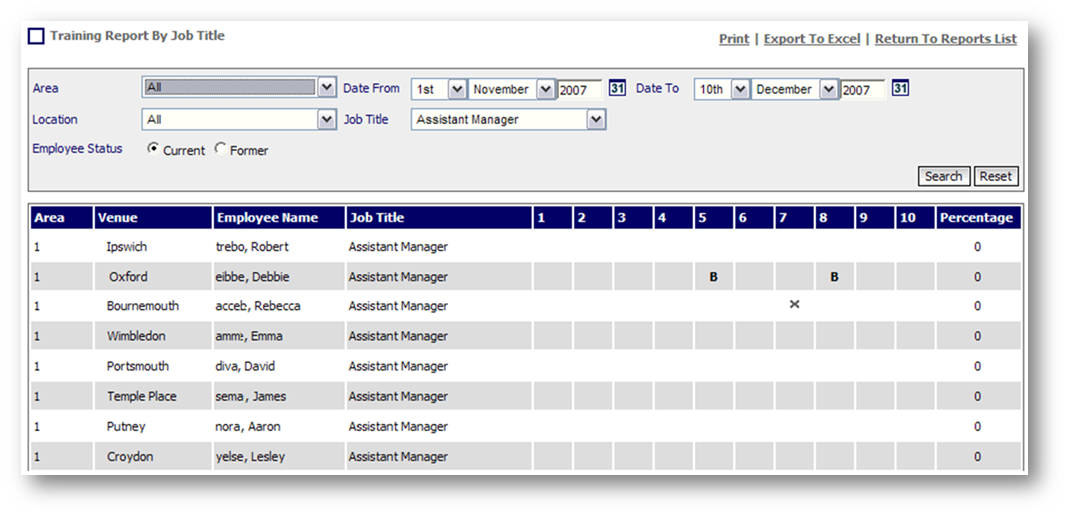
Fig.11 - Onscreen Training Report By Job Title Report
When exported and viewed in Excel, 'booked' shows as a ‘B’, 'booked but did not attend' shows as a red ‘NS’ (for No Show) and 'attended' shows as a blue ‘A’.

Fig.12 - Training Report By Job Title Report - sample export
Training Report to Date
This report was designed to give training records to date with a percentage of training completed for each employee, and works in the exact same way as Training Report By Job Title. Again within this is it possible to hone it down to a particular Area / Location or job title within the company.

Fig.13 - Onscreen Training Report to Date Report
Reports
There are three standard reports that come with the training module and there is also a flexible report writer, which allows all information on training courses and attendance to be exported.
- Development plans and Course diaries can be printed from the system by right-clicking on the relevant page and selecting Print
Custom Report Writer
The customised reports functionality allows users to create their own reports, choosing which information will be displayed. This information can be filtered and sorted during the creation of the report, which will then be presented in an Excel document.
- Within the Training module, go to Reports > Custom Reports
- To create a new report, select Create Template button on the top-right hand corner (see Fig.1)

Fig.1 - Create Template button
- Enter a Name for the template and also a Description of what information the report will contain
- Also select an appropriate Report Type
- Save once finished

Fig.2 - Creating a new report template
A list of fields will then appear. These can be selected so that they appear in the report.
- To have a field displayed on the report, tick its relevant Return tick box
- Use numerical values in the Sequence column to have the fields displayed on the report in a particular order. Number them 1,2,3,and so on
- The Condition option allows the filtering of information based on a certain criteria. For example a report can be produced which only contains employees who started after a certain date, or employees of a certain gender etc
An explanation of the condition symbols can be found on the right hand side of the screen (see Fig.3) and in the tables below.
| = | Returns data matching the specified value |
| > | Returns data greater than specified value |
| >= | Returns data greater than or equal to specified value |
| < | Returns data less than specified value |
| <= | Returns data less than or equal to specified value |
| <> | Eliminates data matching the specified value |
| IN | Enter a list of values separated by a comma (e.g. Smith, Jones, Edwards will return all with either of these surnames) |
| LIKE | Enter text that may appear anywhere in the answer (e.g. "on" will return names Jones, Wilson and Onslow) |
- The Order column is used to chose which order the information is displayed in
| ASC | Ascending - the results will be ordered from bottom to top e.g. Z-A , 10-1 |
| DEC | Descending - the results will be ordered from top to bottom e.g. A-Z, 1-10 |

Fig.3 - Selecting fields for a report
- Once all fields, conditions, etc are selected, use the Save button at the bottom of the screen
- A series of similar screens containing more fields relating to other areas of the General Module will appear. These additional fields can be added to the report if wished
- Once all fields to be returned in the report are selected, used the Run Report button in the top-right corner
- If any conditions have been selected throughout the report writer, the screen as shown in Fig.4 will appear, where the value of the condition(s) must be entered
- Once all the condition values have been entered, use the Run button

Fig.4 - Adding conditions
- A pop-up box will appear, with the option to either Open or Save the report just created
- Select Save

Fig.6 - Open or Save a report
Reports will save as a CSV (Comma Separated Values) file, which will open with Excel (see Fig.7).

Fig.7 - Example CSV report opened in Excel
The report just created is now saved on the system.
- To run the same report again, go to Training > Reports > Custom Report Writer
- Select EDIT against the report to rerun and then select Run Report
Standard Reports
There are some standard reports available within the Training Module.
- Go to Training > Reports > View Reports
- To run a report, select its underlined link

Fig.8 - Standard reports
Training Report by Status
This report was specifically designed to be able to pick up the sessions that employees are booked on and also any employees that have been recorded as a ‘no show’ for a session that they were due to attend.
- To run this report it is necessary to enter values for Date From and Date To
- It is possible to Print this report or Export to Excel, using the buttons in the top-right corner

Fig.9 - Onscreen Training Report By Status Report
The export is in the exact same format as the onscreen version (see Fig.10).

Fig.10 - Training Report By Status Report - sample export
Training Report by Job Title
This report was designed to allow searching specifically by job title between two dates for how many people have attended training.
The report indicates employees who have booked in sessions for a particular course with a ‘B’ and those who were booked but did not attend with an ‘X’. Where an employee has attended it will be marked with a green tick.

Fig.11 - Onscreen Training Report By Job Title Report
When exported and viewed in Excel, 'booked' shows as a ‘B’, 'booked but did not attend' shows as a red ‘NS’ (for No Show) and 'attended' shows as a blue ‘A’.

Fig.12 - Training Report By Job Title Report - sample export
Training Report to Date
This report was designed to give training records to date with a percentage of training completed for each employee, and works in the exact same way as Training Report By Job Title. Again within this is it possible to hone it down to a particular Area / Location or job title within the company.

Fig.13 - Onscreen Training Report to Date Report
Continue to Workforce Management Training Module - Employees

Comments
Please sign in to leave a comment.