What is the Cash Management Module
The cash management module is a fantastic way to process monies taken by a business, record bankings and check any variances. As it is used on Fourth’s cloud, the information can be viewed from any computer with an internet connection. This document will show how to use the cash management module to get the most out of it for your business.What are the features of the Cash Management Document
The cash management module gives a transparent way to enable a business to accurately process the cashing up procedure. Each till within a business is cashed up separately, and can be set for as many sessions they need within a day’s trading time.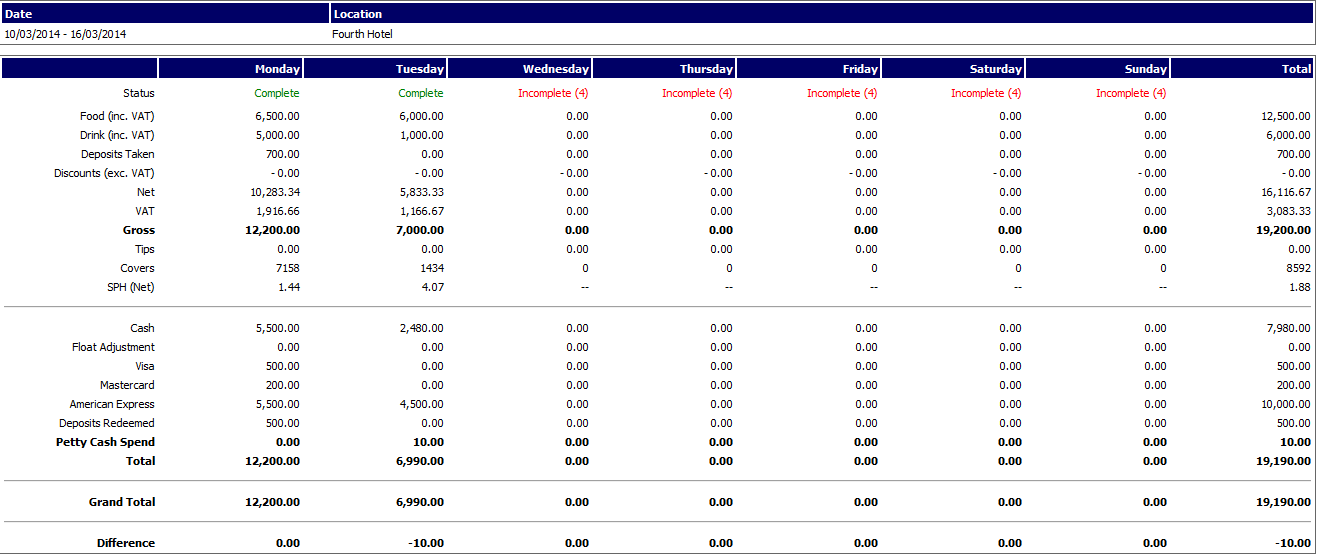
Fig 1 - Breakdown of the Current Week’s Cash Up
- Report cash up’s from various sessions within a trading day.
- Error! Reference source not found. shows a full week’s cash up, looking at variances and amounts banked.
- Set up different tills within a business.
- Have one safe per location or share a safe between locations.
Using the Cash Management Module
Setting up the Cash Up Week
To enter a cash up into the system, first a week must be opened. To do this, follow the path:Cash Management > Cash Up > Cash Up Week > Create New Cash Up
- Enter the date required for the week to start. This must be on the day that has been set to start your week on, as stated. Also select the site you require, you will see all sites that you have permission to see.
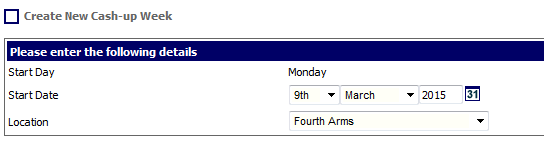
Fig 2 - Create New Cash-up Week
- Fig 3 shows the dialogue box to create a new cash up week.
- The start date must be the same day as the business starts its week on, as specified
- Select the relevant location and press Save.
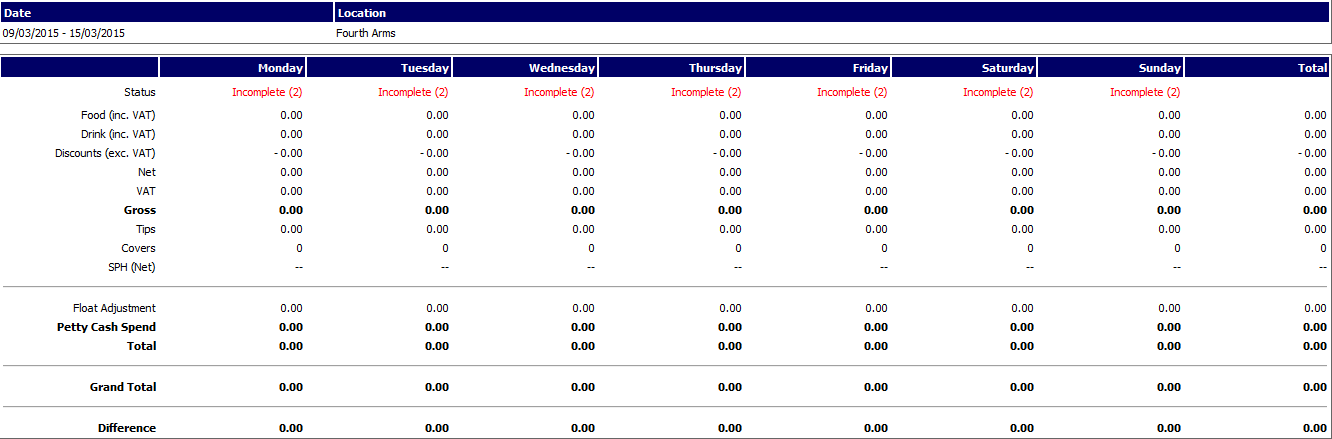
Fig 3 - New Cash Up Week
- Once the week has been created it is ready to start adding cash up sessions.
Create a Cash Up for a Session
- Click into the week that you require to enter a cash up for. If they are not visible, click search to view all of them or use the filters to find a particular week.
- Once in the week, pick the particular day you require for the session

Fig 4 - Choose a Session
- Fig 4 shows the available sessions to be completed for that day in the particular location. Select one.
- Depending on the set up, you may be required to enter the amount of covers, voids etc. as shown in Fig 5.

Fig 5 - Enter Covers & Voids
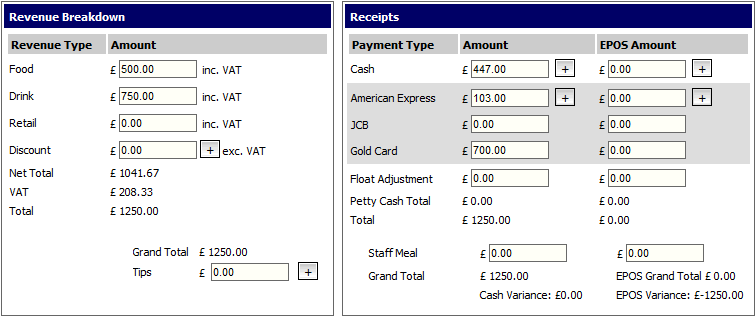
Fig 6 - Cash Up Screen
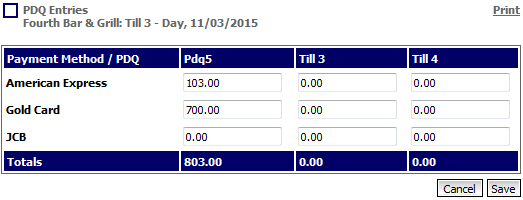
Fig 7 - Card Breakdown
- Fig 6 shows the cash up screen where all the data needs to be entered. On the left hand side, financial data needs to be entered. This is data taken from the till report and may be broken down into different categories, for example they could be revenue streams such as food and drink, or they could be payment methods such as cash, credit card, gift card. The grand total is your takings for that session.
- On the right hand side enter what needs to be banked. Enter the cash amount have, and information from PDQ’s. Click on the + sign to enter each card type one by one as in Fig 7.
- Fig 6 also shows the EPOS amount. This is where you can enter what the till report is expecting from each payment method. This setting is permission based and may not be there
- Your variance is then displayed at the bottom
- Any petty cash that may need entering can be done so in petty cash payments. Click on create new and fill in the dialogue box shown in Fig 8.
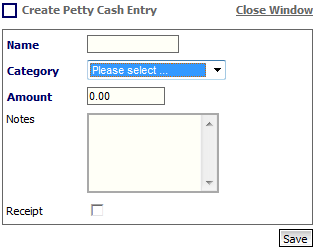
Fig 8 - Create Petty Cash Entry
- Different categories can be added/removed through the setup of the module. Speak to your administrator.
- If there is a variance, the day cannot be completed until a confirmation is given. To do this Click Show Variance Details link within Float details as shown in Fig 9.

Fig 9 - Show Variance Details Link

Fig 10 - Enter Variance Amount & Reason
- The variance amount can be confirmed (remembering to enter a minus amount if applicable) and the reason for this variance.
- When all the information has been entered the session can be completed.
- When a week is fully completed, the next week’s sheet will be automatically generated.
Create a Bank Lodgement (Banking)
- When the session has been completed the system will automatically go to the bank lodgement screen as shown in Fig 11.
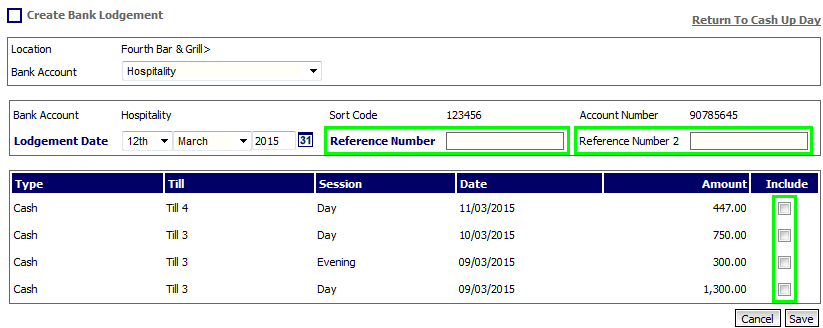
Fig 11 - Create Bank Lodgement Screen
- If a lodgement (banking) needs to be made, this can be done here. This can be done at a later time, and can return to the main screen by clicking return to cash up day, and then return to cash up week.
- If a lodgement is required, tick the sessions to be banked under the ‘Include’ column. A reference number will need to be added (this is usually banking bag and banking slip numbers) and click on save.
- A confirmation screen will then be displayed with the total amount banked.
Comments
Please sign in to leave a comment.