What’s Changing?
Adaco release 4.6.82 includes new functionality, new reports and changes to existing reports. Specifically:
Release Date: 5th June 2018.
Reason for the Change
The new Receiving Variance Report allows users to monitor the extent to which their orders are being accurately fulfilled by their vendors. The new report shows variances between what was ordered and what was received (price and/or quantity).
To reduce printing and paper usage it is now possible to print an Outlet Requisition Template with 7 columns for each day’s ordering rather than having to print a new report for each day.
It is now possible to lock an inventory count once it has been agreed so that no further changes can be made to the count after it’s been agreed and entered.
When monitoring the assignment of products to properties from CP it is now possible to see which product details are active in which properties.
Customers Affected
All Adaco users.
Release Notes
Receiving Variance Report
Within the Receiving section of the Report Center there is a new report called Receiving Variance Report. When the report is run the following criteria can be set:
Please note: This new report replaces a custom report which has previously been implemented for some clients

Fig.1 – New Receiving Variance Report
7 Day Format When Printing a Requisition Template
When printing an outlet or purchase requisition template to be used as a physical ordering sheet there is now an option to print a 7 day ordering sheet. When this option is selected the report will be printed in landscape format with 7 columns for daily on hand and order quantities. The columns will have a Day of the Week header as well as a space to enter the date.

Fig.2 – Option to print 7 day order sheet
Ability to Lock an Inventory Count Prior to Period End
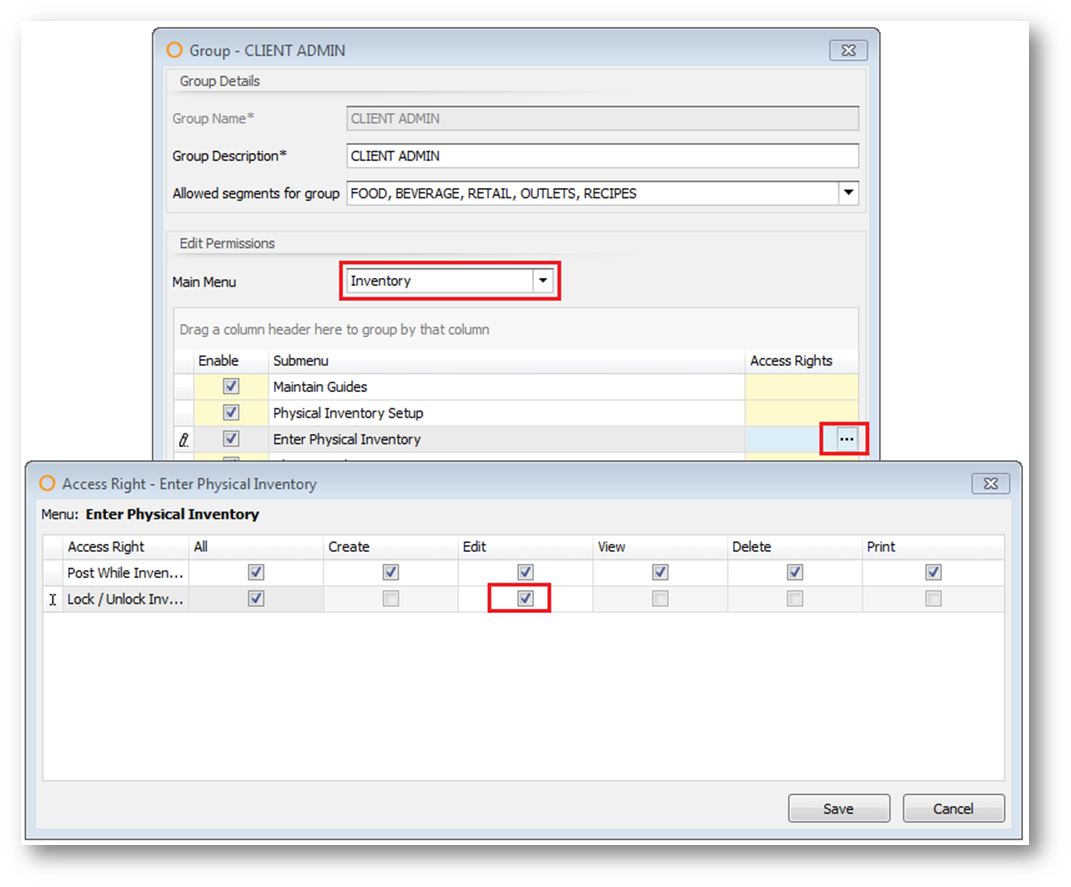
Within Property > Set Up > User Groups > Inventory > Enter Physical Inventory there is a new access right called Lock / Unlock Inventory Counts. The default setting for this access right is false (unchecked). To enable the locking of outlet inventories, set the Edit option to true (tick the box – see Fig.3).

Fig.3 – Lock/Unlock Inventory Counts
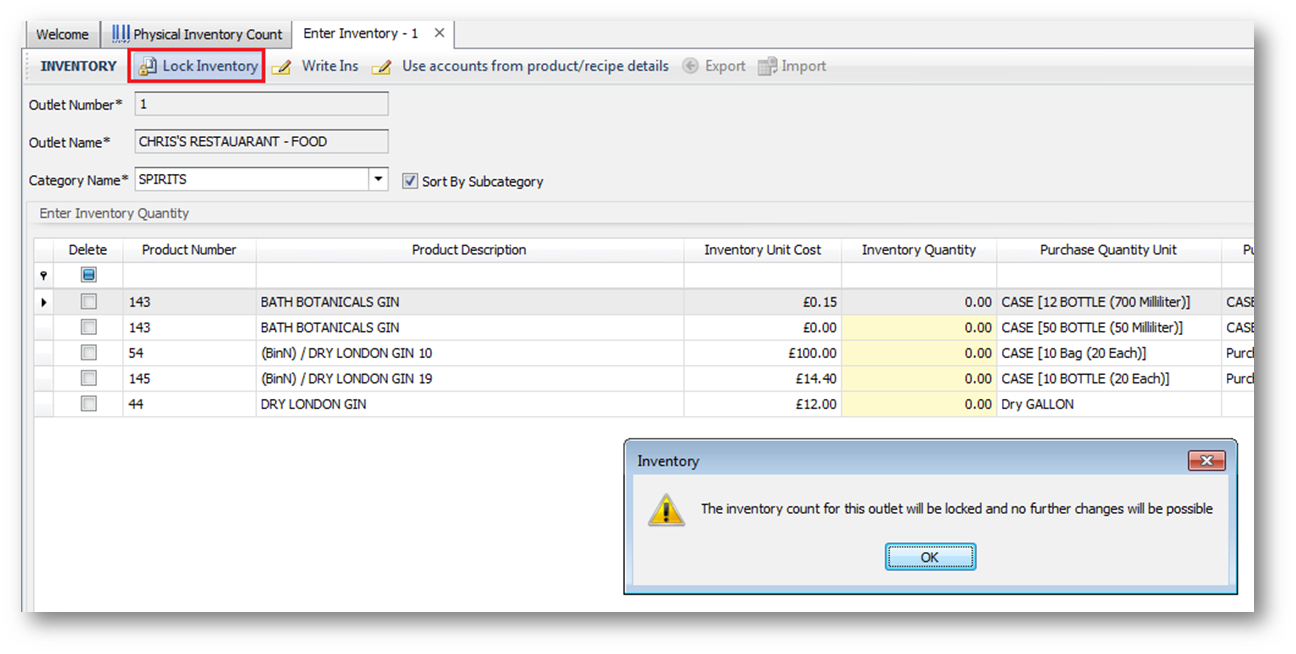
For a user with the above access right enabled there will be a new button in the Enter Inventory screen labelled Lock Inventory. When this button is used the user will be prompted to confirm the locking of the inventory. When confirmed the inventory count for the selected outlet will be locked and no further changes can be made to the inventory count. The counts for all categories or locations within the selected outlet will be locked.
If you wish to enter or amend counts for a locked inventory then a user with the above access right can select Unlock Inventory which will allow users to amend quantities.
Please note: The locking or unlocking of a physical inventory count will not impact the closing of a period. A period can be closed when inventory counts are locked or unlocked.

Fig.4 – Lock Inventory button
Show Active / Inactive Status by Property in CP > Product > Property screen
Within CP > Property > Products > Product Master > Property there is a new field which displays the status of each product detail within each property where the product is present.
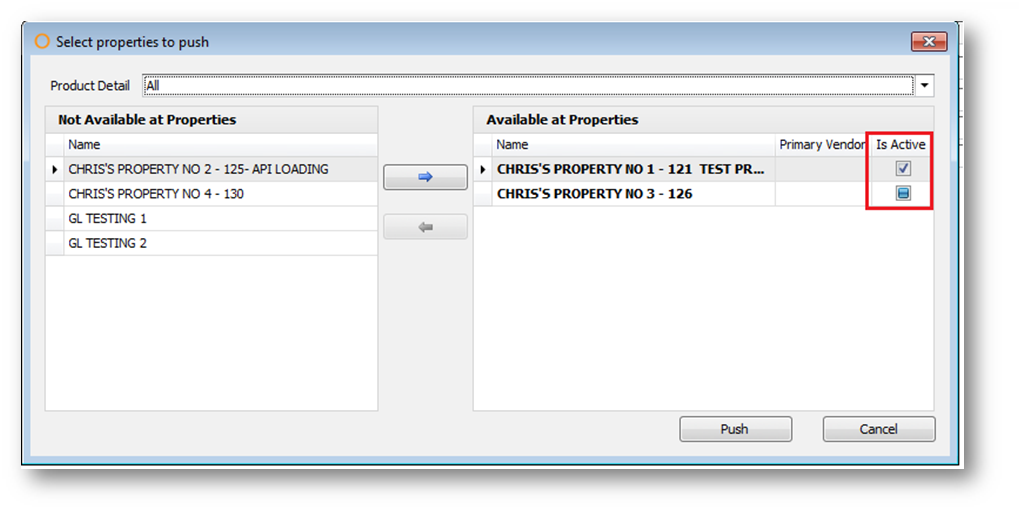
When a specific detail is selected in the Product Detail dropdown list the “Is Active” column will show the status of the selected detail in each property. When All is selected in the Product Detail drop-down the “Is Active” column will show a tick where all details are active within a property, will show unticked where no details are active with a property and will show a partial tick (blocked out checkbox) where some details are active and some are inactive (selecting the specific details in the drop-down will show which details are active and which are inactive).

Fig.5 – Checking the Active status of a products
Adaco release 4.6.82 includes new functionality, new reports and changes to existing reports. Specifically:
- New Receiving Variance Report
- Option for 7 Day format in Outlet Requisition Template print
- Ability to lock an inventory count prior to period end
- Show Active / Inactive Status by Property in CP Product > Property Screen
Release Date: 5th June 2018.
Reason for the Change
The new Receiving Variance Report allows users to monitor the extent to which their orders are being accurately fulfilled by their vendors. The new report shows variances between what was ordered and what was received (price and/or quantity).
To reduce printing and paper usage it is now possible to print an Outlet Requisition Template with 7 columns for each day’s ordering rather than having to print a new report for each day.
It is now possible to lock an inventory count once it has been agreed so that no further changes can be made to the count after it’s been agreed and entered.
When monitoring the assignment of products to properties from CP it is now possible to see which product details are active in which properties.
Customers Affected
All Adaco users.
Release Notes
Receiving Variance Report
Within the Receiving section of the Report Center there is a new report called Receiving Variance Report. When the report is run the following criteria can be set:
- From and To Date – Receivings within the selected period will be included in the report
- Show Variances In – You can select to see only variances in quantity, only variances in price or variances in either price or quantity
- Variance – Enter a % to filter the report to only show variances greater than the specified percentage
- Sort Order – Select whether the report output is sorted by Order, by Vendor or by Product Description
Please note: This new report replaces a custom report which has previously been implemented for some clients

Fig.1 – New Receiving Variance Report
7 Day Format When Printing a Requisition Template
When printing an outlet or purchase requisition template to be used as a physical ordering sheet there is now an option to print a 7 day ordering sheet. When this option is selected the report will be printed in landscape format with 7 columns for daily on hand and order quantities. The columns will have a Day of the Week header as well as a space to enter the date.

Fig.2 – Option to print 7 day order sheet
Ability to Lock an Inventory Count Prior to Period End
Within Property > Set Up > User Groups > Inventory > Enter Physical Inventory there is a new access right called Lock / Unlock Inventory Counts. The default setting for this access right is false (unchecked). To enable the locking of outlet inventories, set the Edit option to true (tick the box – see Fig.3).

Fig.3 – Lock/Unlock Inventory Counts
For a user with the above access right enabled there will be a new button in the Enter Inventory screen labelled Lock Inventory. When this button is used the user will be prompted to confirm the locking of the inventory. When confirmed the inventory count for the selected outlet will be locked and no further changes can be made to the inventory count. The counts for all categories or locations within the selected outlet will be locked.
If you wish to enter or amend counts for a locked inventory then a user with the above access right can select Unlock Inventory which will allow users to amend quantities.
Please note: The locking or unlocking of a physical inventory count will not impact the closing of a period. A period can be closed when inventory counts are locked or unlocked.

Fig.4 – Lock Inventory button
Show Active / Inactive Status by Property in CP > Product > Property screen
Within CP > Property > Products > Product Master > Property there is a new field which displays the status of each product detail within each property where the product is present.
When a specific detail is selected in the Product Detail dropdown list the “Is Active” column will show the status of the selected detail in each property. When All is selected in the Product Detail drop-down the “Is Active” column will show a tick where all details are active within a property, will show unticked where no details are active with a property and will show a partial tick (blocked out checkbox) where some details are active and some are inactive (selecting the specific details in the drop-down will show which details are active and which are inactive).

Fig.5 – Checking the Active status of a products

Comments
Please sign in to leave a comment.