Overview
This is a guide on setting up basic configuration of the tablet device, as well as using Adaco Mobile on it.
Please note: Information in this article is for use with Android version 4.1, "Jelly Bean".
The guide is divided into 2 sections:
Configuration of the Tablet
First, please note that the device has a lock screen which displays the time and date and a small lock icon at the bottom.

Fig.1 - The Lock Screen
Setting up Wi-Fi
Wi-Fi will need to be setup when first using the tablet – this cannot be setup by the Adaco team beforehand.

Fig.2 - The Android Home Screen

Fig.3 - Example available networks
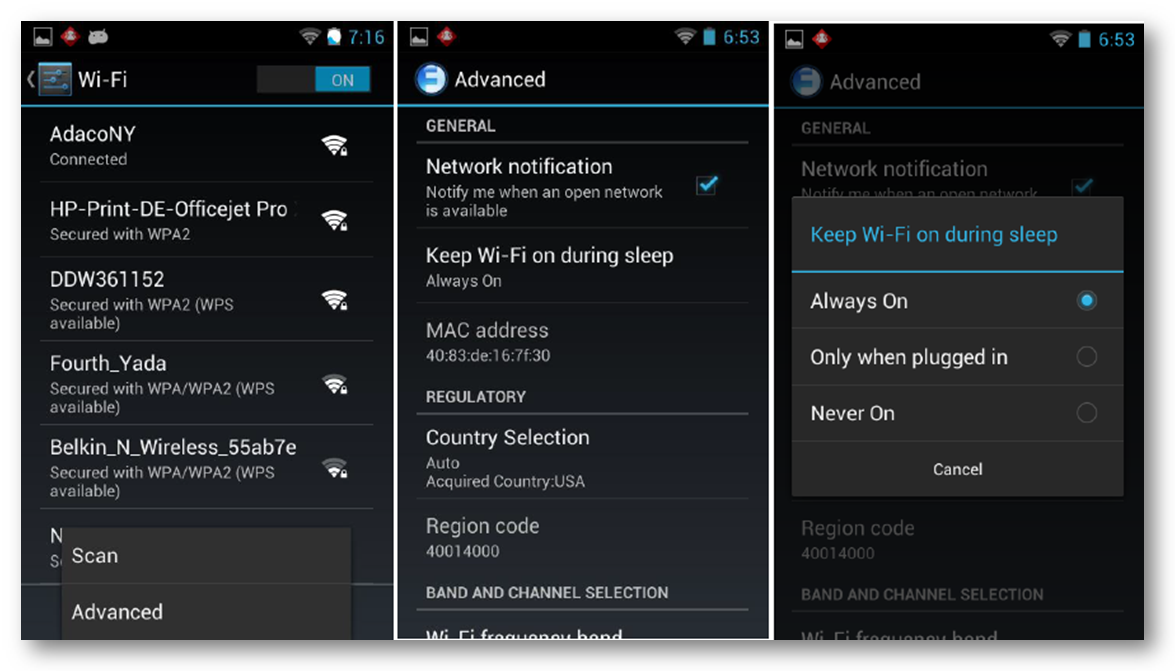
Fig.4 - Keep Wi-Fi on during sleep settings
If this setting is not turned on, the handheld may disconnect from the database during syncing.
Date and Time settings are not essential for the successful operation of the Adaco Mobile software. However, users may want an accurate date and time on the device.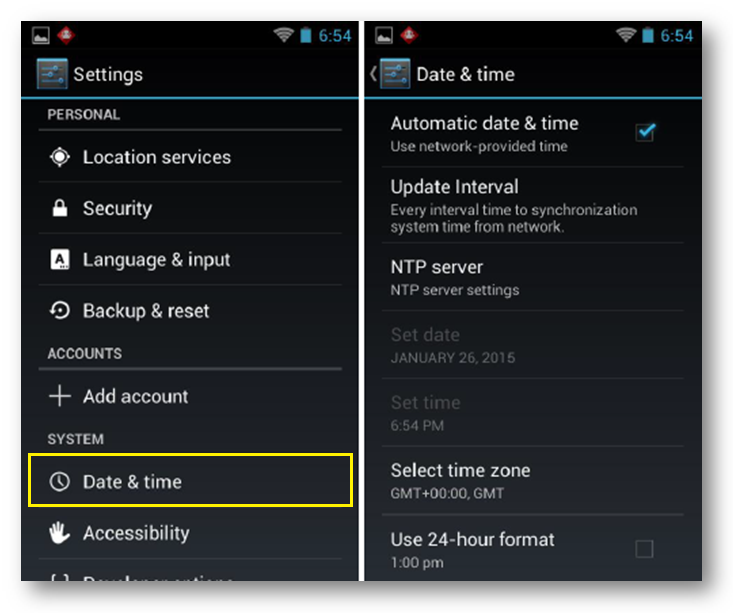
Fig.5 - Date and Time settings
Display Settings
Changing the Sleep display settings is advised. If the screen is constantly turning itself off during usage it can be quite inconvenient.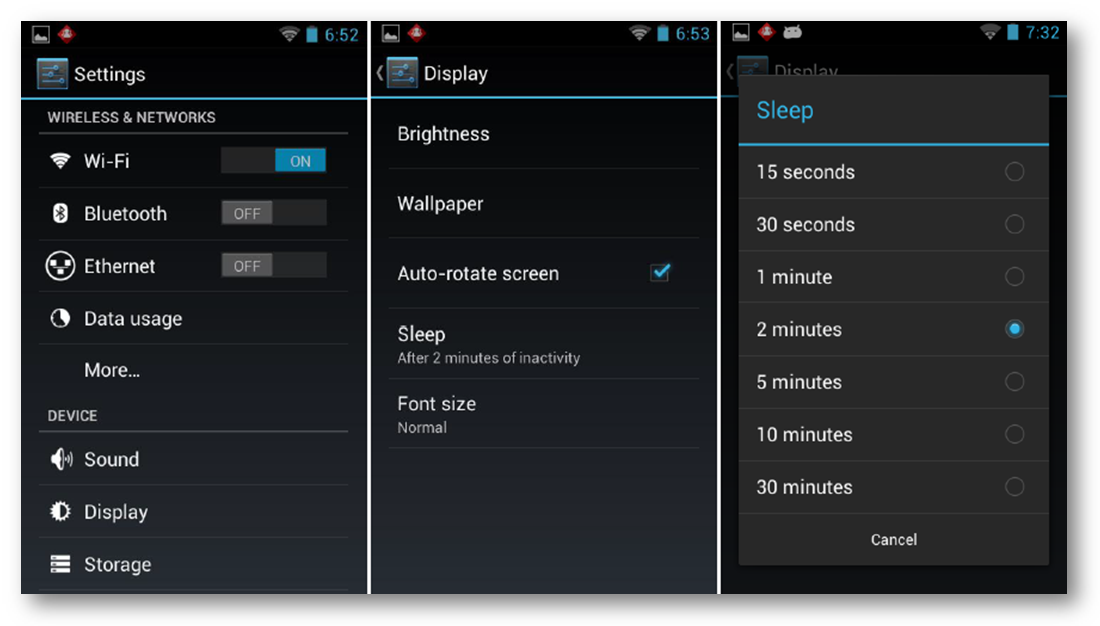
Fig.6 - Changing the screen sleep setting
Using Adaco Mobile
Main Screen and Syncing
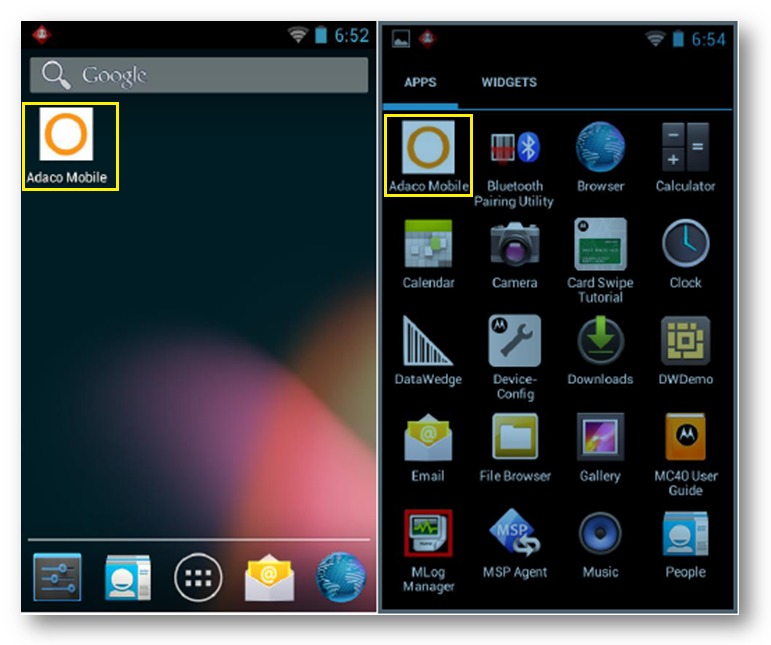
Fig.7 - Accessing the app via the Home screen (left) or the Applications Menu (right)
On the main screen there are four main areas:
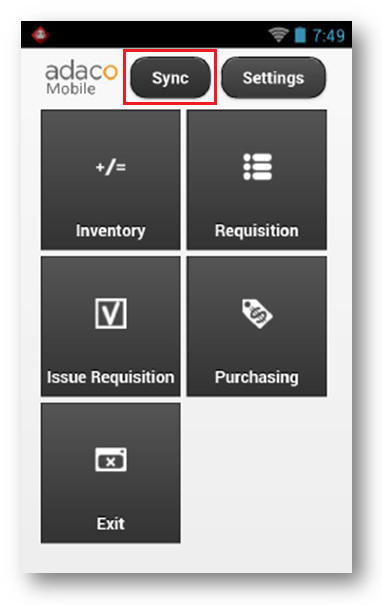
Fig.8 - The main page, with Sync highlighted
Please note: Syncing has been separated into 2 functions..
Upload vs Full Sync
Upload is simply designed to send data to the main Adaco database without doing a full synchronization. This is to speed up the process of uploading inventory data and requisitions without having to wait for all products to be re-downloaded to the device.
Full Sync is the process of downloading all new/updated product, outlet, and account information. This should be done when first using the device and before month end/interim inventory. This is to ensure that the latest products, bar codes, and outlets are available.
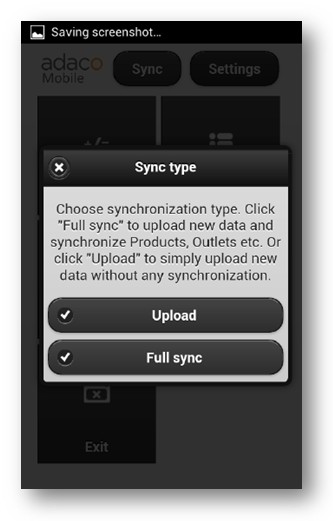
Fig.9 - Upload and Full sync options
After choosing the Sync option, the device may prompt for a username and password if the credentials are not already saved. This will be the same Adaco username and password used for logging in to the desktop version.
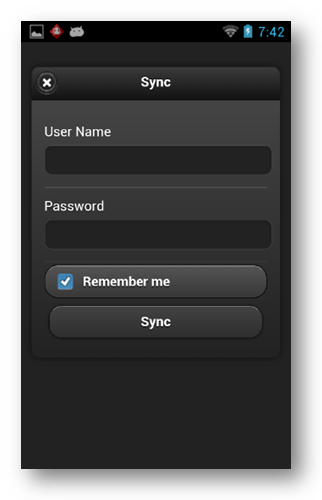
Fig.10 - Prompting for username and password
The device will then sync the information whether downloading all of the products or simply uploading information.
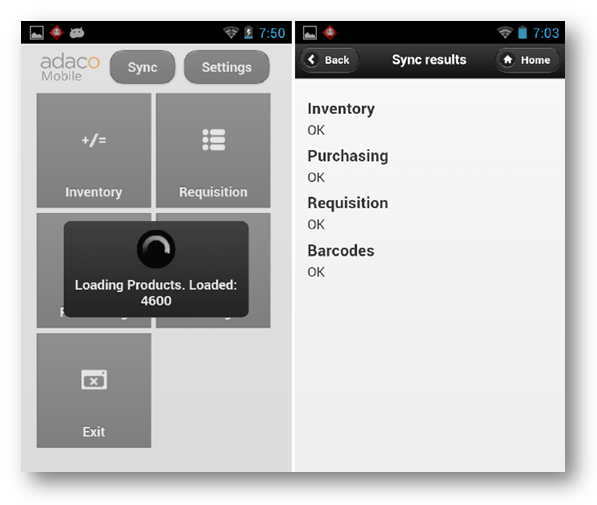
Fig.11 - Sync Status and Results screens
It will have a status screen while downloading information and once completed will display the results.
If there are any issues with any parts of the sync, it will display them in the Sync results. Examples are barcodes already matched to products, inventory is not in progress, outlet accounts not setup, etc.
Most of the issues listed on this screen would likely need to be fixed in the main desktop Adaco application prior to being able to successfully upload the information from the handheld.
Inventory
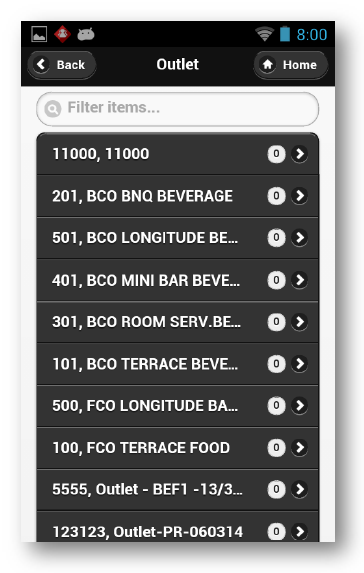
Fig.12 - Selecting an Outlet
The scanning screen will then load.
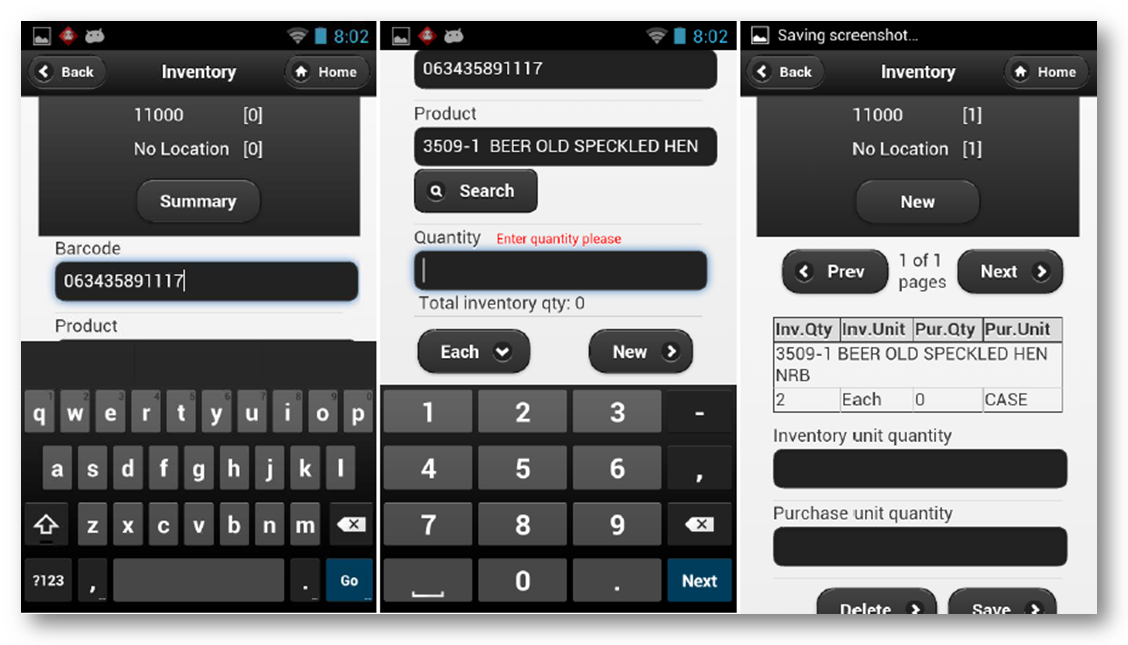
Fig.13 - Scanning a bar code

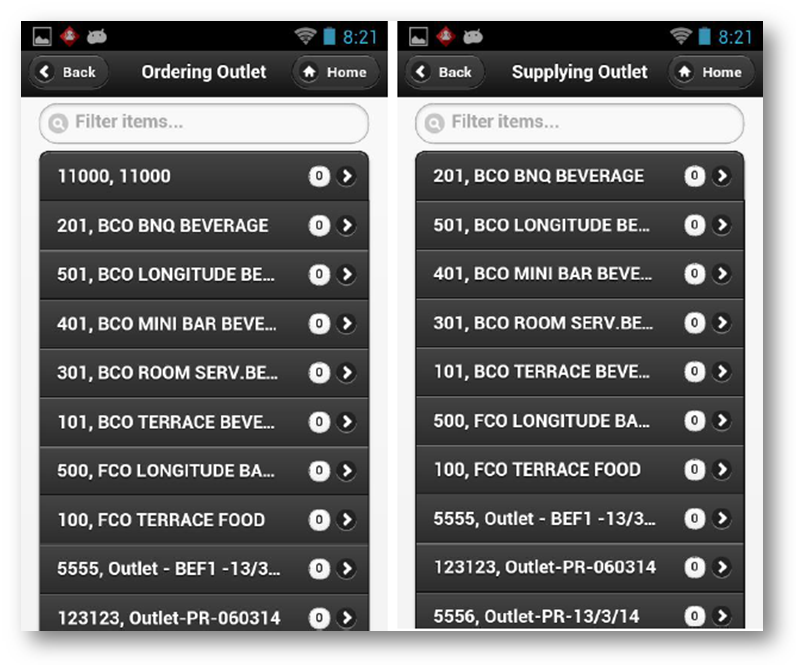
Fig.15 - Ordering and Supplying Outlet lists
The system will then display a screen that allows the entering of quantities to be requisitioned This screen will look very similar to the Inventory screen.
Just as on the Inventory screen, a bar code can be scanned and the Barcode field and Product fields will populate. Quantities can then be entered. Once again, selecting Next on the keyboard while in the Quantity field or selecting on New at the bottom right of the screen will save the entry and allow the scanning of another product.
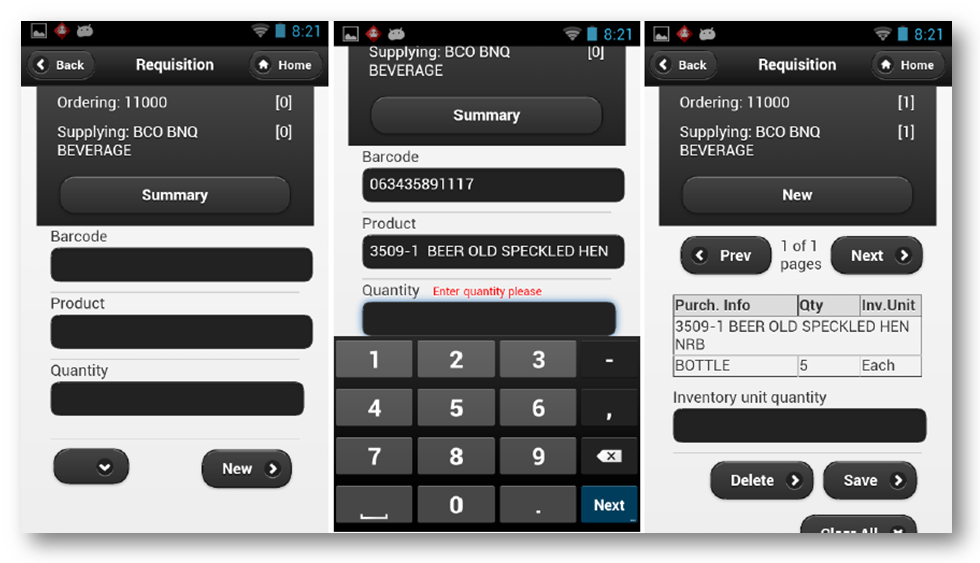
Fig.16 - Adding products to a requisition
Once finished adding products to the requisition, the amounts can be checked and modified them via Summary. Remember to select Save after making any modifications.
Please note: The only options are Inventory Unit. A Purchase unit cannot be used on an Outlet Requisition.
Issue Requisition
This is new for Adaco Mobile version 1.1.1.
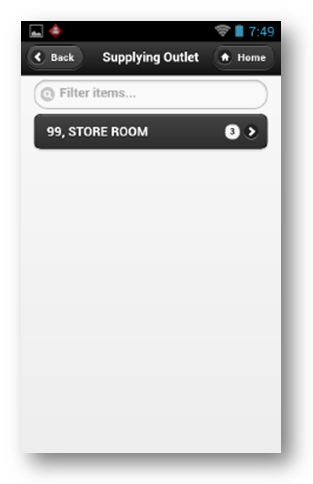
Fig.17 - Selecting a Supplying Outlet
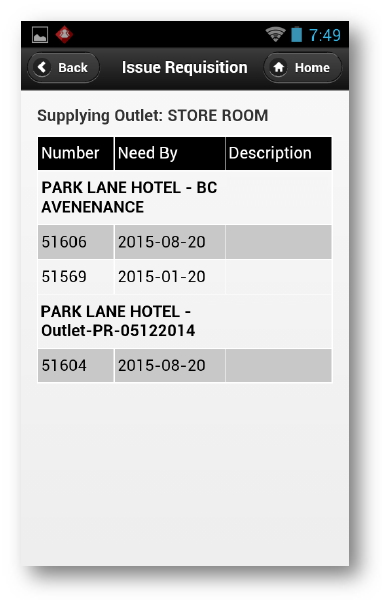
Fig.18 - List of available requisitions
Please note: The Requisitions must be Released in the main desktop Adaco application before they will be available on the device for issuing.

Fig.19 - Entering issuing quantities
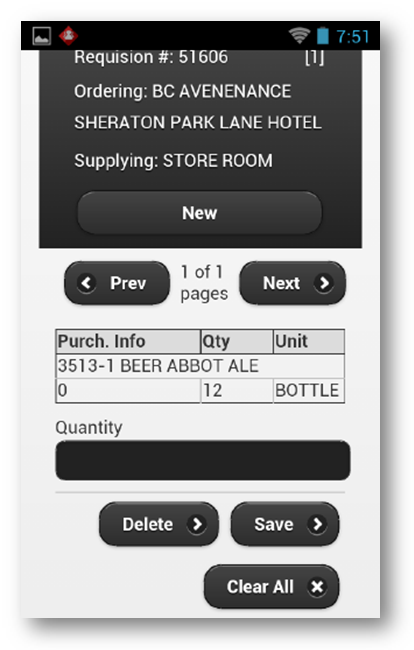
Fig.20 - The Summary screen
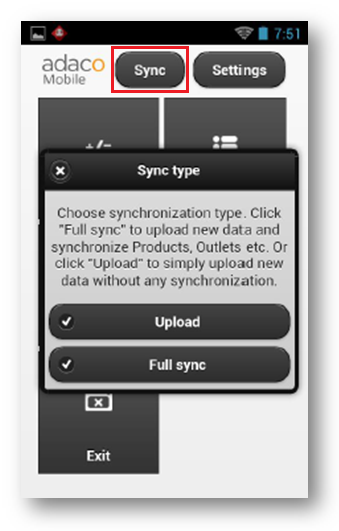
Fig.21 - Selecting the Sync button
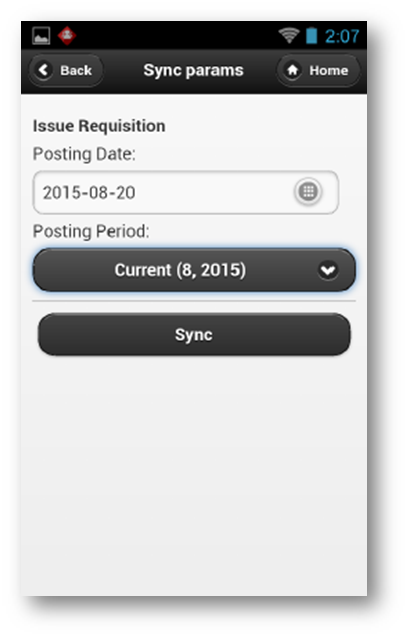
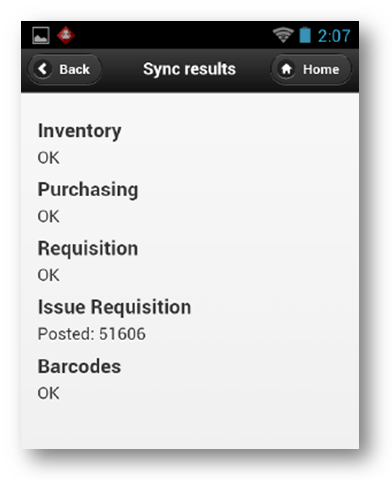
Fig.23 - Sync results
Purchasing
Please note: This menu is for creating Purchase Requisitions. It will not automatically create a Purchase Order (PO). POs can be created from the Requisition in the main desktop Adaco application.
Again, a screen will display where bar codes can be scanned and quantities entered.
Please note: The Quantity entered will only be based on the Purchase Unit.
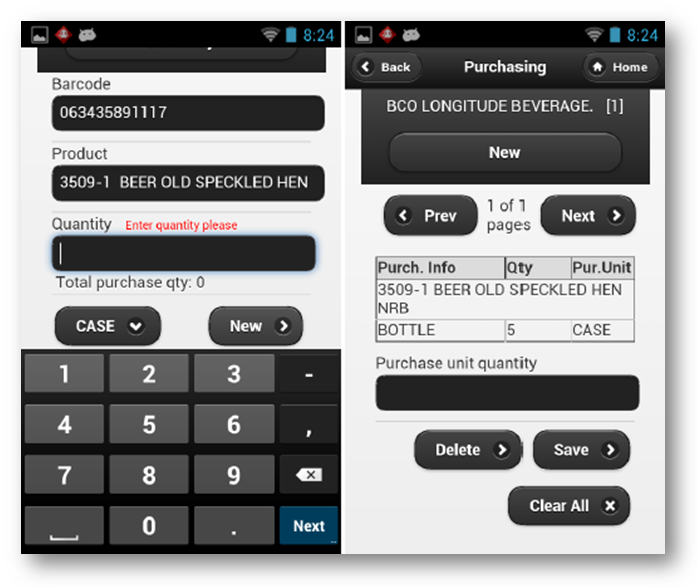
Fig.24 - Scanning a bar code & entering a quantity
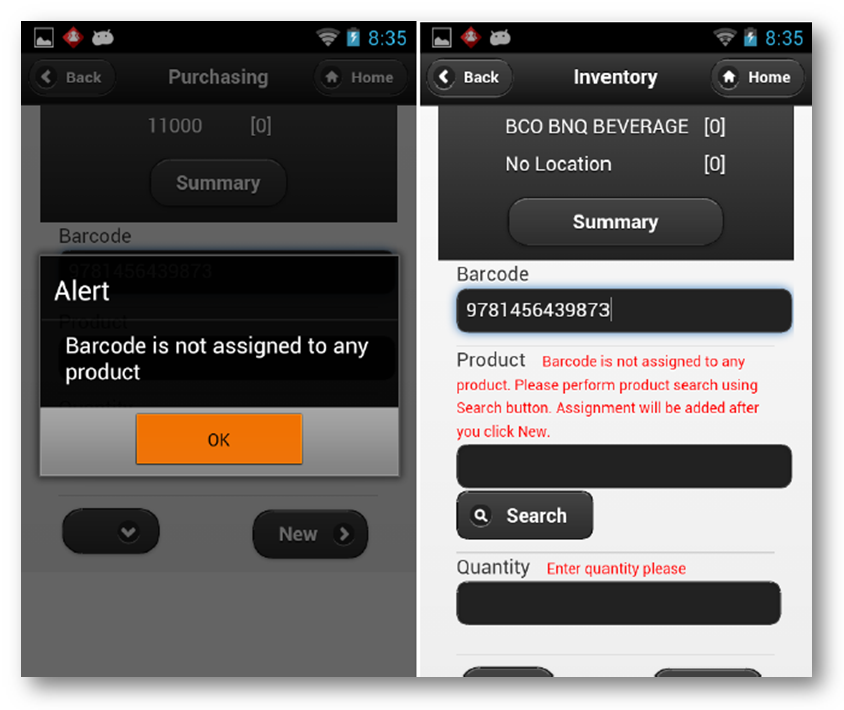
Fig.25 - Bar code messages
Please note: This should not happen with Adaco generated bar codes unless the database has not been synced. There is no need to associate CODE39/Adaco bar codes.
These messages will occur when scanning a new manufacturer bar code. To assign a bar code, the Inventory screen should be used.
Please note: If not in Inventory mode, it will still associate bar codes in Adaco. Any inventory numbers enteredwill be ignored and left on the device.

Fig.26 - Assigning bar codes
The Search screen will contain possible products.
It will save the quantities – however, if not in Inventory mode, they will not be uploaded into Adaco. If doing Inventory, make sure the quantity entered is accurate for that product.
Processing Data
All data processed into Adaco is available and capable of being edited.
When processing Outlet Requisition data, the device will ask for the Need by Date and allow the entering of a Description if wished.
If processing Outlet Requisitions and Purchase Requisitions, the screen as seen in Fig.27 will display. Otherwise, only the options of the Requisition type created will display.
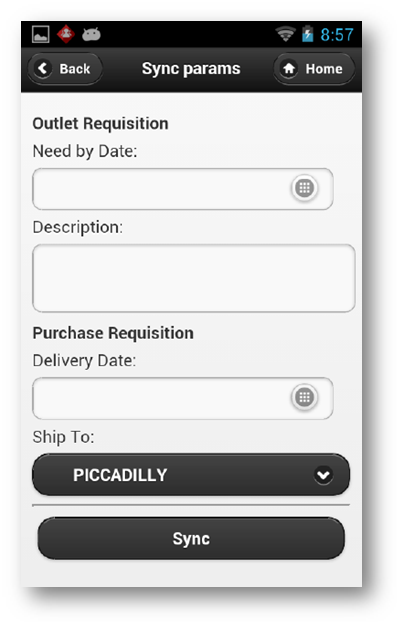
Fig.27 - Processing Outlet Requisitions and Purchase Requisitions
Please note: Approval Routing must be done through the main Adaco application. It cannot be done through Adaco Mobile.
This is a guide on setting up basic configuration of the tablet device, as well as using Adaco Mobile on it.
Please note: Information in this article is for use with Android version 4.1, "Jelly Bean".
The guide is divided into 2 sections:
- Configuration of the Tablet
- Using Adaco Mobile
Configuration of the Tablet
First, please note that the device has a lock screen which displays the time and date and a small lock icon at the bottom.
- To unlock the device and get to the main screen, slide the lock icon to the left

Fig.1 - The Lock Screen
Setting up Wi-Fi
Wi-Fi will need to be setup when first using the tablet – this cannot be setup by the Adaco team beforehand.

Fig.2 - The Android Home Screen
- The far left bottom button (black with blue sliders) is the quick access to Settings
- The middle button (white circle with 6 squares) is the Applications Menu
- Select the Settings button
- At the top of the screen will be Wi-Fi settings - set Wi-Fi to ON
- Select Wi-Fi itself to see a list of available networks (example shown in Fig.3)

Fig.3 - Example available networks
- Join an available network so as to connect to the internet
- When on this screen, press the button second from the right on the bottom of the device (should be a button with stacked squares – between the home and oval buttons). This will bring up two options – Scan and Advanced
- Select Advanced
- Set the option Keep Wi-Fi on during sleep to Always On

Fig.4 - Keep Wi-Fi on during sleep settings
- Press the back arrow button on the device (bottom left button) to get back to the main Settings screen
Date and Time settings are not essential for the successful operation of the Adaco Mobile software. However, users may want an accurate date and time on the device.
- Go to the main Settings menu - Home screen (home button on device > Settings (far bottom left icon on screen)
- Scroll down and select Date and Time Settings
- If the Automatic Date and Time settings are incorrect, un-check the box next to this field to manually enter the information

Fig.5 - Date and Time settings
Changing the Sleep display settings is advised. If the screen is constantly turning itself off during usage it can be quite inconvenient.
- Go to the main Settings menu - Home screen (home button on device > Settings (far bottom left icon on screen) > Display
- Set the Sleep setting accordingly

Fig.6 - Changing the screen sleep setting
Using Adaco Mobile
Main Screen and Syncing
- Open the Adaco Mobile app either via the Home screen or the Applications menu

Fig.7 - Accessing the app via the Home screen (left) or the Applications Menu (right)
On the main screen there are four main areas:
- Inventory: For doing physical counts either for Interim Inventory or Month-end Inventory
- Requisition: For creating Outlet Requisitions
- Issue Requisition: New for Adaco Mobile 1.1.1 – Allows Posting of Outlet Requisitions from tablet
- Purchasing: For creating Purchase Requisitions
- To Sync the device, select Sync button from the main page

Fig.8 - The main page, with Sync highlighted
Please note: Syncing has been separated into 2 functions..
Upload vs Full Sync
Upload is simply designed to send data to the main Adaco database without doing a full synchronization. This is to speed up the process of uploading inventory data and requisitions without having to wait for all products to be re-downloaded to the device.
Full Sync is the process of downloading all new/updated product, outlet, and account information. This should be done when first using the device and before month end/interim inventory. This is to ensure that the latest products, bar codes, and outlets are available.

Fig.9 - Upload and Full sync options
After choosing the Sync option, the device may prompt for a username and password if the credentials are not already saved. This will be the same Adaco username and password used for logging in to the desktop version.

Fig.10 - Prompting for username and password
The device will then sync the information whether downloading all of the products or simply uploading information.

Fig.11 - Sync Status and Results screens
It will have a status screen while downloading information and once completed will display the results.
If there are any issues with any parts of the sync, it will display them in the Sync results. Examples are barcodes already matched to products, inventory is not in progress, outlet accounts not setup, etc.
Most of the issues listed on this screen would likely need to be fixed in the main desktop Adaco application prior to being able to successfully upload the information from the handheld.
Inventory
- To enter Physical Counts for Month-end or Interim Inventory, select the Inventory button from the main screen
- There is no setting on the device for differentiating between Month-end and Interim Inventory. Ensure the correct inventory cycle has been chosen from the main Adaco application
- Inventory is entered one outlet and one location at a time. Outlets and locations must be changed before entering counts for a new outlet and/or location. Otherwise, when syncing this information to Adaco, there will be many write-ins and counts in the wrong location/outlet
- Select the Outlet to count
- If it is a Location outlet, choose the specific location

Fig.12 - Selecting an Outlet
The scanning screen will then load.
- Tap in/highlight the Barcode field prior to scanning an item
- Once the cursor is in the Barcode field, scan the bar code
- Next, select Go from the on-screen keyboard

Fig.13 - Scanning a bar code
This will then automatically populate the Product field and unit at the bottom if the bar code is associated.
- After entering a quantity, select New or Next to save the product and proceed with counting
- When finished scanning and counting products, select Summary to review the products and counts entered
Please note: If counts entered are not valid or otherwise need to be removed, use the Clear All button found at the very bottom of the Summary screen. This will remove all inventory data.
This will only clear inventory data for the current selected Outlet and Location.
This will only clear inventory data for the current selected Outlet and Location.
- To then move on to a new outlet, simply use the Back button in the upper left until the screen that lists Outlets displays
Numbers next to the outlet names that have already scanned products should display. This is the number of products counted for that outlet. This helps indicate which outlets have already been done.
- Once completed all inventory, use the Back button until the Home screen displays or simply select on the Home button in the upper right to return to the main screen of Adaco Mobile
Here there will be a star next to Inventory. This indicates there is inventory data that needs to be processed.

Fig.14 - Back and Home buttons (left) and the star showing against Inventory on the main screen (right)
- Once ready to Sync, choose either Sync option to upload the inventory data into Adaco.
Please note: The only differences here are the data being returned to Adaco Mobile and generally the amount of time it takes to sync (Full Sync will take significantly longer).
Requisition
Requisition
- To create Requisitions in Adaco Mobile, select Requisition from the main menu
- Select an Ordering Outlet
- Select a Supplying Outlet

Fig.15 - Ordering and Supplying Outlet lists
The system will then display a screen that allows the entering of quantities to be requisitioned This screen will look very similar to the Inventory screen.
Just as on the Inventory screen, a bar code can be scanned and the Barcode field and Product fields will populate. Quantities can then be entered. Once again, selecting Next on the keyboard while in the Quantity field or selecting on New at the bottom right of the screen will save the entry and allow the scanning of another product.

Fig.16 - Adding products to a requisition
Once finished adding products to the requisition, the amounts can be checked and modified them via Summary. Remember to select Save after making any modifications.
Please note: The only options are Inventory Unit. A Purchase unit cannot be used on an Outlet Requisition.
Issue Requisition
This is new for Adaco Mobile version 1.1.1.
- Select Issue Requisition
- A screen to choose the Supplying Outlet for the Requisition will display
- Select a Supplying Outlet

Fig.17 - Selecting a Supplying Outlet
Requisitions available for issuing should then display.

Fig.18 - List of available requisitions
Please note: The Requisitions must be Released in the main desktop Adaco application before they will be available on the device for issuing.
- Select the requisition to issue
- Either scan bar codes of the products and enter the issuing quantities as in Fig.19 or skip to the Summary screen to manually enter quantities for products

Fig.19 - Entering issuing quantities
- Once finished scanning the products and entering a quantity, use the New button to save the entered quantities and proceed to scanning another item
- When finished scanning and issuing quantities, select Summary to review what has been entered or simply press the Home button in the upper right to return to the main Adaco Mobile screen

Fig.20 - The Summary screen
- Once finished entering issued quantities for all of the Requisitions to post, go back to the main Adaco screen using the Home button and select Sync

Fig.21 - Selecting the Sync button
- The data is to be uploaded to Adaco so select Upload
- Enter the Posting Date and verify the period the requisition(s) are to be posted to

Fig.22 - Entering Posting Date and Period
- Select Sync to post this requisition to Adaco as well as upload any barcode/inventory data entered during this time
Sync results should then appear showing “Posted:” followed by the Requisition Number once the Syncing process has completed.

Fig.23 - Sync results
Purchasing
Please note: This menu is for creating Purchase Requisitions. It will not automatically create a Purchase Order (PO). POs can be created from the Requisition in the main desktop Adaco application.
- Access the Purchasing menu from the main screen in Adaco Mobile
- Select an Outlet
Again, a screen will display where bar codes can be scanned and quantities entered.
Please note: The Quantity entered will only be based on the Purchase Unit.

Fig.24 - Scanning a bar code & entering a quantity
- After entering the Quantity either select Next from the keyboard or select the New button in the bottom right to save the entry and continue scanning
- Once finished, select Summary to see the quantities and products entered and adjust them if needed
Barcode Association
While scanning an item, a message will appear stating:
"Barcode is not assigned to any product. Please perform product search via Search button and assignment will be added after New button click.”
Or, if on the Purchasing or Requisition screen while trying to scan an unassociated bar code, a message will appear stating:
“Barcode is not assigned to any product”.
These messages indicate the barcode(s) scanned is not associated to a product in the database.

Fig.25 - Bar code messages
Please note: This should not happen with Adaco generated bar codes unless the database has not been synced. There is no need to associate CODE39/Adaco bar codes.
These messages will occur when scanning a new manufacturer bar code. To assign a bar code, the Inventory screen should be used.
Please note: If not in Inventory mode, it will still associate bar codes in Adaco. Any inventory numbers enteredwill be ignored and left on the device.
- Type the Product number or the Product description underneath Product and then select Search to bring up possible product matches

Fig.26 - Assigning bar codes
The Search screen will contain possible products.
- Select the product description to associate it.
Please note: For Retail outlets, all barcodes should be associated to the Inventory unit of the product.
Purchase units are not used in Retail outlets, so it is not possible to easily inventory by them. Associating units is done by switching the unit in the bottom left. It will always default to Inventory unit though, so there is no need to switch.
If the wrong product is accidentally selected, do not save the entry.
- Do this by either selecting the Back button at the top or the back arrow on the device itself
Once associated, the product will show up in the Product field as any already associated product would.
The Product field will still display the bar code not-assigned warning. This is expected, as the the barcode has not yet been fully associated.
The Product field will still display the bar code not-assigned warning. This is expected, as the the barcode has not yet been fully associated.
- Enter a quantity and either select Next on the keyboard or select New on the bottom right of the screen to save the bar code as well as the quantities
It will save the quantities – however, if not in Inventory mode, they will not be uploaded into Adaco. If doing Inventory, make sure the quantity entered is accurate for that product.
Processing Data
All data processed into Adaco is available and capable of being edited.
- Inventory quantities and information can be edited via the Inventory > Physical Inventory Count screen
When processing Outlet Requisition data, the device will ask for the Need by Date and allow the entering of a Description if wished.
- For Purchase Requisitions, enter a Delivery Date and choose a Ship To address (if the property has more than one)
If processing Outlet Requisitions and Purchase Requisitions, the screen as seen in Fig.27 will display. Otherwise, only the options of the Requisition type created will display.

Fig.27 - Processing Outlet Requisitions and Purchase Requisitions
Please note: Approval Routing must be done through the main Adaco application. It cannot be done through Adaco Mobile.

Comments
Please sign in to leave a comment.