Overview
This article is a guide on advanced setup as well as troubleshooting and installation of Adaco Mobile.
The article is divided into 3 sections:
Adaco Mobile Settings
There are some settings which may need to be controlled from the Settings menu in Adaco Mobile.
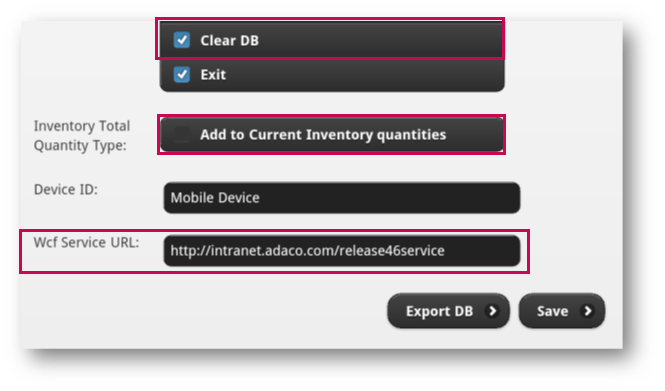
Fig.2 shows the Settings Menu.
Important settings to note are: Clear DB checkbox; Add to Current Inventory Quantities; Wcf Service URL
Please Note: If a property is changed, the user will have to Sync the device with the new property’s database.

Clear DB Tile
If Clear DB is checked, this will allow users to see the tile to clear the database. Doing this removes all products, and the tablet will need to be set up again.
Please note: This should only be done if the database seems corrupted.
Add to Current Inventory Quantities Option
This option will allow multiple tablets scanning the same products at the same time to add to each other’s quantities.
For example: A user is scanning a product with the tablet in an outlet. Another user on a different tablet is scanning the same product in the same location. If this option is enabled, the totals which the users enter will add together. If the option is not selected, the last user to scan the product and enter quantities will have their counts override the other user upon syncing.
Wcf Service URL
This is the address by which the tablet will access the Adaco Database.
The URL is the address used to access Adaco from a web browser and service by the user.
For example: If the URL is ‘google.com/Adaco’ it would be ‘google.com/adacoservice’. Do not add another slash.
This URL should not be modified unless specified by Fourth.
Reinstallation of Adaco Mobile
This section covers the reinstallation of Adaco Mobile.
This should only be done if a new version is available from Adaco or under the direction of Foruth.
Uninstalling Adaco Mobile from the Tablet

The next window should default to Downloaded applications where Adaco Mobile is located.
The tablet will ask for a confirmation that the user wishes to uninstall the software. 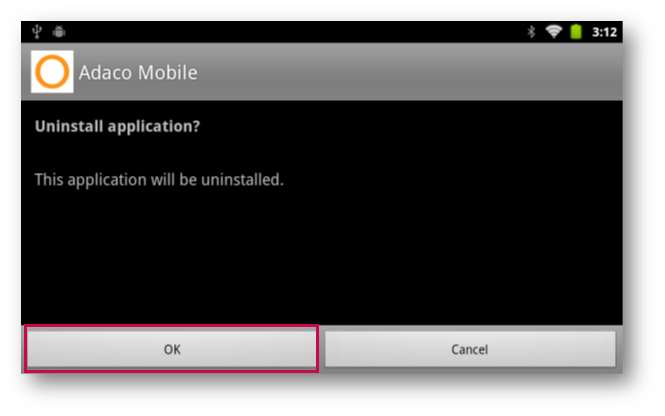
Obtaining a New Version of Adaco Mobile
Please note: If the device does not automatically bring up this screen, it is likely that the device was turned on after it was connected to the PC.
To resolve this: 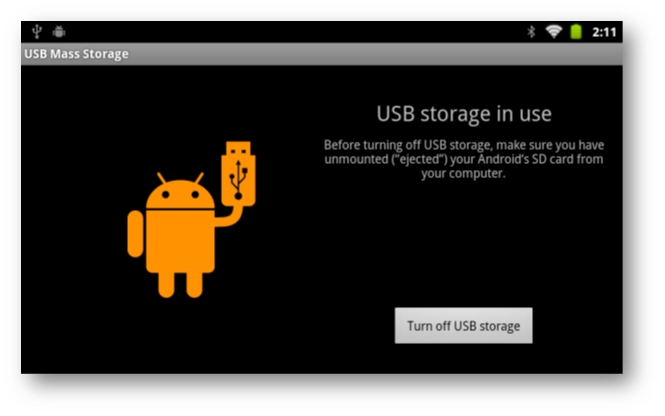
In Purchasing & Inventory (Adaco), Adaco Mobile can be obtained in Adaco through: 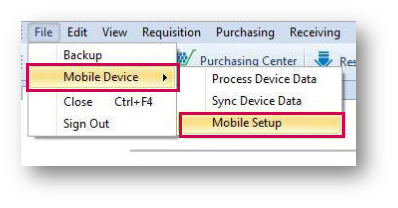
Please note: If none of these menus are visible, it indicates that the user does not have the correct permissions in Adaco. Typically, a Property Administrator or the IT Department can give the user’s security group these permissions, or they can complete this step in the installation.


If the tablet is not correctly connected via USB, the user will see the following message:



To install Adaco Mobile:
Once the application has finished installing, it will provide a notification stating "Application Installed".
Adaco Mobile Shortcut on Home Screen
After installing Adaco Mobile, it will be listed in Applications, but it will not re-appear on the Home screen.
To make it easier for users to find and use the application, the icon can be added to the Home screen.
To do so:
Troubleshooting
This section will go over some of the common issues experienced using Adaco Mobile.
Barcode not Recognized
If the user is using Adaco-generated/created barcodes and knows that one has been assigned to the product being scanned, a message stating the barcode is not associated may appear. There are two possible causes for this:

This will bring up several Profiles
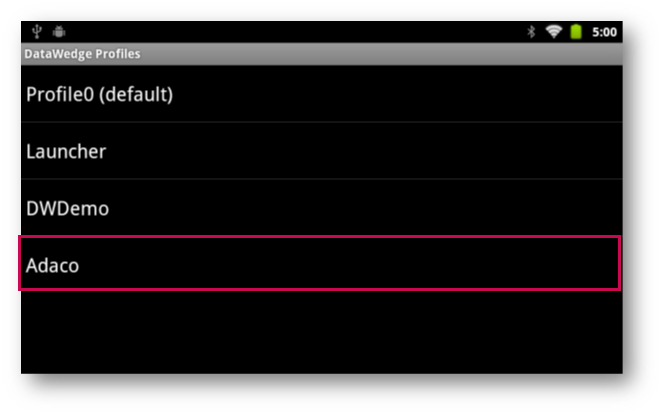
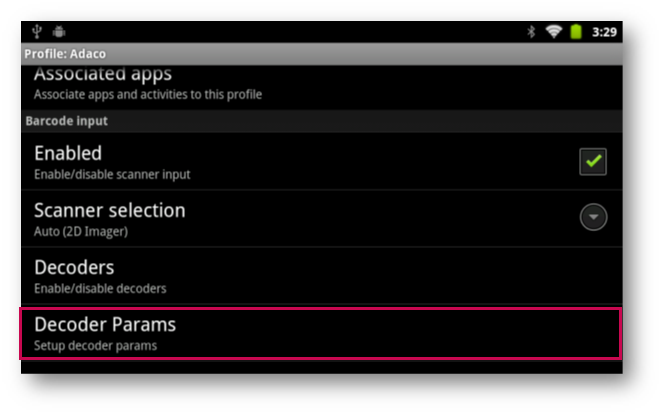
Fig.23 – Decoders Params
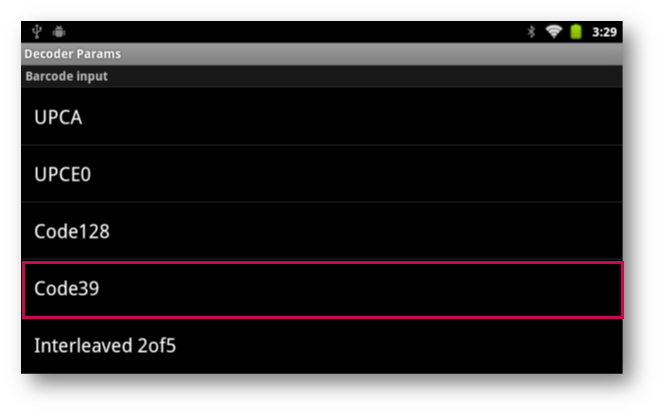
Several barcode standards will be listed.
When the barcodes are scanned again, they should be recognised
This article is a guide on advanced setup as well as troubleshooting and installation of Adaco Mobile.
The article is divided into 3 sections:
Adaco Mobile Settings
There are some settings which may need to be controlled from the Settings menu in Adaco Mobile.
- To do so, select Settings from the Adaco Mobile main screen menu

Fig.1 – Adaco Mobile Menu
Fig.2 shows the Settings Menu.
Important settings to note are: Clear DB checkbox; Add to Current Inventory Quantities; Wcf Service URL
- If the user has access to multiple properties, the property can be changed here
- Then select Save
Please Note: If a property is changed, the user will have to Sync the device with the new property’s database.


Fig.2 – Settings Menu
Clear DB Tile
If Clear DB is checked, this will allow users to see the tile to clear the database. Doing this removes all products, and the tablet will need to be set up again.
Please note: This should only be done if the database seems corrupted.
Add to Current Inventory Quantities Option
This option will allow multiple tablets scanning the same products at the same time to add to each other’s quantities.
For example: A user is scanning a product with the tablet in an outlet. Another user on a different tablet is scanning the same product in the same location. If this option is enabled, the totals which the users enter will add together. If the option is not selected, the last user to scan the product and enter quantities will have their counts override the other user upon syncing.
Wcf Service URL
This is the address by which the tablet will access the Adaco Database.
The URL is the address used to access Adaco from a web browser and service by the user.
For example: If the URL is ‘google.com/Adaco’ it would be ‘google.com/adacoservice’. Do not add another slash.
- If this URL is modified, the tablet will need to be resynced
- If this URL is wrong, the tablet will not successfully sync
This URL should not be modified unless specified by Fourth.
Reinstallation of Adaco Mobile
This section covers the reinstallation of Adaco Mobile.
This should only be done if a new version is available from Adaco or under the direction of Foruth.
Uninstalling Adaco Mobile from the Tablet
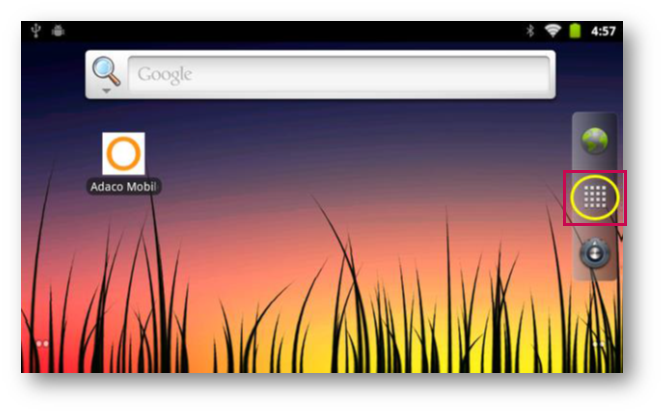
- From the Home screen, select the Dial button to open Settings
- Select Applications

Fig.3 – Settings Menu
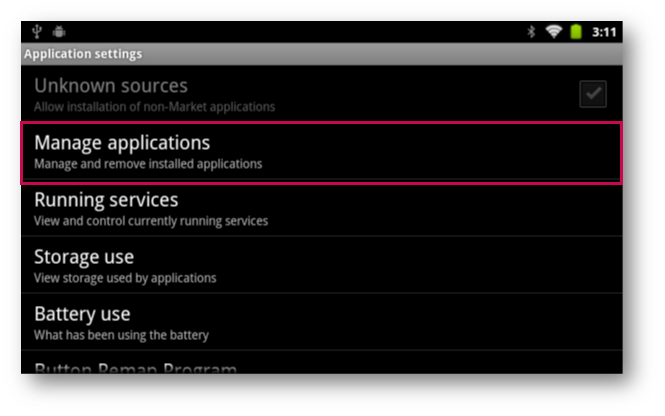
- In Applications, select Manage Applications

Fig.4 – Manage Applications
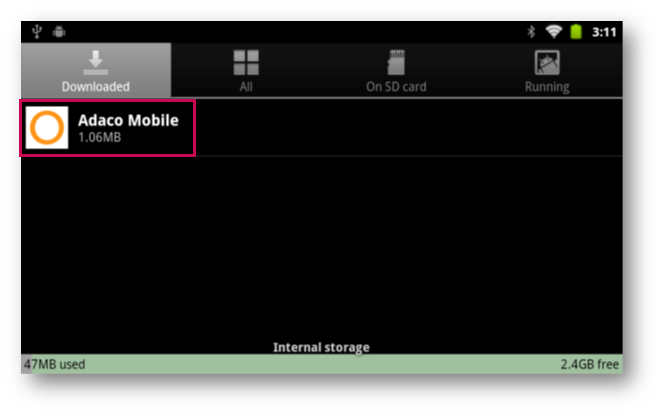
The next window should default to Downloaded applications where Adaco Mobile is located.
- Select Adaco Mobile

Fig.5 – Adaco Mobile
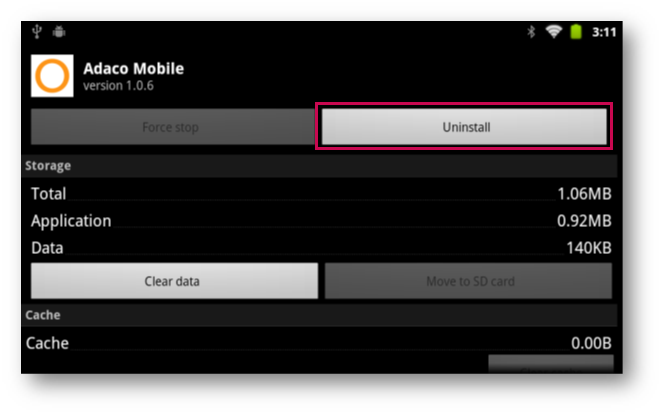
- Select Uninstall

Fig.6 – Adaco Mobile Settings
The tablet will ask for a confirmation that the user wishes to uninstall the software.
- Select OK to continue with the uninstall

Fig.7 – Uninstalling Adaco
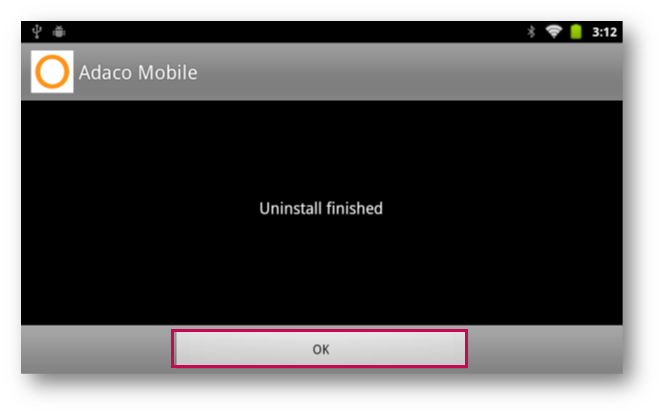
- Once it has finished uninstalling Adaco Mobile, it will provide confirmation. Select OK to close this menu

Fig.8 – Uninstall Confirmation
Adaco Mobile has been successfully uninstalled.Obtaining a New Version of Adaco Mobile
- The tablet must be connected to a PC and be in USB Mode. This is enabled from the tablet after connecting via USB
- Select Turn on USB Storage. The Android icon will turn orange
Please note: If the device does not automatically bring up this screen, it is likely that the device was turned on after it was connected to the PC.
To resolve this:
- Disconnect the USB cable from the PC and connect it again. This should trigger the USB Mass Storage screen

Fig.9 – USB Storage Screen
In Purchasing & Inventory (Adaco), Adaco Mobile can be obtained in Adaco through:
- File > Mobile Device > Mobile Setup

Fig. 10 – Adaco Mobile Device Menu
Please note: If none of these menus are visible, it indicates that the user does not have the correct permissions in Adaco. Typically, a Property Administrator or the IT Department can give the user’s security group these permissions, or they can complete this step in the installation.
- Selecting Mobile Setup will cause a new window to appear
- Select Android Devices (Motorola ET1)

Fig.11 – Mobile Setup
After selecting Setup, Adaco Mobile will be downloaded to the tablet and once completed, the user will receive the message as seen in Fig.12
Fig.12 – Download Message
If the tablet is not correctly connected via USB, the user will see the following message:

Fig.13 – Error Message
- In Applications, select File Browser

Fig.14 – File Browser
- Select the AdacoMobile apk file (AdacoMobile.apk), seen in Fig.15

Fig.15 – Adaco Mobile File
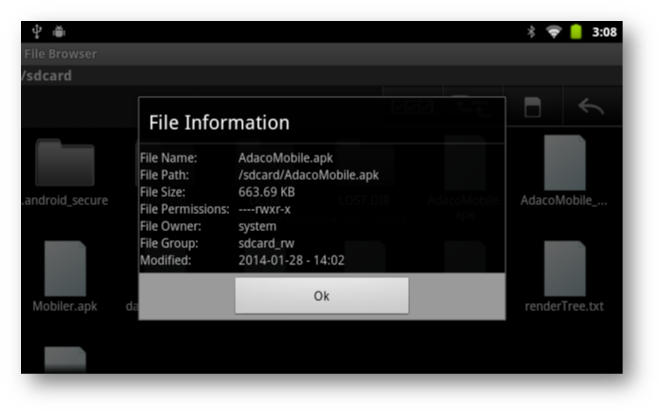
- Select File Information to see the full file name and information, seen in Fig. 16 and Fig.17

Fig.16 – File Operations Menu

Fig.17 – File Information
- Select Ok to return to the main browser
To install Adaco Mobile:
- Select the Adaco Mobile.apk file
It will bring up a menu asking Do you want to install this application? and lists permissions below.
- Select Install to proceed.
Once the application has finished installing, it will provide a notification stating "Application Installed".
- Either select Done to return to Applications or Open to open Adaco
Adaco Mobile Shortcut on Home Screen
After installing Adaco Mobile, it will be listed in Applications, but it will not re-appear on the Home screen.
To make it easier for users to find and use the application, the icon can be added to the Home screen.
To do so:
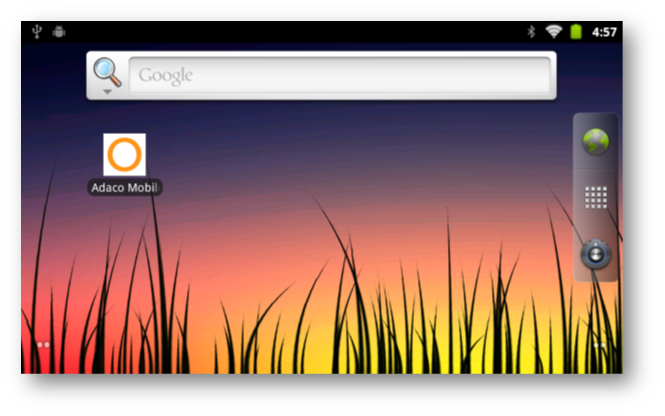
- Hold down the Adaco Mobile icon in Applications until it brings up the Home screen. Let go of the icon and it will drop in place

Fig. 18 – Adding Adaco Mobile to the Home Screen
Troubleshooting
This section will go over some of the common issues experienced using Adaco Mobile.
Barcode not Recognized
If the user is using Adaco-generated/created barcodes and knows that one has been assigned to the product being scanned, a message stating the barcode is not associated may appear. There are two possible causes for this:
- The database on the tablet has not been updated since the product has had a barcode assigned
- Check Digit option on the tablet is not enabled
- To resolve the first issue, the database must be synchronised.
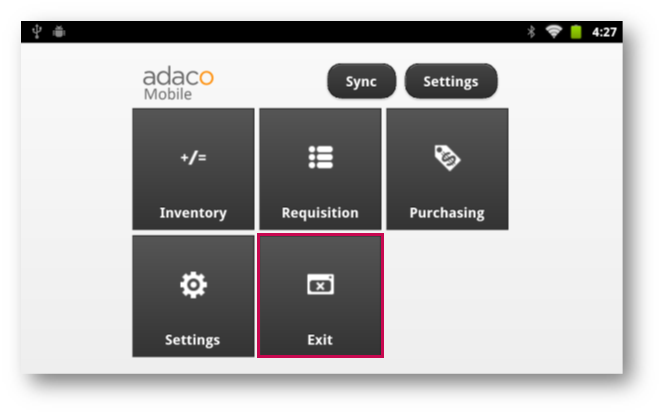
- To resolve the second issue, In Adaco Mobile select Exit

Fig. 19 – Exit from Adaco Mobile
- From the Home Screen, open Applications

Fig.20 – Opening Applications
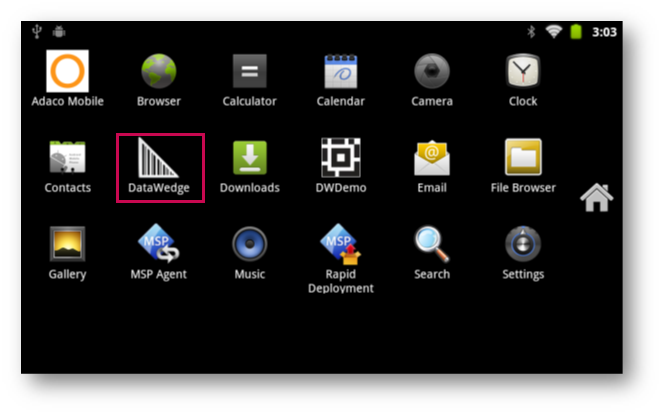
- In Applications, select DataWedge

Fig. 21 – DataWedge in Applications Screen
This will bring up several Profiles
- Select Adaco

Fig.22 – DataWedge Profiles
- From within the Adaco profile, scroll down the list to select Decoder Params

Fig.23 – Decoders Params
- Select Code39

Fig. 24 – Barcode Standards
- There is an option titled Verify Check Digit. Ensure there is a check mark next to this option
- After selecting the Home button, the settings will be saved automatically
- Open Adaco Mobile
When the barcodes are scanned again, they should be recognised

Comments
Please sign in to leave a comment.