Rotas - Using Shift Types
-
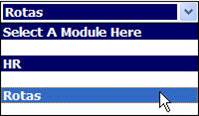
Select Rotas from the drop-down menu

Fig.1 Rota Module
-
Select the Create new Rota quick link
Fig.2 Create New Rota Quick Link
Each site has a set start date, to create a Rota it must start on this day of the week.
Fig.3 Create New Rota
-
The easiest way to do this is to use the calendar link, so that the correct day is selected first time
Fig.4 Calendar
-
The Location will be entered automatically, the exception being when access Levels allow access to more than one site e.g. Area Managers
-
If staff will be working similar shifts to a previous week then there is an option to copy shifts across, which will create a duplicate rota with the new dates
Fig.5 Copy Shifts
-
Select the Week to copy shifts from by selecting it from the drop-down list. Once all the relevant details for the new Rota have been selected, click on save on the righthand side of the screen
The system will then automatically produce the Rota and it will appear on the screen. Each rota is broken down into 2 sections: Financial and the Rota.
At the top of the page will be the financial information as below.
Fig.5- Financial Data
-
Budgeted Revenue: Inputted by head office or the administrator for the site, this is then broken down over each division
-
Forecast Revenue: The system allows for forecasts to be entered e.g. if a large function is taking place revenue may be higher than budget. To amend forecast, select Edit Revenue
-
Wage Budget: The amount available to spend on wages set by the wage target %. Available for wages: will go up and down depending on the forecast. Rota wage cost: shows the cost of all the staff on the rota for that day, also displayed in % underneath.
-
To minimise the financial information use the minus button in the top right hand side of the screen. Once minimised this can be expanded at anytime by clicking on to the same button which will now be a plus sign.

Fig.6 - Minimise or Maximise financial information
-
Messages can be added to a day on the rota as reminders for large events etc. Select Add Message from the top right hand side
-
From the pop up window select the date the message is relevant to, complete the details and click save
Fig.7 - Create a daily message
-
This then appears as a pencil icon next to the day of the week in the financial section. When hovered over with the mouse the message/reminder appears
Fig.8 - Hover over the pencil icon to see daily message
-
In the bottom half of the page will be the rota:
-
There will be a separate rota for each Division within the site. To switch between divisions use the Division drop down.

Fig.9 - Division dropdown
-
To look at the rota for a specific job title within the division, use the Job Title drop down.

Fig.10 - Job Title dropdown
-
Each employee will appear on a separate row. To see an employees job title hover the mouse over their name.
-
To see any skills associated to the employee click on their name.
Fig.11 - Employee record on the rota
-
To see the employee’s HR Summary with contact numbers etc click on the icon next to their name.
-
When there is an asterisk next to the employee’s name it means they are not yet on payroll.
-
When an employee is set up with multiple employments two icons are used to signify the multiple employment on the rota.
-
This icon is used to show a multiple employment within the same site or location, or when a member of staff is being borrowed from another site or location.
-
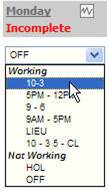
Create the rota by selecting the shifts that each member of staff will be doing that week by using the drop down menu for their row under the correct day of the week.

Fig.12 - Select shift type which corresponds with their working hours
-
Best practice is to do 1 day or 1 employee at a time, and then select calculate or save.
-
Both save any amendments, and will update the total hours / shifts an employee is scheduled in to work that week. It will also update the wage cost in the finance section.
-
To check that the correct number of staff have been scheduled on the division’s rota and that busiest times have optimum staffing levels select the graph icon next to the day.

Fig.13 - To view Optimisation select graph icon
-
Within this optimisation screen it is possible to check the hours through the day versus the number of employees that are scheduled to work within the rota.
Fig.14 - Optimisation screen
-
It is possible to amend the rota in this view by selecting a new shift code for an employee from the drop down list and then clicking save.
-
Once saved either print or return to rota.

Fig.15 - Return to rota from optimisation screen
-
To print the rota once the week is completed click on Print in the centre of the screen.
-
From the rota’s print function select from each dropdown menu what is to be printed e.g. if using multiple employment within a site, select to see multiple employees within their main job division so that they only appear on the rota once.
![]()
Fig.16 - Print rota screen
-
Select to run report and then this view can be printed, or exported to excel.

Fig.17 - Export rota to excel or print
-
Once saved an open rota can be amended at any time. To enter the rota select it from the module home page.

Fig.18 - Selecting open rotas from Rota module home
-
Rotas can be created as many weeks in advance as necessary, if amending a current rota remember to update staff with any amendments to their hours – or print off a new copy.
-
Use the current week’s forecasted rota to enter the actual hours for staff, this will then be submitted through to payroll for payments.
-
Please note that a rota in the future can not be completed as the actual hours will not have yet been done.
-
To enter the actual hours and complete the day on the rota, enter the current weeks rota and click on the day of the week, please note that it will only say Incomplete in red when in a current week. Best practise is to enter actual hours on a daily basis rather than weekly.

Fig.19 - Selecting day content screen
-
The next screen is where the actual hours are inputted for each employee.
Fig.20 - Day content screen
-
If an employee worked a different shift then select it from the dropdown list.
Fig.21 - Shift codes in day content screen
-
The shift hours will then filter through to the actual times. If a split shift is selected then both actual times will be filled out. The actual times can be overwritten, therefore if a member of staff came in later or earlier than the shift expected this can be reflected, and the member of staff will be paid correctly.
Fig.22 - Actual Times 1 and 2
-
Always use the 24 hour clock when overwriting times.
-
If an employee was absent that day click on the absence button, complete and save the form that pops up and this will filter back to their HR record.
Fig.23 - Entering absences through the day content screen
Fig.24 - Add a New Absence screen via the rota
-
The same for if an employee received a warning whilst working that day.
Fig.25 - Entering a warning through the day content screen
Fig.26 - Add warning screen via the day content screen
-
Or if a comment needs to be recorded regarding lateness or a compliment from a customer for example.
Fig.27 - Entering a comment through the day content screen
Fig.28 - Add comment screen via the day content screen
-
Once the actual hours etc have been entered change the Status from in progress to complete in the bottom left hand side of the screen.

Fig.29 - Completing the day via day content screen
-
This can then be saved and the division will be complete.
-
If completing more than one division select 'Save And Move To Next Division'.
-
To find out which divisions have been completed select 'Save And Return To Division List' which will confirm which divisions have yet to be completed.
-
If completing more than one day select 'Save And Move To Next Day'. Alternatively click on next day or the day of the week at the top of the screen.
-
Once all the required days and/or divisions have been completed, select either save and return to rota, or if already saved simply return to rota.
-
When a day is complete it will say complete in green under the day of the week on the rota.

Fig.30 - Completed day on the rota
-
If any mistakes have been made at this point, the actual hours can still be amended by clicking on the day of the week and overwriting any hours and saving.
-
At the end of the week when all the days have been completed the actual hours need to be submitted to payroll. Depending on access levels there may only be one option to ‘Closed at Location’ in the drop down on the far right of the screen. Once selected ‘Save’.
Fig.31 Rota Status drop-down
-
Best practice is to then print off a ‘Rota Summary’ report found in the reports dropdown, ‘view reports’. This creates a pre-payroll report which can be printed and checked by GMs before finally being submitted to payroll.

Fig.32 - Rota Summary Report
-
Once the totals have been checked, go back into the rota and select ‘Submitted to Payroll’ then ‘Save’. This will move the rota from the open rotas on the homepage to the closed box at the bottom. The actual hours have now gone to Payroll.
Also See

Comments
Please sign in to leave a comment.