Overview
Within the Workforce Management HR module, document templates can be uploaded to specific Locations and Job Titles. These documents can contain mail merge fields that will pick up the information from the relevant employee’s details stored on the system.
This functionality is useful when creating contracts, or specific letters for employees who have recently joined the company. As long as the employee has been created within the HR module, the documents can then be produced with the correct information.
Adding the Merge Fields
First, the document with the mail merge fields needs to be created.
- Open a relevant document (the contract/letter to be sent to the employee) and add the required fields to populate with the employee's details.
The table below has a list of the available fields, which can be used to copy and paste into the document.
| Field name in EMS | Enter in Word Doc | Field name in EMS | Enter in Word Doc |
| Title | <?Title?> | Second Expense Manager | <?SecondaryExpenseManager?> |
| First name | <?Firstname?> | Primary Holiday Manager | <?PrimaryHolidayManager?> |
| Surname | <?Surname?> | Secondary Holiday Manager | <?SecondaryHolidayManager?> |
| Address 1 | <?EmployeeAddress1?> | Primary Timesheet Manager | <?PrimaryTimesheetManager?> |
| Address 2 | <?EmployeeAddress2?> | Second Timesheet Manager | <?SecondaryTimesheetManager?> |
| Address 3 | <?EmployeeAddress3?> | Start Date | <?StartDate? |
| Address 4 | <?EmployeeAddress4?> | Employee Number | <?EmployeeNumber?> |
| Town | <?EmployeeTown?> | Date of Birth | <?DateofBirth?> |
| County | <?EmployeeCounty?> | NI Number | <?NINumber?> |
| Post Code | <?EmployeePostCode?> | Home Tel | <?HomeTel?> |
| Location | <?Location?> | Mobile | <?MobileTel?> |
| Location Address 1 | <?LocationAddress1?> | <?Email?> | |
| Location Address 2 | <?LocationAddress2?> | Employee Status | <?EmployeeStatus?> |
| Location Address 3 | <?LocationAddress3?> | User Level | <?UserType?> |
| Location Address 4 | <?LocationAddress4?> | Holiday Allowance | <?HolidayAllowance?> |
| Location Address Town | <?LocationTown?> | Bank Name | <?BankName?> |
| Location Address County | <?LocationCounty?> | Bank Address 1 | <?BankAddress1?> |
| Location Address Postcode | <?LocationPostCode?> | Bank Address 2 | <?BankAddress2?> |
| Division | <?Division?> | Bank Address 3 | <?BankAddress3?> |
| Salary | <?Salary?> | Bank Address 4 | <?BankAddress4?> |
| Job Title | <?JobTitle?> | Bank Address Town | <?BankTown?> |
| Rate (£/hr or shift) | <?PayAmount?> | Bank Address County | <?BankCounty?> |
| Pay Period (i.e. hour shift) | <?PayType?> | Bank Address Postcode | <?BankPostCode?> |
| Company | <?Company?> | Sort Code | <?SortCode?> |
| Primary Absence Manager | <?PrimaryAbsenceManager?> | Account Number | <?AccountNumber?> |
| Secondary Absence Manager | <?SecondaryAbsenceManager?> | Account Name | <?AccountName?> |
| Primary Expense Manager | <?PrimaryExpenseManager?> | Payment Method | <?PaymentMethod?> |
| Tronc Rate | <?TroncRate?> | Eligibility Proof | <?EligibilityProof?> |
| Total Rate | <?TotalRate?> | Work Permit Type | <?WorkPermitType?> |
| Reports To Full Name | <?ReportsToFullName?> | Work Permit Expiry Date | <?WorkPermitExpiryDate?> |
| Reports To Job Title | <?ReportsToJobTitle?> | Work Time Directive Opt Out | <?WorkTimeDirectiveOptOut?> |
| Job Title FTE Hours | <?JobTitleFTEhours?> | Employment Type | <?EmploymentType?> |
| Job Title FTE Shifts | <?JobTitleFTEshifts?> | Holiday Allowance | <?HolidayAllowance?> |
| Job Title FTE Days | <?JobTitleFTEdays?> | Paid by Rota | <?PaidByRota?> |
| Basic Holiday Allowance | <?BasicHolidayAllowance?> | FTE Shifts | <?FTEShifts?> |
| Continuous Service | <?ContinuousService?> | Holiday Display | <?HolidayDisplay?> |
| Contract Hours | <?ContractHours?> | Staging Date | <?StagingDate?> |
| Pension Scheme Description | <?PensionSchemeDescription?> | Date Valid Pension Notice Received | <?DateValidPensionNoticeReceived?> |
| Automatic Enrollment Date | <?AutomaticEnrolmentDate?> | Date Active Member Worker Join Notice | <?DateActiveMemberWorkerJoinNotice?> |
| Employee Percentage Deduction | <?EmployeePercentageDeduction?> | Employee Contribution Type | <?EmployeeContributionType?> |
| Employee Fixed Amount Deduction | <?EmployeeFixedAmountDeduction?> | Opt In Date | <?OptInDate?> |
| Employer Percentage Deduction | <?EmployerPercentageDeduction?> | Date Invalid Opt Out Notice Received | <?DateInvalidOptOutNoticeReceived?> |
| Employer Fixed Amount | <?EmployerFixedAmount?> | Date Valid Opt Out Notice Received | <?DateValidOptOutNoticeReceived?> |
| Deferral Date | <?DeferralDate?> | Opt Out Reference Number | <?OptOutReferenceNumber?> |
- Once the mail merge fields have been added, save the document

Adding the Document in HR
Once the new document has been created, it will need to be uploaded into the system.
- Go to HR > Administration > Document Management > Document Templates
If this function has been used previously there may be templates already uploaded. These can be deleted at any time. However, make sure there is a hard copy stored onsite or scanned and uploaded to the employee file if necessary, as it will delete the template from their file.
- From this screen, select Upload Document Template

Fig.2 - The ‘Upload New Template’ option from Document Templates
- Browse for the .doc file to upload and enter a description. Notes are optional

Fig.3 - Uploading the amended document
- Select Upload
- Select the relevant locations. Single arrows move the selected locations across. Double arrows move all the locations across

Fig.4 - Pulling over the relevant locations
- When the relevant locations have been pulled across, select Next
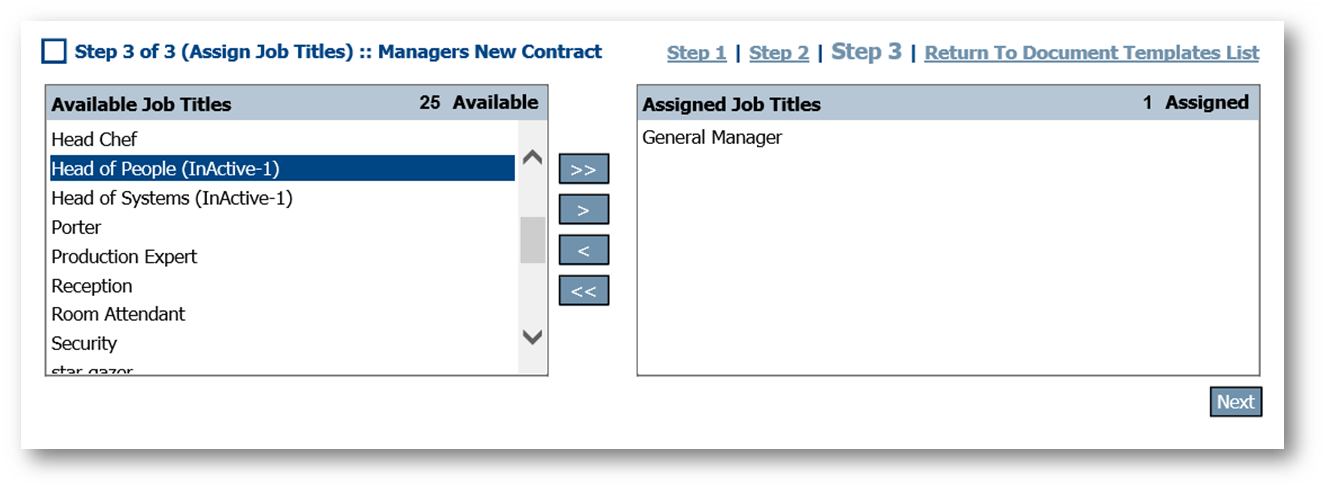
- Use the arrows again to assign the document to the applicable Job Title(s) within the location(s)

Fig.5 - Assigning the document to the applicable Job Titles
- Select Next
The new document has now been assigned. This will apply to all employees at the given locations and job titles.
Viewing the Documents Against Employees
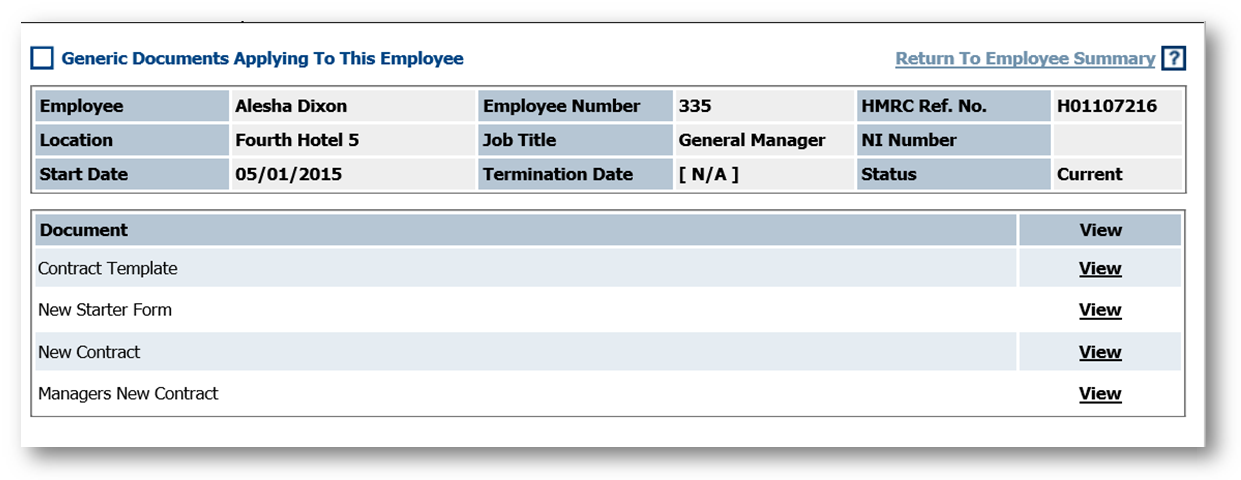
Once documents have been uploaded to the portal, they can be run from an employees' file.
- Go to HR Module > Employees > Employee List (select Employee) > Employee Info > Document Management > View Templates
- From the list, open the relevant document by selecting View

Fig.6 - All documents that have been assigned to an employee - 'View' buttons appear on the right side

Comments
Would it be possible for leave date to be added to the merge list above?
Thank you!
Hi Samantha Earls, Thank you for posting the question to this article. Could you raise this as an idea with a post to https://help.hotschedules.com/hc/en-us/community/topics/360001928991-Ideas-WFM-Workforce-Management? This way, it can be entered as an idea and people can vote if they would like this capability as well.
Please sign in to leave a comment.