What’s Changing?
Enhancements have been made to the Overtime calculation within the Rota module in order to enable calculations over 2 and 4 weeks.
Release Date: 16th January 2020
Reason for the Change
To allow People System users to calculate Overtime payments for a period of either 2 or 4 weeks.
Customers Affected
All People System users who use the Rota Module.
For customers who use Dynamic Rotas, please refer to the section entitled ‘Dynamic Rotas’
Release Notes
The new functionality will allow users to calculate Overtime based on 2 or 4 weeks’ total hours. Once configured, the Rota module will use the total hours worked within a 2 or 4 week period to calculate how much overtime is due to be paid.
HR Module
An update has been made to the Contract page which allows the user to edit how the Overtime for employees should be calculated.
To do so:
- Go to HR > Administration > Contracts > Overtime Settings

Fig.1 – Contract Overtime Settings
There is a new setting titled Overtime Frequency where a drop-down list is used to select the number of weeks that should be used when calculating Overtime for employees.

Fig.2 – Overtime Frequency Selection
If 2 Weeks or 4 Weeks is selected, a new Date criteria box will appear.
- The Date entered within this field will be used by the Rota as the start date of the Overtime calculation and Overtime Period
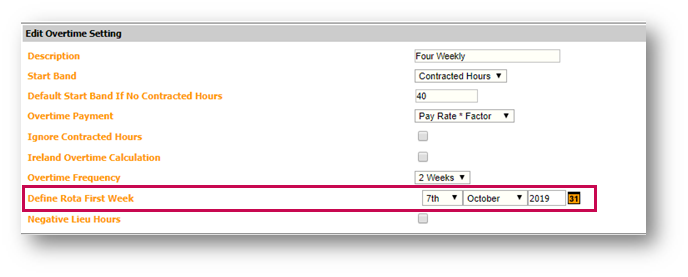
Fig.3 – Define Rota First Week for Calculation
- Use the Default Start Band if No Contracted Hours setting to record the weekly contracted hours to be used in the calculation as default if the employee does not have Contracted Hours set up within their employment record
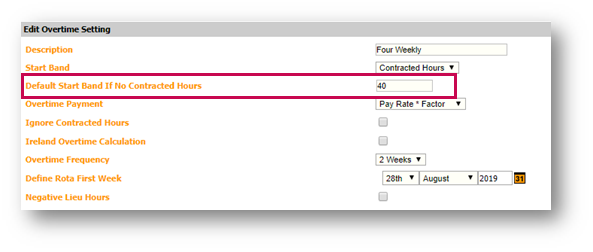
Fig.4 – Default Contracted Hours
In the example displayed in Fig.4, the Overtime will calculate on a fortnightly basis based on 40 hours per week, with the Overtime Periods starting from 28th August 2019 and running bi-weekly from that date moving forward.
Rota Module
The Rota Module has been updated so that Overtime only has to be confirmed when submitting the final Rota of the Overtime Period.
When the final Rota of the Period is submitted to Payroll, a page will display where the user must confirm the Overtime to be paid to employees.
- To locate this page, go to Rota Module > Rotas > View Rotas > Submit to Payroll
The screen will display the following:
- The total Contracted Hours within the Overtime period
- The total Actual Hours worked within the Overtime period
- The total Overtime Hours to be paid
- The total Pay Amount of overtime
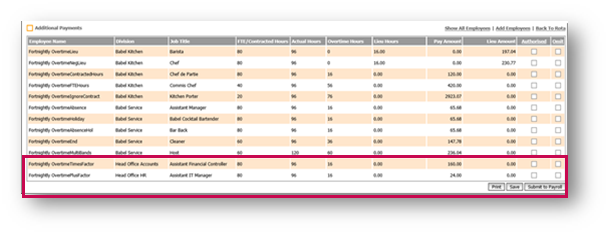
Fig.5 – Overtime Confirmation Screen
- Use the Authorised and Omit tick boxes against each line to either authorise or omit the Overtime which is due to be paid to the employee
Once authorised and submitted to Payroll, the Overtime hours will feed through to the employee’s payslip, as seen in Fig.6.

Fig.6 – Employee Payslip
Dynamic Rotas
Due to the nature of the Dynamic Rota functionality, the Overtime screen displays differently to that of the standard Rota functionality.
- To locate Overtime information, go to Rota Module > Rotas > View Rotas
- Select the Rota and complete the hours as normal
- Once completed, select Close at Location

Fig.7 – Rota Closed at Location
- Once the Rota has been Closed at Location, go to Additional Payments

Fig.8 – Additional Payments
The screen will display the following:
- The total Contracted Hours within the Overtime period
- The total Actual Hours worked within the Overtime period
- The total Overtime Hours to be paid
- The total Pay Amount of overtime
- Use the Authorised and Omit tick boxes against each line to either authorize or omit the Overtime which is due to be paid to the employee

Fig.9 – Overtime Confirmation Screen
- Once confirmed, select Submit to Payroll
Overtime Calculation
The system calculation will use multiple areas to locate the start date which should be used to base the ‘Hours Worked’ from.
Firstly, the Employee Contract will be used to find a start date.
- To locate this option, go to HR > Administration > Contracts > Overtime Settings
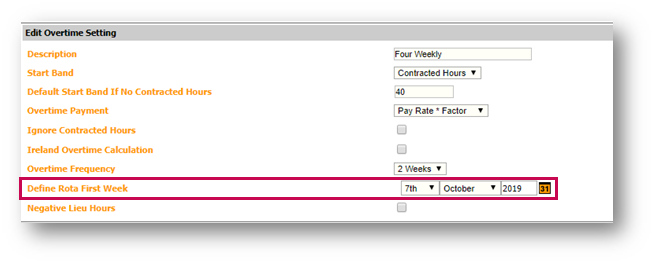
Fig.10 – Rota First Week
If the Define Rota First Week field (see Fig.6) is blank, then the Pay Basis within Payroll will be used to locate a start date.
- To locate this option, go to Payroll > Administration > Company Setup > Company > View Pay Basis

Fig.11 – Pay Basis Start of Pay Range
If the Start of Range field for the Pay Basis does not match a Rota start date, then the system will use the original Rota start date for the Location when it was first configured.
- To locate this option, go to Rotas > Administration > Configure Locations
- Select the Location

Fig.12 – Rota Week 1 Start Date
Once the Calculation Start Date has been established, the Contracted Hours within the Employee’s Employment Details or the contract will be used.
Please Note: The Calculation Start Date dictates the beginning of the Overtime period. If the original Rota start date is used, this is simply to establish the fortnightly or four-weekly blocks of weeks, and the system will use the week in the current Pay Period to base the calculations on. The system will not back date the calculations to the original Rota start date.
Lieu Hours
The changes made in relation to Overtime calculating over 2 or 4 weeks can also be utilised by customers who use the Lieu Hours functionality.
For details on configuring Lieu Hours functionality, please refer to WFM - Configuring Lieu Hours Functionality
- Within the Additional Payments screen on the Rotas, the Lieu Hours will show under the Lieu Hours column
The screen will display the following:
- The total Contracted Hours within the Overtime period
- The total Actual Hours worked within the Overtime period
- The total Lieu Hours
- The total Lieu Amount to be paid

Fig.13 – Lieu Hours Authorisation Page
Overtime Example Calculations
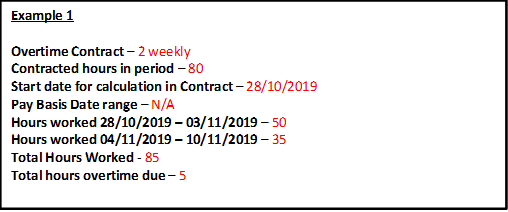
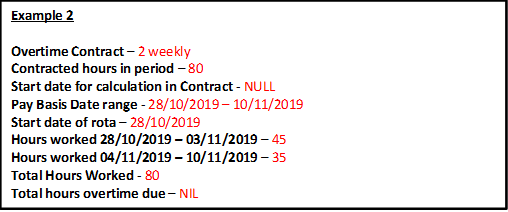
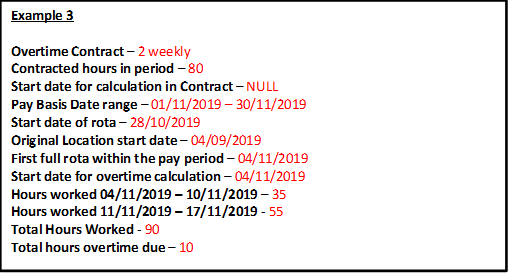

Comments
Please sign in to leave a comment.